

In this 2-part tutorial you are learning how to create the look of an aged, hand-tinted photograph by using masks, fill and adjustment layers, blending modes and layer styles.

In Part 1, I showed you how to age the photograph using tools from the brushes palette, brighten the photo using layer masks and filters, and add an artificial water-damaged look using an alpha channel.
In Part 2, you will create the title and the kanji (Chinese character) to the left of it using the Type tool, Layer styles, and the Distort filter. Then you will add a few finishing touches with the Shape and painting tools.
Create the title treatment
STEP 1
Select the Horizontal Type tool. Choose a font you like. I chose Trajan Pro bold. Click on the Color Swatch in the options bar and move your cursor over the image. The cursor changes to the eyedropper tool. Sample a light warm gray from within the image. Click in the image window and type OKAYAMA. Make the initial cap about 84.5 points and the other letters about 60 points. Reduce the Layer opacity of the new Type layer to 74% and change the blending mode to Hard Light.

STEP 2
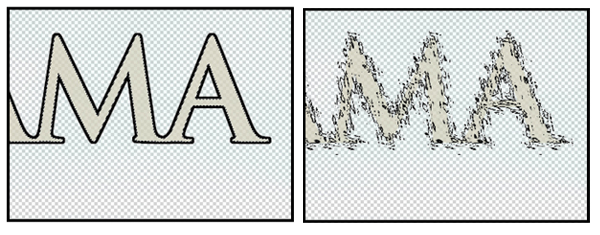
At the moment the type is a little too clean looking compared to the rest of the composition. Here’s a little trick that will quickly give the type a distressed look. Load the type as a selection by Command-clicking (Control-clicking on PC) on the T symbol in the Layers palette. Make a new layer. Name it stroke. Make your foreground color black. Go to Edit>Stroke and apply a 3px stroke to the outside of the selection. Deselect (Command-D on Mac, Control-D on PC).
STEP 3
Go to Filter>Distort>Ripple. Make the amount about -714 and select small from the Size drop-down menu and click OK. Hide the layer by clicking on the eyeball next to the layer in the Layers palette.
STEP 4
To distress the edge of the type, highlight the Type layer and add a Layer mask. Load the distorted stroke as a selection by Command-clicking (Control-clicking on the PC) on the stroke layer. With the Type layer mask highlighted, use black and soft round brush (about 65px) with a flow or opacity of 45% and begin masking the edges of the letters. Press Command-H (Control-H on the PC) to hide the marching ants so you can more easily see the results of the masking.
STEP 5
To fade the type in and out, deselect, increase the size of your brush to 125px. Uncheck Shape Dynamic in the Brushes palette (press F5 to open the Brushes palette). Lower the flow or brush opacity to about 7%. Randomly paint on the mask, decrease the opacity more in some areas by overlapping strokes.

STEP 6
To give the title a somewhat illustrated look duplicate the layer and, with the lower layer highlighted, click on the Add a layer style button (the circled f icon) at the bottom of the layers palette to access the Layers styles menu. Choose Stroke. Make the stroke 2px wide, 100% opaque black. Click OK. At the top of the layers palette just below Opacity is Fill. Reduce the fill of this layer to 0%. That will cause the type itself to disappear, but the stroke will remain visible. Make the Layer Opacity 35% and change the blending mode to Multiply.

STEP 7
Next you will separate the title somewhat from the background and accentuate the illuminated quality of the composition by adding highlights to the title. Make a new layer above OKAYAMA copy and name it “highlights”. Load OKAYAMA as a selection by Command-clicking (Control-clicking on the PC) on the T symbol in the OKAYAMA copy layer. Choose a large (100px) round soft brush with a flow or brush opacity setting of about 10%. Make the foreground color white and paint lightly the top and right portions of the selection, gradually adding highlights to the type.

STEP 8
Reduce the Layer opacity if needed and change the blending mode to Color Dodge.
Create the kanji (Chinese character) using a Solid Color fill layer
Kanji is the Japanese name for the Chinese characters that are an integral part of the Japanese writing system. Adding such a character to the composition will immediately tell the viewer this is Asia. The particular kanji you will be using in these steps means tranquil or calm. You will create the kanji much as you did the look of water-damage –by using an alpha channel selection.
STEP 1
Open the image Kanji.tif. Select All and Copy. Go back to Postcard.psd. Click on the small triangle in the upper right corner of the channels palette and choose New Channel. Name the channel “kanji” and under Color Indicates, choose Selected Area and click OK.

STEP 2
Load the kanji alpha channel as a selection. Make the RGB channel active and hide the kanji channel. In the Layers palette highlight the layer abstract texture then add a solid color fill layer from the fill and adjustment layer menu at the bottom of the Layers palette. Name the new fill layer kanji. When the Color Pick appears, move your cursor over the image and sample a medium warm grey from within the image and click OK.
STEP 3
Scale the kanji to about 57% and position it in the upper left corner slightly behind the O in OKAYAMA.

Add texture to the Kanji with a Pattern fill layer.
Pattern fill layers are a great way to add an organic quality to an otherwise flat looking object.
STEP 1
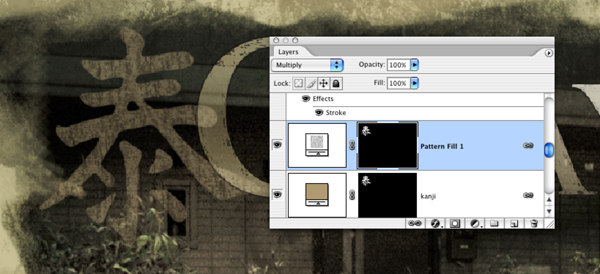
Command-click (Control-click on PC) on the thumbnail in the layer kanji to load it as a selection. Click on the Create a New Fill or Adjustment Layer button at the bottom of the layers palette. Choose Pattern way up near the top of the menu. When the Pattern dialog appears, click on the Pattern Swatch. This will open the Pattern Presets palette. Click on the small triangle in the upper right corner and from the drop-down menu choose Artistic Surfaces. When asked if you want to replace current patterns, click Append. This will add the Artistic Surfaces collection of patterns to the Pattern presets. Then select Wax Crayon on Vellum and click OK.

The kanji now has texture and blends nicely with the rest of the composition.
Finishing touches
You will finish the composition by adding a black Shape at the bottom to give the composition structure, contrast, a place for the eyes to rest, and a non-busy background in which to put descriptive information.
STEP 1
Select the Rectangle Shape tool (just below the Type tool). In the options bar make sure Shape Layers is selected on the far left. Click on the Color Swatch in the options bar and pick black in the Color Picker. Make a rectangular shape at the bottom of the composition, approximately 0.65 inches high.

Note: Refer to Figure 23 below for the next three steps.
STEP 2
Select the Horizontal Type tool and a font you like, I chose Post Antiqua (Bold and Roman). Create separate Type layers for each of the following lines of copy and position them as shown below in Figure 23:
Images of (12 points, bold)
January 2006 (10 points. Roman)
A unique eye captures the seasons of Japan in the Land of Sunshine – Okayama (8 points, Roman)
STEP 3
Next, you will create a very narrow horizontal Rectangle Shape. The point of this shape is simply to create interest with an additional design element and place emphasis on Images of. Choose a light warm grey and, with the Rectangle Shape tool, make a shape about 0.020 inches high. It only needs to go from the left edge to just beyond the O. Position the shape so it appears just above “Images of” in the image window. In the Layers palette, put the Shape layer below the layer “Images of”. Add a layer mask. Make the foreground color black and use a brush or Linear Gradient to mask out the left and right sides of the shape, blending the shape into the background.
STEP 4
Finally, you will create the red stamp in the lower right. In addition to being reminiscent of the wax stamps the Japanese use as signatures, the red is a nice accent color. The symbols in the stamp represent the name Okayama written in kanji. Open Stamp.tif and follow the same procedure as used in making the kanji. Choose red for the Solid Color fill layer. Use Free Transform to rotate the stamp slightly. Add a layer mask and use a texture brush to distress the stamp and blend it with the background.

That concludes this tutorial. You now know some of my favorite Photoshop techniques. Have fun using them to add interest and depth to own Photoshop creations.
More images of Japan will soon be available at www.digitaldesignranch.com
