
Better Masking Techniques in Adobe Photoshop CS4
With the new Masks panel, Photoshop CS4 has greatly improved the way essential masking techniques are implemented. Key controls are readily available and you no longer have to rely on convoluted workarounds to apply essential mask-editing modifications. In this tutorial we’ll go over some of the new ways to work with masks in CS4.
If you’d like to download the image used in this tutorial to practice these techniques, just click here. All files are for personal use only.
Creating New Masks with Color Range
1 OVERVIEW
I recently visited my old junior high school in Boise, Idaho. A new school had replaced it and only the entrance of the original building was left standing. My nostalgic pilgrimage occurred in the late afternoon, shortly before sunset and the edifice was backlit. These challenging lighting conditions meant that in order to get a decent exposure of the wonderful educational graphics over the window, the late afternoon sky would be blown out. We’ll drop in a new sky using the Color Range command and the new Masks panel in CS4. (The new sky has already been placed in the practice file as a separate layer.)

2 ADD A PIXEL MASK
Click on the Building layer in the Layers panel to make sure it’s active. In the Masks panel (Window>Masks), click on the Add a Pixel Mask icon in the top-right corner of the panel (it’s the icon on the left). You’ll see that a layer mask has been added to the Building layer in the Layers panel. Now click on the Color Range button near the bottom of the Masks panel to bring up the Color Range dialog.

3 SAMPLE COLORS WITH EYEDROPPER
In the Color Range dialog, make sure that the Invert box is checked on and the Fuzziness is set to 40. Use the Eyedropper to click on the sky above the building. Most of the white sky is immediately masked, revealing the new sky layer underneath. This is very useful because you can see the mask being created live. In previous versions (and if used apart from the Masks panel in CS4), the result from using Color Range is always a selection, not a mask. Use the plus Eyedropper to click in the lower-left windows to make those areas totally black in the Color Range preview. Click OK.

Fine-tuning with the Masks Panel
1 CONTROL DENSITY OF MASK
The Masks panel offers two dynamic sliders (Density and Feather) that can be adjusted and readjusted at any time. Density controls the black areas in the mask: 100% is total black and anything less than that becomes gray. This functions like an opacity setting for the black areas of the mask. Choosing a lower Density will allow more of the original white sky to show through, and thus minimize the brightness of the new sky layer underneath. In the past, this type of mask editing had to be made using Levels or Curves. For this example, we left Density at 100%.

Mask Density 100% (image on left); Mask Density 50% (image on right)
2 CONTROL FEATHER OF MASK
Feather controls the hardness of the mask edge. In previous versions, this was accomplished by either feathering a selection before you turned it into a mask (not ideal, because you couldn’t see how much feathering you might need) or by using the Gaussian Blur filter on the layer mask. As this is a dynamic control, meaning it can be changed at any time, it’s a welcome masking improvement in CS4. For this example, we need to apply the edge modifications another way, so leave the Feather set to 0 pixels.

Feather = 0 px (on left); Feather = 5 px (on right)
3 THE REFINE MASK DIALOG
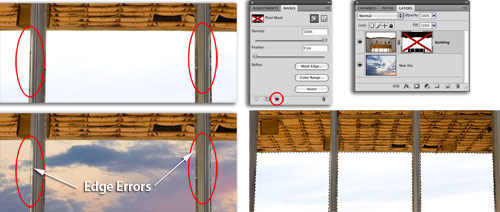
There are a few errors on the mask edges in some areas, particularly along the vertical window frames. To fix this, click the Mask Edge button in the lower portion of the Masks panel. The controls in Refine Mask are the same as Refine Edge, but they affect a mask and not a selection, allowing you to see in real time how the edges of an adjustment layer’s mask are affected. If you’re creating a selection that will be used to create a layer mask, apply your edge modifications in the Refine Mask dialog where you have a better view of what’s happening—see next Step.

4 ADJUST SETTINGS IN REFINE MASK
Choose View>Actual Pixels to zoom the image to 100%. In the Refine Mask dialog, click on the Standard preview icon (circled above). This shows the mask as a selection edge, which is totally useless if you’re working on a mask because it obscures the very edges we need to see, so choose Command-H (PC: Ctrl-H) to hide the selection edges. Set the Feather to 0.8 pixels to slightly soften the edge, then set the Contract/Expand slider to –35 to “fit” the mask edge tighter to the building. Finally, set the Contrast to 20 to further fine-tune the edge. Click OK.

Note the difference in the Before (on left) and After (on right)
5 SELECT THE SKY IN THE WINDOWS
The adjustments we made in the Refine Mask dialog did a good job at creating a better fit for the layer mask, but we still need to do some manual touchups. For this photo, we’ll use the Brush tool to fill in areas of bright, specular highlights on the vertical window frame that were initially selected by the Color Range command. Click on the Eye icon at the bottom of the Masks panel to temporarily disable the layer mask. Use the Quick Selection tool (W) and drag across the sky area inside each of the window frames while holding Shift to select those areas.
6 PAINT WHITE ON MASK
Choose Select>Inverse to select everything except those sky areas. In the Layers panel, click on the layer mask to be sure that it’s active and also to enable the mask. Use the Brush tool (B) and paint with white at 100% Opacity. Depending on the selection, you may need to apply further edge feathering.

7 ADD CURVES
As a final touch, I added a Curves adjustment layer that applied a slight contrast boost to the building layer. With the Curves layer active, I clicked the third icon from the left at the bottom of the Adjustments panel to clip the adjustment so that it only affected the building.
