
Making an Action in Photoshop
The Eight-Step Approach to Successful “Actioneering” in Photoshop
From actions to batch processing and scripting, Photoshop makes automation accessible to moderate and expert users alike. Yet despite automation’s obvious benefits—i.e., you can kick back and let Photoshop do the routine, brain-dead stuff for you—most designers never take advantage of it. Instead, they waste countless hours doing the routine, brain-dead stuff manually because they’re either too busy or too intimidated to plan a more efficient approach.
Don’t fall into that trap. If nothing else, learn how to use the Actions palette. The oldest and easiest form of automation in Photoshop, an action is a recorded sequence of events. Record the action, test it to make sure it works, and it may serve you well for years to come, even from one version of Photoshop to the next. Invest an hour or two now and your future self—sunning yourself on a beach while Photoshop works away like your compliant digital slave—will thank you.
In this column, I lay out the basic approach to recording, testing, and saving an action. In future columns, we’ll put this approach to use and design some mind-bogglingly practical actions of our own. Prepare yourself to join the smug and satisfied ranks of the real-world “actioneers.”

STEP ONE:
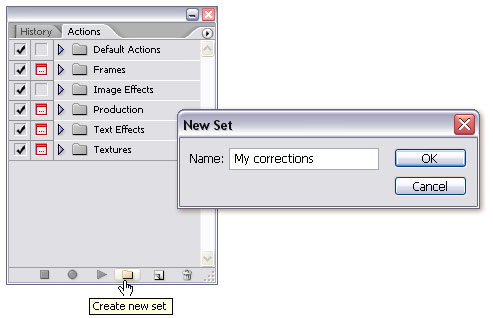
Make sure you have an image open to serve as a guinea pig for your action, and choose Window>Actions to bring up the Actions palette. Every action has to reside inside a folder, called a set, so select the set that will house your new action. If this is the first time you’ve made an action, no sense in junking up one of Photoshop’s default sets. Better to create your own by clicking the little folder icon at the bottom of the Actions palette. Name the set as desired and click OK.
STEP TWO:
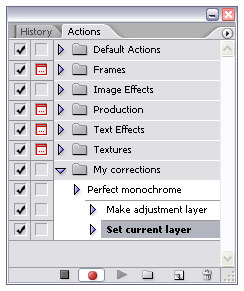
Click the little page icon at the bottom of the Actions palette to make a new action. Photoshop will ask you to name your new action. Give it a descriptive name that explains the function of the action. You can always change the name later, but might as well give it your best shot for now. Click the Record button to begin recording.

STEP THREE:
Perform the operations that you want to record, in the sequence you want to record them. This generally means choosing a command, entering some settings, and clicking the OK button. But it might also mean switching modes (as when entering or exiting Quick Mask mode) or changing a selection, layer, channel, path, or other specialized object. (Actions are not particularly good at recording manual operations, such as dragging, painting, or editing.) Each successfully recorded operation will appear as a step in the Actions palette.
Incidentally, there’s no rush. The action will play back at the same speed regardless of how long it takes you to record it. The red Begin Recording button at the bottom of the Actions palette doesn’t mean “Hurry!” It’s just Photoshop’s way of being an active listener. Take that phone call, go see that movie. Photoshop is patient.
STEP FOUR: Although the Actions palette is a good and patient listener, it’s not very forgiving of mistakes. You can get away with canceling out of a dialog, but if you undo, the Actions palette ignores you and leaves the previous operation in place. (Back stepping from the History palette is even worse—every change to the history state gets recorded as yet another step in the action!)
So if you’re not sure where you’re going and you want to test out a few steps before you record them and make a mess of your action, take a break by clicking the square Stop Recording button at the bottom of the palette or hitting the Escape key. Think of it as pause. You can always take up where you left off—or at any other step in the action.
STEP FIVE:
After you stop recording, choose File>Save to save the image. Then try out the steps you want to apply and make sure they work out the way you hoped. When you’re ready to resume, choose File>Revert to get the image back to its previous state. Then click the round Begin Recording button at the bottom of the Actions palette to resume recording.
STEP SIX:
Expect to repeat Steps Three through Five several times to get the action right. When you’re completely finished with the action, click the square Stop Recording button a final time.
STEP SEVEN:
Now for the moment of truth. Just because your action worked well for the current image doesn’t mean it’s going to work worth a hill of beans in another image. So it’s very important to test the action by playing it on three or four other images. These images should be different sizes, contain different numbers of layers, and otherwise be, well, different. It’s possible the action will succeed, but it’s more likely that it’ll fail. That’s when you need to troubleshoot the action and edit its steps as needed. (I’ll discuss troubleshooting more in a future column.)
STEP EIGHT:
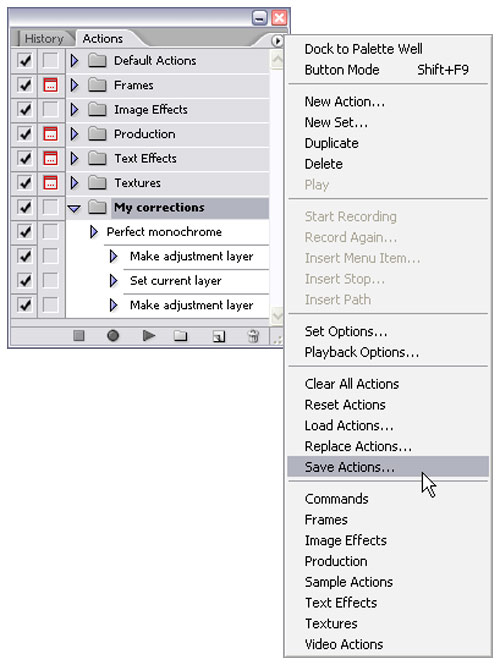
Actions are savable in sets only. So when you’re satisfied with the action, save the set by clicking on the set name and choosing Save Actions from the Actions palette flyout menu. It doesn’t matter if the set contains just the one action; better to save the set than lose an action in a crash.
All right, so there you have it—the eight steps required to create and save a flexible, practical, problem-free action. In an upcoming issue, we’ll employ this basic approach to create an action that assigns a digital watermark, complete with trade dress, to your copyrighted digital images.
