
The Digital Camera: Focus on Seeing
Planning in advance, or “seeing,” what can be done to an image in Adobe Photoshop CS2 is an important part of the photography process. To illustrate my points, I’ll use a photograph (RAW file) that I took on a once-in-a-lifetime Antarctica expedition in December 2005.
How do you “see” the end result? Well, having lots of experience taking pictures and working and playing in Photoshop helps. Talking to yourself, or rather asking yourself when you’re photogra¬phing if a particular technique would look cool, is another method—but don’t talk out loud if you’re with other photographers because someone might think you’re losing it!
Some of the following techniques, admittedly, are quite simple. However, oftentimes, when you keep it simple, that simplicity unlocks a new way of seeing—and thinking.
My vision
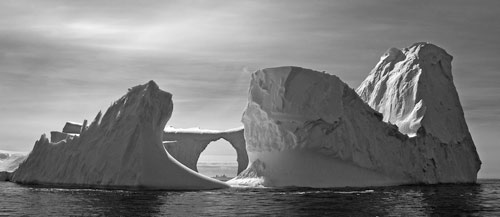
The iceberg photo was taken knowing that lens flare, created by direct light falling on the front element of the lens, was dominating the upper left of the frame, ruining, in my mind, a full-frame image. However, my goal was not a full-frame shot. Rather, I envisioned a panoramic-type image of the dramatic iceberg with much less sky. Using my Canon 17–40mm lens set at 17mm on my EOS-1Ds Mark II (with full-frame image sensor), I had to compose the scene in this manner from a bobbing Zodiac to get the very wide-angle effect I envisioned.

What’s more, I saw a black-and-white image rather than a color image. Why? Because I like the look of black-and-white images and monochromatic landscape scenes, and all the blue in this scene created somewhat of a monochromatic image anyway. Naturally, getting a good exposure was essential. So I checked the histogram and the overexposure warning on my camera’s LCD monitor to make sure I was not losing any highlights. My ISO was set at 100 for the cleanest possible (least amount of digital noise) image.
STEP ONE:
The first order of business is to remove the lens flare and create a panoramic image, which is accomplished with the Crop tool (C). Click on a point in the image where you want your crop to begin and drag diagonally across the image. You can fine-tune your crop with the arrow keys. Press Return (PC: Enter) to commit the crop. Hey, I’m talking about using Photoshop here, and not Camera Raw. Of course, it’s better to crop and make exposure and color adjustments in Camera Raw. In fact, you should make as many image enhancements as possible in Camera Raw before opening an image in Photoshop. We’re working in Photoshop here for those JPEG shooters who may not have totally converted to shooting RAW files, yet.
STEP TWO:
It’s good technique to use adjustment layers for nondestructive editing. To create the black-and-white image, click on the Create New Adjustment Layer icon (half-black, half-white circle) at the bottom of the Layers palette and choose Hue/Saturation from the pop-up menu. In the Hue/Saturation dialog, drag the Saturation slider all the way to the left (–100) to desaturate the image and click OK.

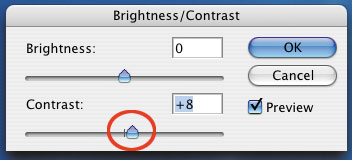
STEP THREE:
After desaturating the image, it looked a little flat. So, we boosted the contrast by clicking the Create New Adjustment Layer icon at the bottom of the Layers palette and choosing Brightness/Contrast. Drag the Contrast slider a little to the right (we used 8) to give the image more dimension.
This is the image that I saw in my “mind’s eye” when I first observed the magnificent natural ice sculpture. I actually thought about Ansel Adams, perhaps the best-known landscape photographer of all time, and his use of black-and-white techniques to remove some of the reality of the scene. When we remove color from a picture, we remove some of the reality.
Same image; another view
Let’s take a closer look at the same iceberg. I envisioned a tighter shot—actually a tight, square image. This is a picture within a picture, and training our eyes to see that picture within a picture offers us additional creative possibilities.
STEP ONE: For the second version of the iceberg image, open the original file, choose the Crop tool, and crop a square frame around the picture within a picture. Press Return (PC: Enter) to commit the crop.

STEP TWO:
The image looks a bit flat, so click on the Create New Adjustment Layer icon and choose Brightness/Contrast. Drag the Contrast slider to the right a bit to boost the contrast (here it’s 12) and click OK. Overall, the picture looks better.
STEP THREE:
As opposed to the opening picture in this article, the goal here is to maintain a full-color image; however, we’re not satisfied with the color. Click on the Create New Adjustment Layer icon and choose Hue/Saturation. Drag the Saturation slider to the right to boost the Saturation (ours is 19) then click OK.
STEP FOUR:
To further increase the saturation and make the image darker, click the (you guessed it) Create New Adjustment Layer icon and choose Curves from the pop-up menu. To achieve the desired effect, we pulled the Curve down a little from the center point. Click OK when you’re satisfied with the result.


Compare this image to the original. You might agree that this picture has more impact. Whatta ya think?

So, I leave you with an important, although not-too-original thought: Think before you shoot.
