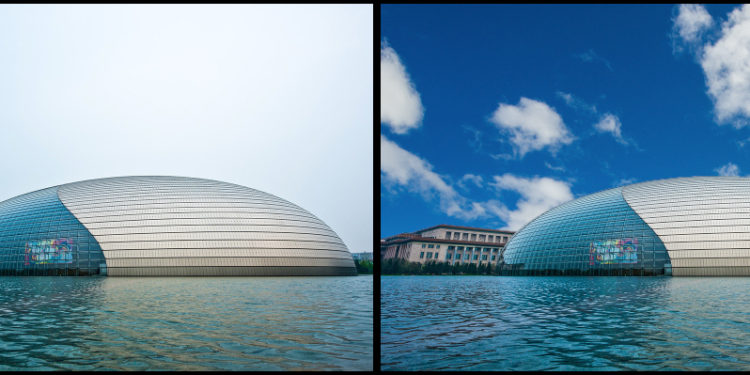
Swapping Out for a Better Sky

By Scott Kelby
Excerpt from Photoshop for Lightroom Users
This is yet another form of compositing, but it's kind of "reverse compositing" because, instead of selecting a person or an object and placing it on another background, we're going to select the background (sky) and replace it with a better one. This is a handy thing to know because nothing kills a travel or landscape shot like a dull, gray, cloudless sky, like the sky was on the day I took this photo of the National Centre for the Performing Arts in Beijing.
Step One:
We'll start by opening the first image in Photoshop, so select it in Lightroom then press Command-E (PC: Ctrl-E) to take it over to Photoshop. This photo has it all—it was taken in boring light, with choppy water, under a dull, cloudless sky. I'm amazed I'm letting anyone see it at all, but it's only because I have a feeling it's about to look somewhat better. Since our goal is to fix the sky (by replacing it with a better sky), we need to put a selection around the current sky.

Step Two:
Since the sky is made up of very similar colors, either the Magic Wand tool (shown here) or the Quick Selection tool will select that sky in all of two seconds (I tested both and the Quick Selection is faster for this particular image), but choose whichever you feel more comfortable with. If you chose the Magic Wand tool (Shift-W), click it once anywhere in the sky, then press-and-hold the Shift key and click in any places it missed until the entire sky is selected (as seen here). If you chose the Quick Selection tool (W), paint a stroke from left to right across the sky and it'll select it for you. Once it's selected, let's "dig in" to the edges a bit so there are no little white pixels showing up later. Go under the Select menu, under Modify, and choose Expand. When the dialog appears, enter 2 pixels (your selection will grow outward by 2 pixels), and click OK.


Step Three:
Now you'll need to open an image that has some nice clouds in it. I chose an image taken up on a hill in Banff National Park in Canada. (Hey, there are direct flights from Canada to Beijing every single day, so I felt it was okay to use Canadian clouds. Okay, I'm stretching here, so don't overthink this one.) Once you find a shot with good clouds, select as much of the sky as you can, using the Rectangular Marquee tool (M; as shown here, where I selected all of the sky from just above the trees on the left). Once you've got just the sky selected, you'll need to copy that sky into memory by pressing Command-C (PC: Ctrl-C).


Step Four:
Next, switch back to your original image (the selection you made of the sky should still be in place). Then, go under the Edit menu, under Paste Special, and choose Paste Into (as shown here). This will paste the clouds you copied into memory into your image (as seen in the next step).


Step Five:
Here's the sky image pasted into our selection. By the way, when you paste into a selection like this, it automatically deselects your selection and adds a layer mask to the pasted image (as seen here). That way, if you need to edit the edges (maybe you see some white or something that doesn't look right along the edges where the sky meets the original photo), you can paint in white, with a very small brush, on that layer mask to help cover up any problems (but, our "digging in" of 2 pixels, like we did in Step Two, usually helps avoid that). You can also reposition the sky by using the Move tool (V) to click-and-drag right on the sky itself. If you need to resize the sky, press Command-T (PC: Ctrl-T) to bring up the Free Transform bounding box. If you can't see the Free Transform handles, press Command-0 (zero; PC: Ctrl-0) and the document window automatically resizes, so you can reach all four handles. Just remember to press-and-hold the Shift key to keep things proportional as you scale up or down by dragging the corner handles.


Step Six:
There is one more thing I would do to finish this one off: The water looks a little greenish to be under such a rich blue sky, so if you have Photoshop CC, click on the Background layer, put a rectangular selection around the water, and then go under the Filter menu and choose Camera Raw Filter. When the ACR window appears, drag the Temperature slider (near the top of the Basic panel) to the left a bit until the water becomes more blue (it will only affect the water since you made a selection before you chose the Camera Raw filter). If you don't have Photoshop CC, then wait until you take the image back to Lightroom, and paint over the water with the Adjustment Brush, using the same bluish Temperature setting.


Learn how to do more in Lightroom and Photoshop here: http://kel.by/PSforLR.

