
Save Time with Templates in Dreamweaver
Templates come in many shapes and styles on the Web. You can find templates for Adobe Flash, Photoshop, Dreamweaver, WordPress blogs, and more, but not all templates work in all programs. This column is about creating templates with the .dwt extension—a timesaver when creating custom sites in Dreamweaver.
1 BEST USES OF DREAMWEAVER TEMPLATES
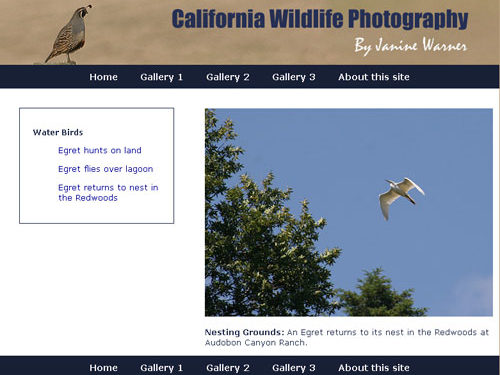
Dreamweaver templates are great for portfolios, photo galleries, and other sites where a series of pages use many of the same elements. In our sample website, CaliforniaWildlifePhotography.com, the template includes common elements, such as the banner graphic and navigation links across the top and bottom of the pages.
To create templates for your webpages, you must already have a site set up using the Manage Site features in Dreamweaver to define a local root folder on your computer.

2 CREATE/OPEN A PAGE IN DREAMWEAVER
To create a new HTML template in Dreamweaver, choose File>New. In the New Document dialog, select Blank Template. For the Template Type, select HTML Template, choose a Layout, and click Create.
To save an existing page in Dreamweaver as a template, choose File>Save As Template. We’ll show you how to design HTML templates, but you can also save other kinds of templates (including PHP, JSP, or ASP.NET). Give each template a special name to identify it later and to help organize a site that uses many templates. If you expect to use many different templates in the same site, a description can be useful.

3 VIEW YOUR TEMPLATES FOLDER
Dreamweaver stores all of the templates you create in a folder called Templates, which it creates for you when you save your first template. The Templates folder is saved at the top level of your site folder and you shouldn’t move or rename this folder. If you want to view your templates, choose Window>Files and then open the Templates folder in the File panel.

4 SELECT AREA TO MAKE EDITABLE
Before you can use a template, you need to designate editable regions—areas that you’ll change on individual pages created from the template. Say you want to change the photo and caption on each gallery page, you’d make those sections of the template page editable. Start by clicking on the edge of a region to select it—choose an HTML tag (div tags work best) that surrounds the contents you want to make editable.

5 INSERT AN EDITABLE REGION
After you select an area of the page you want to make an editable region, such as a Div tag, choose Insert>Template Objects>Editable Region to add the necessary code in Dreamweaver. Remember, you don’t want to make everything editable, just the areas you’ll change; for example, the list of navigation links at the top of this template should not be editable regions, because then you’ll be able to update those areas on all of the pages that use this template at a later time by simply updating the template (see Step 9).

6 NAME EDITABLE REGION
Each time you insert an editable region into your page, you need to name it. You can name editable regions anything you like, just don’t use spaces or special characters. Each editable region in a template must have a unique name. Insert a name for your new region in the New Editable Region dialog and click OK. You can identify editable regions in the template, and the pages created from the template, by the blue outline and tabs. If you don’t see these features in the Dreamweaver workspace, choose View>Visual Aids>Invisible Elements. After you save your template, you can always return later to add more editable regions.

7 CREATE A NEW PAGE FROM A TEMPLATE
To create a new page from a template, choose File>New. Choose Page From Template in the New Document dialog, choose the name of the site you’re working on from the Site list, and select a template for your site. Use the preview to make sure you select the correct template. This is easy if you’re only working on one site with one template, but as your site gets larger and more complex, you need to make sure you’re using the correct template when you create new pages. After you’ve selected all of the Preferences you want, click Create to generate a new page from the template.

8 EDIT A PAGE CREATED FROM A TEMPLATE
After you’ve created a page from a template, you can edit it as you would any other page, inserting images, text, and multimedia into the editable regions. Just remember, you can only change the areas of the page that are editable. If you decide you want to change something that’s not in an editable region, you’ll need to open the DWT template file and make changes to locked areas in that file. When you save a page that you’ve created from a template, give it a new name with an HTML (or other) extension, just as you’d save any other page you create in Dreamweaver.

9 EDIT THE TEMPLATE
The greatest advantage of templates is when you want to edit elements you use throughout your site (such as the navigation links at the top of these pages), you can go back and make that change once to the template and it’s automatically changed on every page created from the template. For instance, if I added a new gallery link to the template, it automatically updates all of the pages with the new link.

10 SAVE CHANGES TO ALL PAGES
When you save a template with changes (File>Save), Dreamweaver opens an Update Template Files dialog. Dreamweaver gives you the option to update all of the pages created from the template, or not. I usually click Update, because it’s a big advantage and timesaver to be able to update all of those pages automatically. After clicking Update, an Update Pages dialog appears. Click Close and all of your pages will be updated.

