
Creative Use of Blur in Digital Photography
If you’d like to download the images used in this tutorial to practice these techniques, visit www.layersmagazine.com and navigate to the Magazine section. All files are for personal use only.
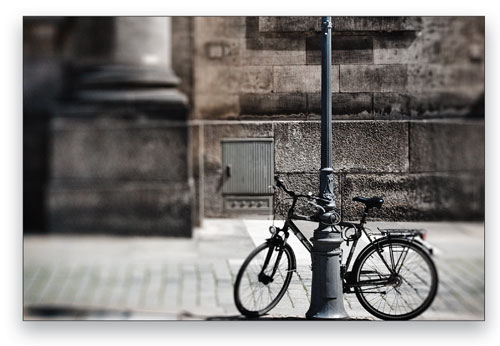
Sharpness is an important element in any photograph, but a creative use of blur—whether from shallow depth of field, motion blur, camera motion, or applied with the Lens Blur filter in Photoshop CS4—can also work to enhance an image. In this article we’ll take a look at several ways to take advantage of the beauty of the blur.
Controlling Sharpness in the Camera
1 KNOW YOUR MINIMUM SHUTTER SPEED
Creative use of blur begins in the camera, but before you can effectively use “unsharpness,” you need to know how to control sharpness. So let’s begin with a look at a few ways to ensure that the photo is sharp. For handheld shots, use a fast enough shutter speed so that camera shake doesn’t render an unsharp image. A common rule of thumb is to calculate minimum shutter speed using the focal length of the lens. For example, with a 100mm focal length, the shutter speed should not be less than 1/100 second.

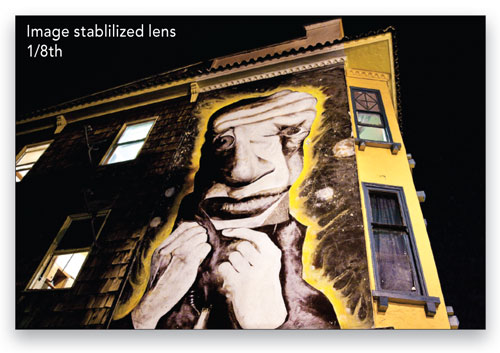
2 VIBRATION REDUCTION TO THE RESCUE!
Lenses that have image stabilization or vibration reduction let you get by with much slower shutter speeds than lenses without this feature. As the old saying goes, your mileage may vary, so you should test your lenses to get an idea of what the slowest usable speed is. Any form of camera motion is more likely to be apparent in shots made with a telephoto focal length, so brace yourself or the camera as much as possible when taking the shot. If it fits the situation and your photographic style, a tripod is often an essential component.
3 DEPTH OF FIELD PREVIEW
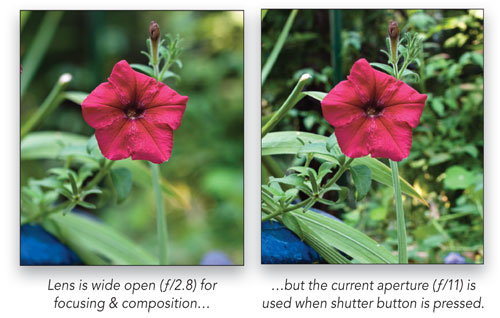
Regardless of what the aperture is set to, when you look through the viewfinder of an SLR, the widest aperture is used to allow as much light as possible for composition. It doesn’t stop down to the specified aperture until the moment of exposure. So you may think that you have a soft, shallow depth of field, only to find later that much more is in focus than you intended. Fortunately, most DSLRs have a Depth-of-Field Preview button that will preview the actual depth of field using the current aperture setting. Find this button and use it!
Creative Use of Subject and Camera Motion
4 SLOW SHUTTER SPEEDS TO BLUR SUBJECT MOTION
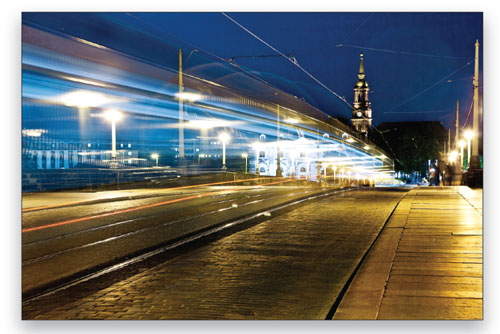
The combination of a tripod-mounted camera and slow shutter speeds can create intriguing motion blurs from the movement of the subject. Night photography is well suited for motion blur since the lower light levels require longer exposures. During the day you can use a solid neutral density filter to cut back on the amount of light entering the lens and force a longer exposure. In Dresden Streetcar above, the image was exposed for 10 seconds as the illuminated streetcar passed by, creating a ghostly blur. Because the camera was on a tripod, other elements in the scene remain in focus.
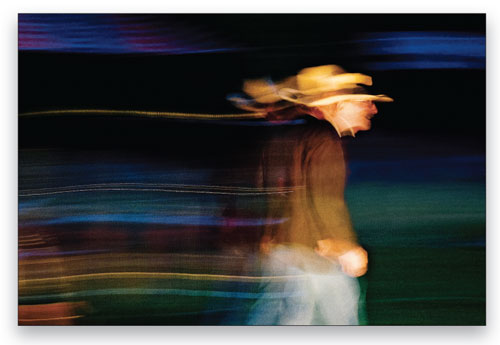
5 SLOW SHUTTER SPEEDS + CAMERA MOTION
Slow shutter speeds can also create interesting motion blurs through the purposeful movement of the camera during the exposure. In Cowboy Poet above, both camera motion and subject movement were used. The exposure time was 4 seconds and the camera was panned to the right during the exposure to follow the man as he walked through the scene. Sharpness isn’t a part of this image but the unexpected combination of subject and camera motion made it the most interesting photo I took that night.
Creating Shallow Depth of Field with Lens Blur
6 [LENS BLUR: CONTROL BLUR WITH A DEPTH MAP]
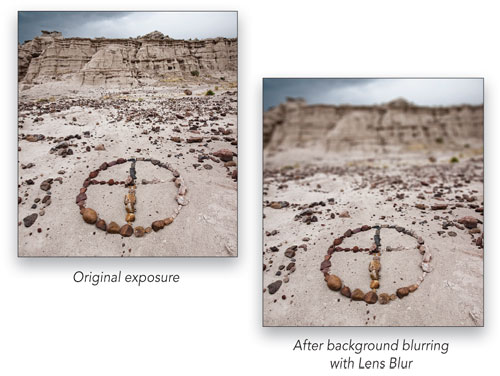
The Lens Blur filter provides a way to create the look of shallow depth of field after the fact. To control how the blur is gradually applied to the image, you first have to create an alpha channel that can be used as a depth map. The intricacy of the depth map will vary depending on the needs of each image, which makes the Lens Blur feature as much about good masking as it is about blurring. Open an image where you want to add a gradual blur to the background or you can download the image used in our example.
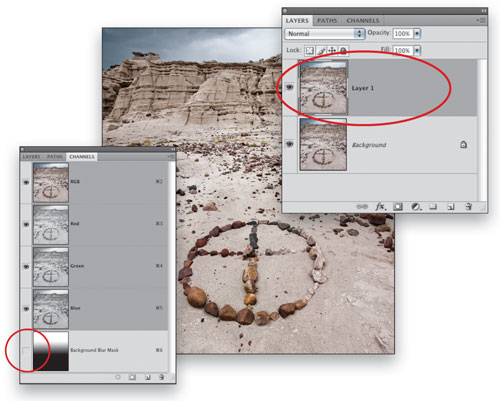
7 DEPTH MAP 1: QUICK MASK
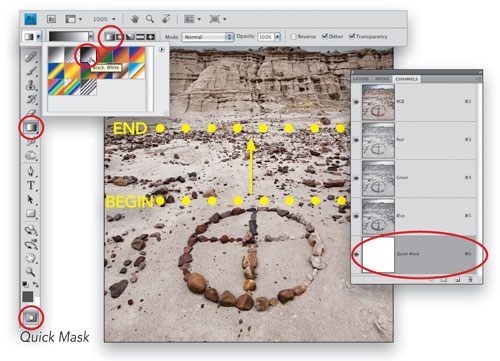
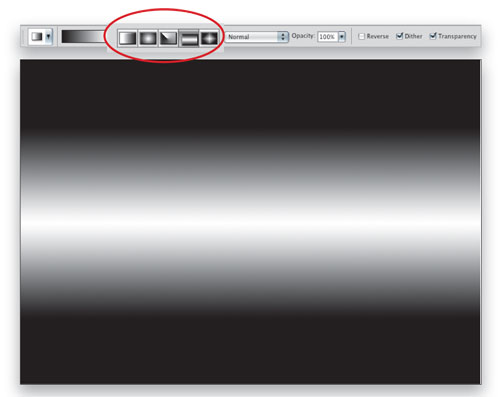
Select the Gradient tool (G); click on the Gradient Picker in the Options Bar; and choose the Black, White gradient (third swatch from the left in the top row). Set the style to Linear Gradient (the first icon), Mode to Normal, and Opacity to 100%. Click the Quick Mask icon at the bottom of the Toolbox or simply press Q on the keyboard. Click-and-drag in the image to apply the gradient. Where you begin is where the blur will begin and where you end is where the blur will be applied at full strength.
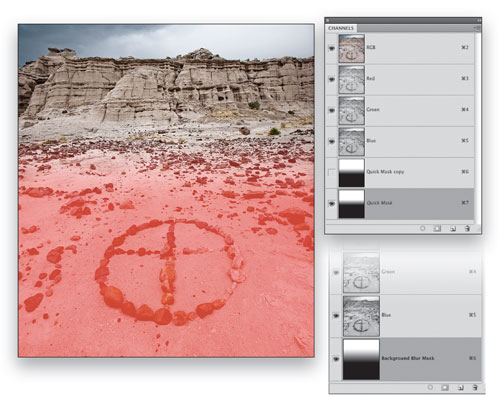
8 DEPTH MAP 2: COPY THE QUICK MASK
The red overlay that appears indicates the black areas of the mask. The area where it fades to clear is where the blur will begin to appear. The totally clear areas will be fully affected by the blur. In the Channels panel (Window>Channels), copy the Quick Mask by dragging it to the Create New Channel icon at the bottom of the panel (or you can choose Duplicate Channel from the panel’s flyout menu). Return to standard selection mode by pressing Q and then choose Select>Deselect. Double-click on the Quick Mask copy channel’s name and rename it (ours is Background Blur Mask).
9 DUPLICATE THE BACKGROUND LAYER
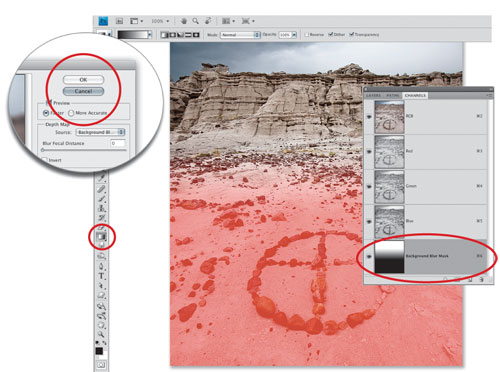
Click on the RGB channel to make it the active channel and turn off the visibility of the new alpha channel by clicking on its Eye icon. Normally, to keep a filter effect flexible and protect the original version of the image, we’d apply it as a smart filter; however, Lens Blur isn’t available as a smart filter. So, let’s go to the Layers panel and make a copy of the Background layer by clicking on that layer and using the Command-J (PC: Ctrl-J) shortcut, then choose Filter>Blur>Lens Blur.
10 APPLY LENS BLUR
In the Lens Blur dialog, open the Depth Map Source menu and choose the channel you created. If the blurred areas are reversed, click the Invert checkbox. You can also click in the preview where you want the image to be in focus. In the Iris section, the Radius slider will control the amount of blur (in this example, we used 30). Blade Curvature, Rotation, and the Shape menu will determine the visible characteristics of the virtual lens iris, but this will only be apparent in images with bright points of specular highlights. Click OK if you like the effect.

11 EDITING THE DEPTH MAP CHANNEL
If you decide the depth map isn’t creating the exact effect you want, click Cancel and return to the Channels panel. Click on the depth map channel to activate it and then turn on the RGB channel’s Eye icon so you can see the mask as a red overlay. Use the Gradient tool to create a new gradient to replace the existing one. When you’re satisfied with the new gradient, click on the word RGB at the top of the Channels panel and then apply the Lens Blur filter again to preview how the mask edits affect the blur.
Combining Hard and Soft Masks
12 COMBINE HARD AND SOFT MASKS 1
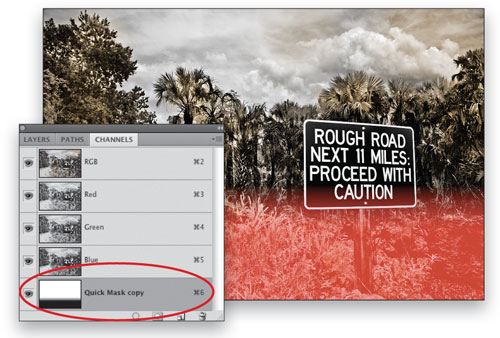
The key to an effective use of the Lens Blur filter lies in the accuracy of the masks you create for the depth map. Each image will have its own challenges, depending on the area that needs to be masked. For photos where a foreground object extends up into an area to be blurred, you’ll need to create a depth map mask that combines both hard and soft edges. In this rough road example, we started by making a gradient mask using the Quick Mask method shown earlier.
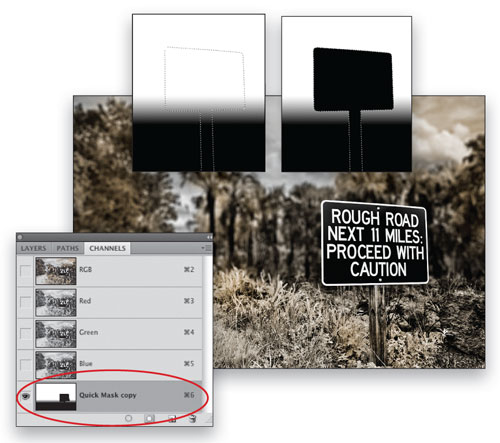
13 COMBINE HARD AND SOFT MASKS 2
Using the Pen tool (P), create a precise path around the sign and then click on the Load Path As a Selection icon in the Paths panel. With the gradient mask alpha channel active in the Channels panel and black as your Background color, press Delete (PC: Backspace) to fill the selected area with black, then deselect (Command-D [PC: Ctrl-D]). This creates a mask with both precise and gradual transitions that can then used for the depth map in the Lens Blur filter.
Creating a Fake Tilt-Shift Effect
14 THE TILT-SHIFT EFFECT
The Lens Blur filter can also be used for creating a fake, tilt-shift effect. To create this optically, you need to use a tilt-shift lens—a fairly pricey purchase. These lenses are commonly used for architectural images to control perspective. On the right type of scene, such as looking down on a city or landscape, the very shallow depth of field can create a sense of looking at a miniature scene. If used too much, it can become gimmicky, but I’ve seen it used to good effect on fine art photographs and even in editorial illustrations.
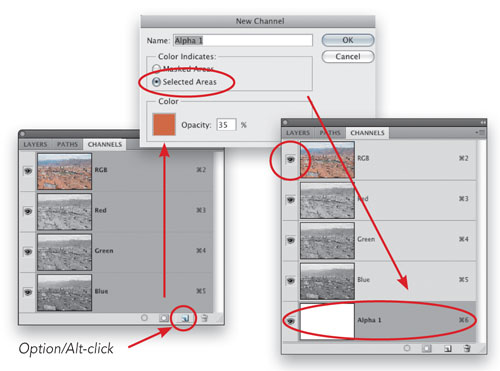
15 CREATE A WHITE ALPHA CHANNEL
To try this, you can open one of your own images looking down on a scene or you can download our example. First, hold down the Option key (PC: Alt key) and click on the Create a New Channel icon at the bottom of the Channels panel. In the New Channel dialog, under Color Indicates, choose Selected Areas, and click OK. This will create a white alpha channel. Turn on the visibility for the RGB channel by clicking where the Eye icon should be. Since the new alpha channel is all white, no red overlay will be visible.
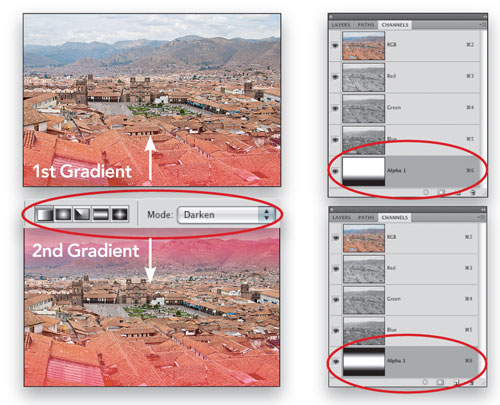
16 ADD TWO GRADIENTS
Select the Gradient tool, make sure that the Black, White swatch is selected in the Gradient Picker, and Opacity is set to 100%. Drag the cursor from the bottom of the image about one-third of the way up. Where you stop dragging, the image will be in focus once the Lens Blur is applied. Now, change the blend Mode of the gradient to Darken and drag down from the top about one-third of the way. The Darken blend mode lets you add a new gradient to the channel while preserving the first one.
17 WHY NOT USE THE REFLECTED GRADIENT?
You could also use the reflected gradient style to get this same effect, but it doesn’t offer as much control. I often have to drag it several times to get it right, and the areas that will be rendered in focus (the white areas) are typically much narrower than what I want. I prefer to use the method shown in the previous step because it gives me maximum control over which areas will be in focus and which areas will be blurred.
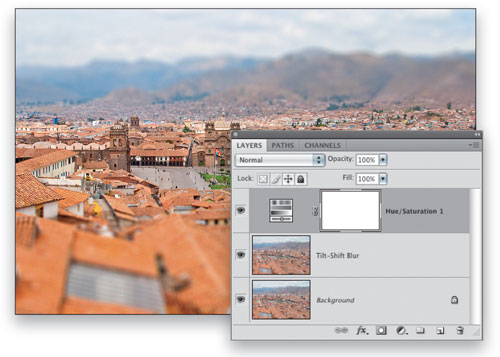
18 APPLY LENS BLUR, INCREASE SATURATION
Click on the RGB thumbnail in the Channels panel to make it active and turn off the alpha channel’s Eye icon. In the Layers panel, copy the Background layer (Command-J [PC: Ctrl-J]) and then choose Filter>Blur>Lens Blur. In the Lens Blur dialog, choose the new alpha channel as the Depth Map and adjust the Radius slider to taste. If the wrong areas are blurred, simply click in the preview on the area that you want in focus. Click OK to close the dialog. Finally, add a Hue/Saturation adjustment layer and increase the Saturation to make things look a bit more plastic and toy-like.
ALL IMAGES BY SEÁN DUGGAN UNLESS OTHERWISE NOTED
