
Some of the most simple, yet very satisfying types of collages are image “mirrors” that are created by duplicating the image and flipping it to form a reflection. Landscapes, clouds, natural patterns and textures, as well as architectural structures all work very well as image mirrors. Along the way, we’ll also use smart objects and smart filters, and then finish up with a tip on using gradient masks to create reflections on polished surfaces.
The mirror collage
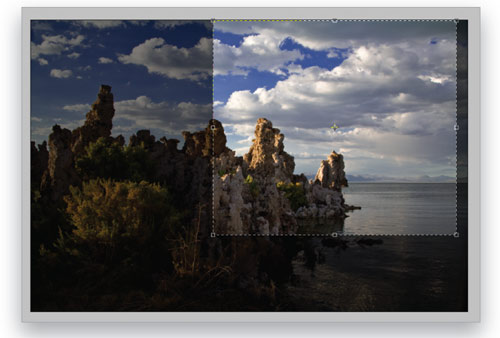
1 [PRE-CROPPING]
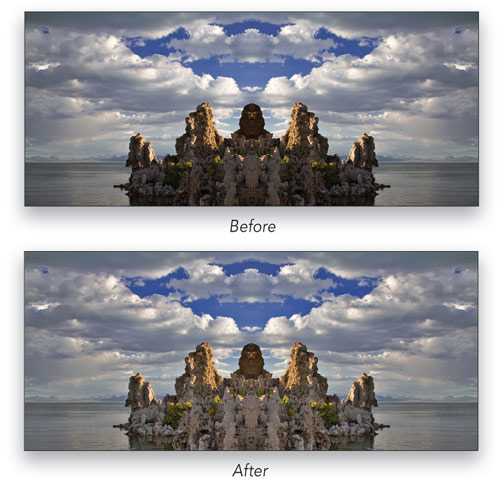
Cropping the file prior to the mirroring process is not required, but for some photos it can produce a more interesting reflected image, and it’s always good to keep this in mind. For the Mono Lake example used here, I decided to crop it as shown since I knew this would result in a mirror where the tufa formations would look more like an island. Study your own images to see if cropping will result in more intriguing results. The more you play around with image mirrors, the easier it will be to see the possibilities that a certain crop might provide.
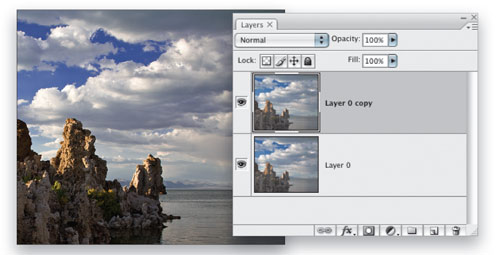
2 [COPY THE IMAGE TO A NEW LAYER]
Start by opening an image you want to use for a mirror, or you can download the Mono Lake file (if you do use the Mono Lake image, crop it as shown in the previous step). Double-click on the Background layer. Click OK in the New Layer dialog that appears to turn it into a regular layer. Next, make a copy of the layer by choosing Layer>New>Layer via Copy, or by using the very useful keyboard shortcut Command-J (PC: Ctrl-J).
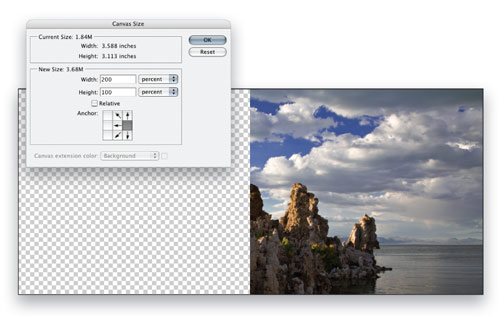
3 [ADD CANVAS SIZE]
Choose Image>Canvas Size. Use the Anchor grid to determine where the original image will be placed in relation to the added canvas. In this example, let’s mirror the image on the left side of the original, so click the right center square to denote this as the position of the original image. Uncheck the Relative box (if it’s checked), and change the units for the Width to Percent (the Height will change as well). Enter 200% for the Width if you’re mirroring to the left or right (as is the case with our image) or 200% for the Height if you’re mirroring the image above or below, and click OK.
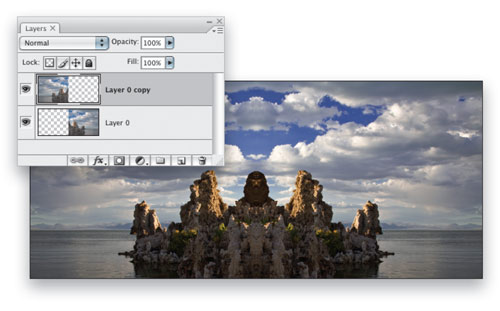
4 [FLIP THE DUPLICATE LAYER]
After adding the extra canvas area, make sure the top duplicate layer is active and choose Edit>Transform>Flip Horizontal (use Flip Vertical if the reflected layer will be placed above or below). Choose the Move tool (V), press-and-hold the Shift key, and drag the flipped layer into position to create the mirror effect. If the Snap feature is enabled under the View menu, the edges of the two layers should snap into alignment. You may need to zoom in for a close view to ensure that the edges line up well. With the Move tool active, you can nudge the layer one pixel at a time using the Arrow keys on the keyboard.
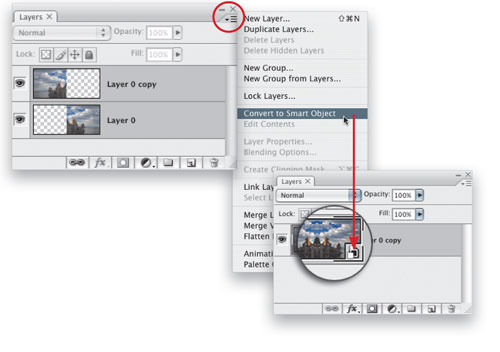
5 [CREATE A SMART OBJECT FROM LAYERS]
For this image, we’ll also apply a Shadow/Highlight adjustment. In order to preserve flexibility and keep our changes nondestructive, we’ll first convert the two layers into a smart object. Click on the bottom layer in the Layers panel, then Shift-click on the top layer to select both of them. Open the flyout menu for the Layers panel and choose Convert to Smart Object.
6 [APPLY SHADOW/HIGHLIGHT AS A SMART FILTER]
Since the layers that create the mirror effect are grouped into a smart object, we can apply the Shadow/Highlight effect as a smart filter. This gives us adjustment layer-type functionality, which means the change isn’t permanent, allowing us to revisit the settings if needed. Choose Image>Adjustments>Shadow/Highlight and click the Show More Options checkbox. For both the Shadows and the Highlights, set the Amount and Tonal Width to 40% and the Radius to 90 px. Click OK to complete the image.
Reflections on polished surfaces
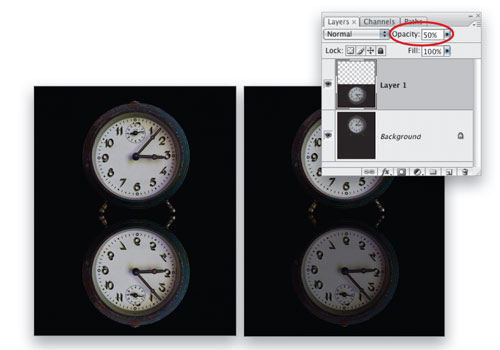
1 [ADJUST LAYER OPACITY]
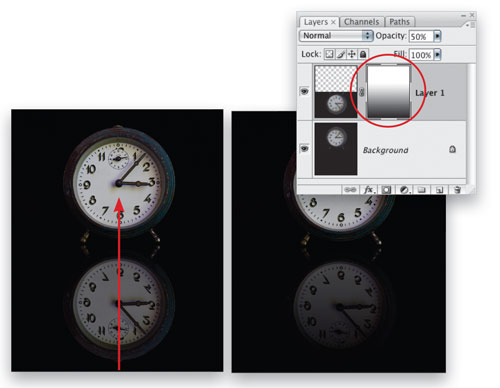
The clock in this example was photographed on a black cloth background and cast no reflection, but it’s very simple to add one. The basic steps are essentially the same as the image mirror shown in the previous steps (the one difference is the addition of extra canvas area that’s black). Since we have already covered that, I have jump-started the process and prepared a clock file with a reflection layer already in position. To make the reflection more realistic, lower the Opacity of the reflection layer in the Layers panel to 50%.
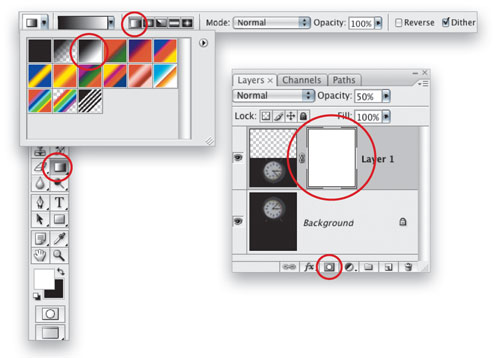
2 [ADD A LAYER MASK]
Reflections on polished surfaces are stronger and brighter the closer they are to the object. To further fine-tune the reflection, we’ll add a layer mask and use the Gradient tool (G) to feather the “lighting” on the reflection. Click the Add Layer Mask icon at the bottom of the Layers panel to add a layer mask to the top layer (the reflection). Choose the Gradient tool and in the Gradient Picker in the Options Bar, select the third swatch to set the gradient to Black, White. In the Options Bar, make sure the style is set to Linear Gradient, the Mode to Normal, the Opacity to 100%, and Reverse is not checked.
3 [MODIFY THE MASK WITH A GRADIENT]
Choose View>Screen Mode>Full Screen Mode with Menu Bar. Zoom out (Command-–PC: Ctrl-–]) to see the entire image surrounded by the gray canvas. With the Gradient tool active, click below the image in the gray area and Shift-drag a line up to the top clock. Let go between the number 6 and the center point of the clock (see illustration). The gradient in the mask now creates a feathering effect so the brightness of the reflection fades out as it moves away from the clock.
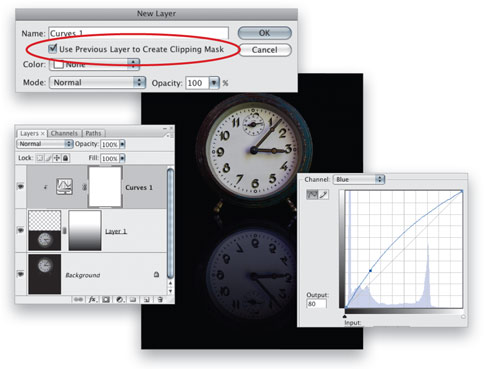
4 [ADD A GROUPED ADJUSTMENT LAYER]
As a final step, let’s add an adjustment layer to color the reflection a cool tone to suggest that the clock is resting on a colored surface. To do this so it only affects the reflection layer, hold down Option (PC: Alt), click the Create New Adjustment Layer icon at the bottom of the Layers panel, and choose Curves. In the New Layer dialog, click the checkbox for Use Previous Layer to Create Clipping Mask, and click OK. In the Curves dialog, choose the Blue channel and drag the lower part of the curve up a bit to add a blue cast to the image. Click OK to complete the reflection.
All images by Seán Duggan
