
Create Custom Vignettes & Spotlights Using Camera Raw’s Radial Filter
Excerpt from The Adobe Photoshop CC Book for Digital Photographers (2014 Release)
You’ve been able to add edge vignettes (where the outside edge around your image is darkened) for a while now, but the problem had always been your subject had to be right in the center, since it darkened evenly around the outside edges. Now, with the Radial Filter, you can control placement of your vignette, so it’s right where you want it, and you can have multiple sources of light, so you can also use it as a spotlight effect or to re-light your image after the fact.
Step One:
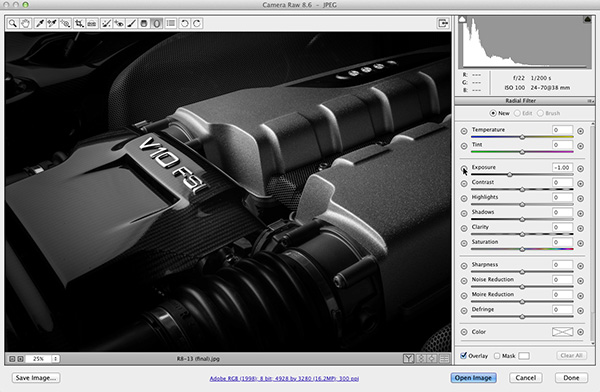
Here, we want to focus the viewer’s attention on the car’s engine specs (using dramatic lighting) rather than the outside edges of the image. So, click on the Radial Filter tool (J) up in the toolbar (it’s the fourth tool from the right). Since we want to darken the outside edges, click the – (minus sign) button to the left of the Exposure slider a couple times, so when we use the tool it will be easy to see the effect (we can always change the amount later).
—CREDIT: SCOTT KELBY
Step Two:
At the bottom of the this panel, you’ll see an Effect option, which lets you choose whether it’s the area inside the circle that gets affected or the area outside. In this case, we want what’s inside to remain unchanged and everything outside it to be darker, so click the Outside radio button. Now, click-and-drag out the tool in the basic direction you want your oval (or circular) pool of light to appear. Here, I dragged it out over the center of the area I want to affect.

TIP: Repositioning as You Drag
As you’re dragging out your oval, you can reposition it as you’re dragging by pressing-and-holding the Spacebar. Try it. It’s really handy.
Step Three:
Once your oval is in place, you can rotate it by moving your cursor outside the green overlay and clicking-and-dragging in the direction you want to go. To resize the oval, just click on any one of the little handles on the edges, and drag out or in. To move the oval, just click anywhere inside the overlay and drag it where you want it. While we’re here, let’s make the area outside of the “lit” area darker. Drag the Exposure slider to the left until it reads –1.75 (as seen here).

TIP: Two Handy Keyboard Shortcuts
Pressing the letter V hides the green overlay oval from view (press V again to get it back; you’ll see I turned it off in the next step), and pressing the letter X swaps the Effect from Outside to Inside (so, instead of the outside being dark in this case, it makes the center dark and everything outside the oval unchanged).
Step Four:
The nice thing about this filter is that you can do more than just adjust Exposure. For example, drag the Contrast slider over to the right (as I did here to +34) and this makes that outside area more contrasty. If it wasn’t already so gray (it is an engine after all), you could lower the Saturation and then everything outside the oval would not only be darker, but black and white (or vice versa if you increased the Saturation). Now, I mentioned in the intro to this technique that you could add multiple filters on the same image and that you could use it to effectively re-light an image. So, let’s do that next.

Step Five:
Here we’re going to re-light this image using the Radial Filter. The viewer’s eye is drawn to the brightest part of the image first, but unfortunately, in this shot, the light on our subject is not as bright as the light coming through the stained glass window next to her, which draws your eye away from her face. The light on our subject is at least directional, nice, and soft—it’s just not quite bright enough.

Step Six:
We’ll start the same way we did the last one—by selecting the Radial Filter tool and dragging out an oval in the direction we want it. In this case, I want her to remain the same, but I want the area around her much darker. So, make sure the Outside Effect radio button is selected and drag the Exposure slider way over to the left to darken the area outside the oval (here I dragged it to –1.40).

TIP: Removing Ovals
If you want to remove an oval you’ve created, either just click on it and hit the Delete (PC: Backspace) key, or move your cursor over the center point of the oval, press-and-hold the Option (PC: Alt) key, and your cursor will turn into a pair of scissors. Now, just click on the center point of the oval to delete it. Also, just as a general rule, when you have this scissor tool, don’t run. Sorry, I couldn’t help myself.
Step Seven:
To add another oval, click the New radio button at the top of the Panel area (so Camera Raw knows you want to create a new pool of light), then at the bottom of the panel, switch the Effect to Inside (or use the shortcut I mentioned earlier: X). Now, we’re going to use this oval to light her bouquet, which is getting a bit lost. So, drag out a small oval over her bouquet, but this time, you’ll brighten this area by dragging the Exposure slider to the right a bit (as I did here, where I dragged to +1.10).

Step Eight:
We need another of the exact same oval to light her face a bit better. Rather than starting from scratch, we’ll duplicate the second oval. Press-and-hold Command-Option (PC: Ctrl-Alt) and when your cursor changes into two small arrows, click-and-drag on the center of your second oval, release your mouse button and those keys, and a third oval (a duplicate of your second one) appears. Place it right on her face (as shown here) and rotate and resize it as necessary. Increase the Exposure a little (here, I set it to +1.35), and you could try increasing the Shadows to open up detail there (as I did here, where I increased it to +14). Remember, you can use any of the sliders in the panel.

TIP: Controlling the Edge Blending
The softness of the transition between the center of your oval and the area being affected by the sliders is controlled by the Feather amount and, at a setting of 100, you get the softest, smoothest blending between the two. If you lower the Feather amount, the transition area becomes smaller and, of course, if you drag it to zero, it becomes a downright hard edge. Never had a use for that. Ever.
Step Nine:
One more thing to think about: What we’ve mostly done here is darken the area around our subject (well, except for those two small areas we brightened). But, if we want to make her brighter overall, we’ll need to go back to the Basic panel and drag the Exposure slider to the right (I didn’t need to here). This would make her brighter, but also make the entire photo brighter at the same time. So, if the edges of the image then look too bright, you can go back to the Radial Filter tool, click on the first oval you made, and decrease (darken) the Exposure slider some more (that will only affect the area around her). I’m showing the before image below, as well, so you can see how dramatically we’ve re-lit the image using the Radial Filter.


Learn how to do more in Photoshop CC (2014 Release) here: http://kel.by/skccbook
