
Excerpt from The Adobe Photoshop Lightroom 5 Book for Digital Photographers
Lightroom's Highlights and Shadows sliders are the sliders that I always think of as the "problem solvers." Sometimes the problems are caused by what I did in-camera (I took a shot where I let the highlights get clipped, or I took a shot where my subject is backlit and they are pretty much a silhouette), or these problems happen in Lightroom because of other changes I've made with other sliders. Here, we'll take a look at how to use these two slider to solve a problems like these.
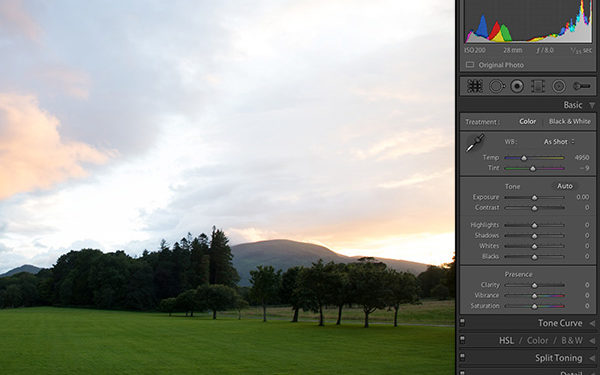
STEP ONE: When I took this shot, I let part of the sky clip (meaning, I let some of the highlights in the shot get so bright that there's actually no detail in those parts of the sky. No pixels whatsoever. Just blank nothing). You'll hear this problem referred to as having part of the photo "blown out" or "clipped" (short for clipped highlights). How do we know that part of this photo is clipping? Lightroom tells us with a white triangle-shaped highlight clipping warning, which appears in the upper-right corner of the histogram.

—CREDIT: ©SCOTT KELBY
STEP TWO: As long as that highlight clipping warning triangle stays black, you're okay (there's no clipping). If it turns white (like it is in Step One), you're in trouble (that means there's some serious clipping). If it's red, yellow, or any other color, it's not as bad—you're only clipping in one of those color channels—but it's not ideal (you'd like it to be solid black). Of course, you could drag the Exposure slider to the left a bunch, until the highlight clipping warning eventually turns black, but in most cases, your overall exposure will now be way too dark (as seen here).

STEP THREE: One thing that might help you in dealing with highlight clipping is to actually see which areas of your image are clipping. One reason you need to know this is so that you can decide if it really needs dealing with at all, because we only really sweat highlight clipping when it happens in an area where there's some important detail. For example, if the sun is visible in your shot, it's gonna clip. But, as far we know, there's no detail in the surface of the sun, so we can just ignore that. To see which parts of your image are clipping, just click directly on the white highlight clipping warning triangle itself (or press the letter J on your keyboard), and the areas in your image that are clipping will appear in red (as shown here).

STEP FOUR: Clipping aside, the overall exposure of the sky looks too bright and (as I mentioned earlier) darkening the Exposure amount just a little makes the sky look better. In this case, it'll also remove some of the highlight clipping. So, I lowered the Exposure amount to -1.05 and you can see it did darken the sky and reduce the clipping a bit, but not nearly enough.

STEP FIVE: The slider that I use to reduce highlight clipping is the Highlights slider, and it does an amazing job of only affecting those really bright areas. If you drag it just a bit to the left (as shown here, where I dragged it to -28), you can see how it completely eliminated the red clipped areas (if you look up at the histogram, the triangle is now black). So, just remember: the Highlights slider is your secret weapon when it comes to highlight clipping.

STEP SIX: Now, we still have the same problem we had in the previous technique, which is the trees are so dark in the foreground that it's hard to see any detail. This is where the Shadows slider comes in—it opens up detail and dimension in the shadows when you drag it to the right (as shown here, where I dragged it over to +69). Compare the trees and grass in this image to those in the last step and you'll see how much this helped, even though we darkened the overall exposure (I ended up decreasing the Exposure a bit here to -1.35). I also use this slider when I have a backlit subject, where I add an extra step to the process to keep things balanced. Okay, so that's it. Those are the two main "problem solver" sliders.


Learn how to do more in Lightroom 5 here: http://kel.by/Zim7Wz
