Flex Your Copyright
For any image that I post on my website or submit for publication, I always add a copyright notice. Sometimes this is a semitransparent watermark over the photo (for Web images), and sometimes it’s on a thin white strip underneath the image (for photos intended for publication). Not only does this visibly tag the image with my copyright notice and sometimes my Web URL, but it also heightens awareness of copyright issues for those who may not be aware of them. Of course, a copyright notice on a Web image will not stop nefarious rogues from ripping you off, but it does give fair notice of your ownership.
In this tutorial, I’ll go over how to define custom shapes for a copyright notice and save them into their own shape library so you can easily add them to your images. I’ll also show how to make an action that will apply the watermark to specific sized images. Finally, we’ll finish up with a look at one of the coolest new features in Photoshop CS3: Smart Filters.
Setting Up a New Custom Shape Collection
STEP 1 Reset to Default Set
Before we explore creating new custom shapes, we’ll create a new, empty library to place them into so they can exist separately from any of the other shape libraries. The first step is to make the Custom Shape tool active and then open the Custom Shape Picker in the Options Bar. Click the flyout menu button in the upper right of the Picker and choose Reset Shapes. In the dialog that appears, click OK (not Append).

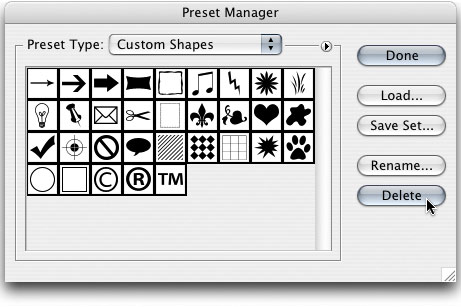
STEP 2 Delete the Existing Shapes
From the same Custom Shape Picker flyout menu, choose Preset Manager. The shapes that are displayed are part of the default library. Click on the first shape and then Shift-click on the last shape to select all of them. Click the Delete button to clear them from the current view of the Custom Shape Picker. Don’t worry; the actual default shapes are safe in their own saved library. This is just the quickest way to start out with a new, empty library. Click the Done button to exit the Preset Manager.
Defining a New Custom Shape
STEP 3 Type a Copyright Notice
Here, we’ll create a custom shape from a copyright notice, but you can apply the same technique to any vector design. Create a new file (File>New). The size and resolution aren’t critical. Select the Type tool (T) and choose a typeface that you want to use for your copyright notice (I used Univers bold). Click in the file to create a new type layer and enter the text for the notice. When you’re finished, press Enter to exit the text-editing mode. (Note: For a copyright symbol, press Option-G [PC: Alt-0169], and for a bullet, press Option-8 [PC: Alt-0149].)

STEP 4 Convert Type to a Shape Layer
From the main menu, choose Layer>Type>Convert to Shape. The type is now a shape layer (which is really just a fill layer with a vector mask creating the shape), and this means that you can no longer edit the text with the Type tool. If you need to change the wording, you’ll have to back up a step. If you’re working from a design that’s already in vector form, make the path or shape layer active and proceed to the next step. (Note: If your converted type doesn’t look clean, that’s just the path around the vector mask that you’re seeing.)

STEP 5 Define a Custom Shape
To define the copyright notice as a custom shape, choose Edit>Define Custom Shape. Give the shape a name and click OK. Now, select the Custom Shape tool again and open the Custom Shape Picker. You should see a single shape in the new library—your new copyright notice. To try it out, click on it to select it and drag the Custom Shape tool in your image file. Hold down the Shift key to constrain the proportions. (Note: Make sure Shape Layers is selected in the Options Bar.)

Adding Watermarks to the Library
STEP 6 Add Additional Watermarks to the Library
Now that you have a copyright and watermarks shape library started, this is a good time to add any additional watermarks that you may need. For example, I have copyright shapes for 2007 all the way back to 2001. I also have a shape with my website URL and my logo. Use the History palette to click back to the history state just before the type layer was converted to a shape. Edit the type as needed and then repeat Steps 4 and 5. Repeat the process for as many watermarks as you want to create.

STEP 7 Save the Library
Make the Custom Shape tool active again and open the Custom Shape Picker in the Options Bar. You should see all the new watermark shapes you’ve created. Click the small button in the upper right of the Picker to open the flyout menu and choose Save Shapes. Give the collection an appropriate name (I called mine “Copyright-Watermarks”) and click Save. The default location where this file is saved is in the Photoshop application folder in Presets:Custom Shapes. Restart Photoshop and this shape library will be available in the Custom Shape Picker flyout menu.

STEP 8 Future Additions to the Shape Library
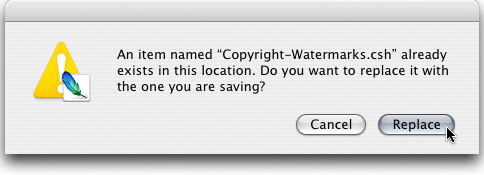
If you need to add new watermarks to this library at a future time, simply select it from the Shape Picker flyout menu. In the dialog that appears, click OK to replace the shapes. Then, create your new watermarks as outlined earlier in this tutorial. When you’re finished, open the Shape Picker flyout menu again, choose Save Shapes, and be sure to save it with the same name. If you’re using the same name, a dialog will appear asking if you want to replace the previous file. Click Replace to update that shape library.
Placing Watermarks with Actions
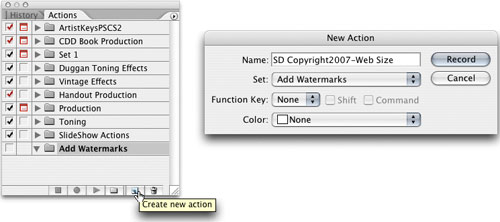
STEP 1 Create a New Action
You can automate the placing of watermarks to images via the Actions palette, but since the size and resolution of the shape you create is recorded in the action (as well as the position in the image), it’s best to record your actions for specific sized images, such as Web images, 5x7s, 8x10s, etc. To try this out, open or create an image that’s sized for Web display (i.e., no more than 800 pixels wide at 72 dpi). Click on the Create New Action icon at the bottom of the Actions palette. Give the new action a name such as “Copyright2007-Web Size” and click Record.
STEP 2 Record the Action
Choose the Custom Shape tool and from the Custom Shape Picker select the appropriate shape from your watermark library. Drag the shape out over the image in the desired size and placement (i.e., lower left, lower right). Since this action will not flatten the shape layer, the actual placement can be fine-tuned after the action is done. If you want the watermark to be semitransparent, then adjust the layer Opacity as desired. You might also consider adding a Drop Shadow or Bevel and Emboss layer style. Click the Stop Recording icon to stop recording the action.

STEP 3 Apply the Watermark Action
Before you run this action on a web-sized, 72-dpi photo, choose an appropriate foreground color that will show up well against the image you’re working with (the foreground color that was active when the action was recorded is not a part of the action). Since the images that you’ll apply the watermark to may have different requirements in regards to the watermark color, for batch applications this action would work best with photos that all have similar lightness and color characteristics that would contrast well with the color of the watermark.
 CREDIT: SEÁN DUGGAN•ALL RIGHTS RESERVED
Photoshop CS3: Smart Filters
STEP 1 Convert a Layer into a Smart Object
One of the major new features in Photoshop CS3 (still in public beta as of this writing) is Smart Filters. With Smart Filters you have the ability to apply filters similar to adjustment layers, so that they can be edited and readjusted even after you click the OK button. Here’s how this cool new feature works: To access the Smart Filter functionality, you need to be working on a layer that has been converted into a Smart Object. To do this, click on the layer you want to work on (or the Background layer) and choose Convert to Smart Object from the Layers palette flyout menu.

STEP 2 Apply Filter to the Smart Object
From the Filter menu, choose the filter you want to apply, use the desired settings, and click OK. The Smart Filter appears in the Layers palette below the layer to which it’s applied. Additional filters can be applied to the same layer and each will appear as a separate Smart Filter entry in this list. To re-edit the filter settings, simply double-click on the filter name. Additionally, you can also control the visibility of the filter effect by editing the layer mask for the Smart Filters.

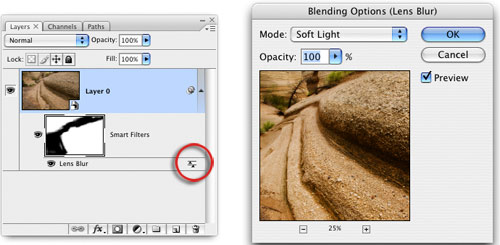
STEP 3 Smart Filter Blending Options
If you double-click on the small adjustment icon at the far right side of the Smart Filter name, it will bring up the Blending Options for that filter. This offers the same functionality as the old Edit>Fade command, only now these options are available whenever you want, not just immediately after applying the filter. This dialog enables you to modify the filter effect through the use of blend modes and opacity. Smart Filters bring the flexibility of adjustment layers to the filters in Photoshop CS3 and they’ll change the way you work with filter effects.