
Artistic Expressions: Warp Versus Warp
Every new release of our favorite applications brings with them a variety of features that leave us wondering how we ever managed to live without them. A perfect example of this is a really cool command that was introduced in Photoshop CS2—Warp. Found under Edit>Transform, Warp allows you to bend things in a variety of ways. My good friend Corey Barker, whose writing always graces the pages of this magazine, has demonstrated some fantastic uses of this powerful feature. Like some other items in Photoshop, however, Warp started somewhere else in the Adobe suite of products.

Make a mesh
Illustrator also has this feature but with far more power than the one found in Photoshop. It has the ability to warp objects via a user-defined mesh. This incredible command is found under Object>Envelope Distort and is called Make with Mesh.
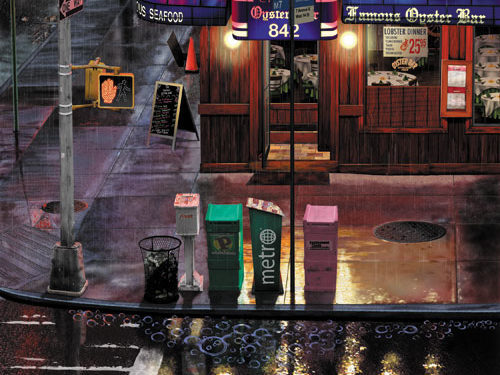
To demonstrate one of the times that I found this tool indispensable, let me refer to my painting Oyster Bar (shown above left). We’re going to focus on the trashcan in this scene. It has a wire net body that needs to conform to the curvature of the can.

The basic shapes were generated in Illustrator. The following image shows the frame for the can and the wire net that I created for it. The wire net was created in a separate layer. (Yes, Illustrator has layers too.)

It was necessary to distort the mesh to follow the curvature of the trashcan. If this were all that I needed to do, then the Warp command in Photoshop would have been sufficient. There was, however, one detail that made it difficult—I wanted the trashcan to be old and worn. The scene is, after all, a busy corner in midtown Manhattan. This meant there had to be additional dents here and there in the trashcan.
Employing the Warp command in Photoshop would have applied a mesh composed of nine panels. This mesh would have been sufficient to distort the mesh into the curvature needed for the can as shown here; but the desired dents added a complexity that this procedure in Photoshop could not handle.

Do it in Illustrator
Since the wire netting was created in Illustrator in the first place, warping it there made perfect sense. I selected the entire wire net and went into the Envelope Distort function (Object>Envelope Distort>Make with Mesh). When you choose this feature, a dialog pops up allowing you to determine the number of sections the mesh for warping will contain. Unlike the Photoshop version that’s limited to nine panels, Illustrator lets you create as many panels as you think you’ll need to do the job. (Note: The maximum is actually 2500 panels, but that’s probably more than you’ll ever need.) I chose a total of 10 Rows with 10 Columns (for a total of 100 panels).

This gave me sufficient space for distorting the net of the can to achieve the 3D effect I was looking for, plus the added dents. Once you have your mesh, you can use the Direct Selection tool to select and manipulate any individual point in the grid, or you can click-and-drag an entire section of the grid. Here you can see how some of the sections of the mesh have been moved, causing the net of the trashcan to distort in specific areas.

The beauty of all this is that you can work at any size in Illustrator without sacrificing resolution. Once you copy-and-paste the object into a Photoshop file, it rasterizes to the resolution of the Photoshop document. I tend to work in Illustrator at 400% of what I need for the painting. I then reduce the object to 25% and export it over to Photoshop.
The bottom line is that no single program does it all. It’s best to get a thorough working knowledge of the entire Creative Suite so you can take advantage of the best that each program has to offer.
