
Actions, Automations, and Scripts in Adobe Photoshop

Making Photoshop Fly with Actions, Automations, and Scripts
Adobe Photoshop is one of the most powerful digital image-editing programs ever created. The things you can do with it are simply amazing, which is why it has such a huge following. But (you knew there was a “but” coming didn’t you), many folks have other things they’d rather be doing than spending extra time in Photoshop. Don’t get me wrong—I absolutely love to use Photoshop; however, I don’t love doing repetitive, mundane tasks. For that reason, I’ve spent a great deal of time learning how to do things faster when I work. In this article we’ll look at some ways to speed up Photoshop so you can spend more time doing things you like and less time doing repetitive tasks.
Automations
These are the easiest way to get more out of Photoshop. Why? Because they’re right there, ready for you to use. You don’t need to create anything and you don’t need to load or move any special files. All you have to do is know where to find them and which ones you want to use. After that, just point them at an image (or many images) and they do the work for you.
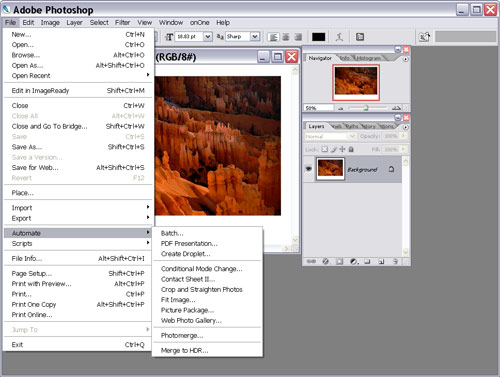
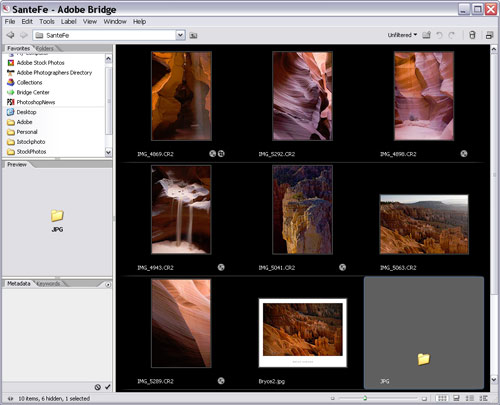
You’ll find Photoshop automations under the File menu. Just scroll down to Automate and you’ll see all of the automations available to you. Interestingly, you can also run most Photoshop automations from Adobe Bridge. Yep, just look in the Tools menu under Photoshop and you’ll see just about all of the same automations. What’s the difference? The main difference is that running your automations through Bridge allows you to visually select which images you want to run them on instead of blindly targeting an entire folder in Photoshop that may or may not contain all of the images you want to automate.
—CREDIT: ©MATT KLOSKOWSKI
Regardless of how you start the automations, it’s important that you think about how to use them to speed up your work. Let’s take a quick look at each one:
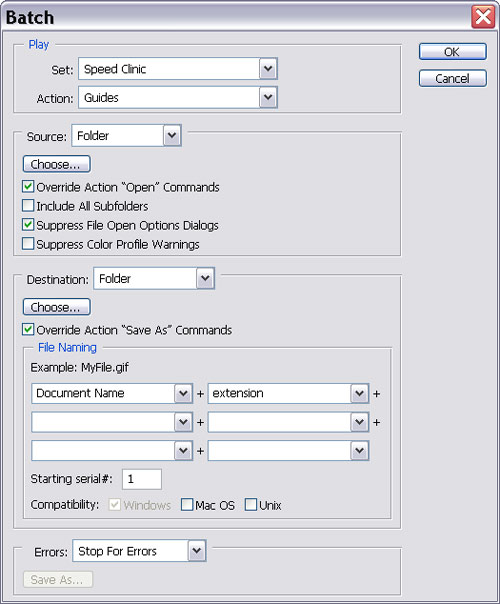
Batch—
The Batch dialog is perhaps one of the most powerful automations in Photoshop. Using actions is a great way to speed up your work. But what if you could apply that action to an entire folder of images and have Photoshop open, edit, and save them for you? Well, that’s exactly what the Batch automation does.
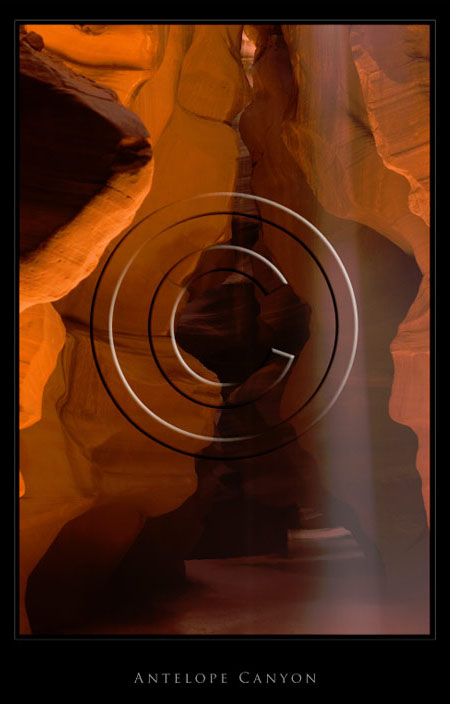
CAPTION: Have you ever wanted to apply a watermark to all of your photos at once? Batch is a fast and easy way to get it done.
Batch2 CREDIT: ©MATT KLOSKOWSKI
PDF Presentation—
This automation allows you to save multipage PDFs from your selected images in Photoshop. It’s a great way to package your images or photos and send them off to a client in one file. You can even secure the PDF so only people with a password can open or print it.
Create Droplet—
First, you’ll need to know what a Droplet is before you create one. A Droplet is essentially a little application that applies an action to the images that you drop on it. The Create Droplet automation works similarly to Batch but instead of running the automation when it’s done, it creates a small file. Simply drop images on top of the Droplet icon to kick it off.
Conditional Mode Change—
Use this automation when you’re recording an action that changes the color mode. Often, an action that has a step that changes the color mode can cause an error if the file being opened isn’t in the source mode specified by the action. If you record this step into the action, then you can specify more than one source color mode and a mode for the target mode.
Contact Sheet II—
The Contact Sheet II command lets you create a printable page of thumbnails for previewing and cataloging groups of images or photos.
Crop and Straighten Photos—
This automation is one of my hidden favorites. Just scan multiple photos at the same time and open the image in Photoshop. Then run this automation on the scanned image and Photoshop will automatically crop, straighten, and remove each image from the master, leaving you with separate files for each scanned image. Talk about simple—there are no dialogs to mess with and no settings. Just be sure to leave about 1/8″ between each photo when scanning.

Fit Image—
Let’s say you want to downsize photos to a particular size but you quickly realize that specifying say, 200 pixels for width for all photos using the Image Size command won’t work because horizontal and vertical images will size differently. The solution is to use the Fit Image command to specify a maximum width or height and Photoshop will make sure that the width or height doesn’t exceed the chosen amount while constraining proportions.
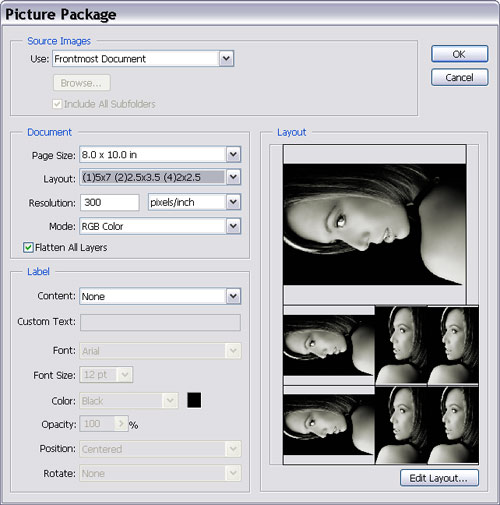
Picture Package—
If you’ve ever seen the way that portrait studios combine multiple versions of a photo on a single page then you know exactly what Picture Package does. This is a great timesaver if you don’t want to manually copy and position each copy of a photo on a page. It’s also customizable and allows you to get just about any combination and size of images that you can imagine.
CREDIT: ©ISTOCKPHOTO/EVA SERRABASSA
Web Photo Gallery—
Also known as WPG, this automation takes a folder of your photos and automatically creates webpages containing your own personal photo gallery from them. There are some great customization features that will allow you to tweak the appearance of the prebuilt templates, but you don’t get total control over the gallery that you’re creating. The trade-off is that it’s fast and easy.
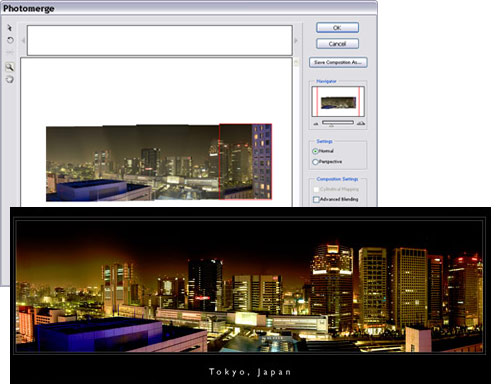
Photomerge—
This one is used for stitching together panos (that’s industry speak for a panoramic photo). Just point it at two or more photos and Photomerge merges (or stitches) them into a single image. There are also some great blending options in case they don’t stitch together perfectly.
CREDIT: ©MATT KLOSKOWSKI
Merge to HDR—This feature is brand-new in Photoshop CS2. Merge to HDR lets you combine several exposures of the same photo into one 32-bit image. Its power comes from the fact that it extends the dynamic range of the image by using all exposures instead of the limited range that only one photo would produce.
Actions
Actions are the next step when it comes to making Photoshop fly. Think of them as tiny macros or a series of recorded steps in Photoshop that you can play back at any time. You can even set keyboard shortcuts to run them just as you would any other commonly used Photoshop command. They’re not hard to create or use and they significantly cut down on the time you spend editing your images or photos.
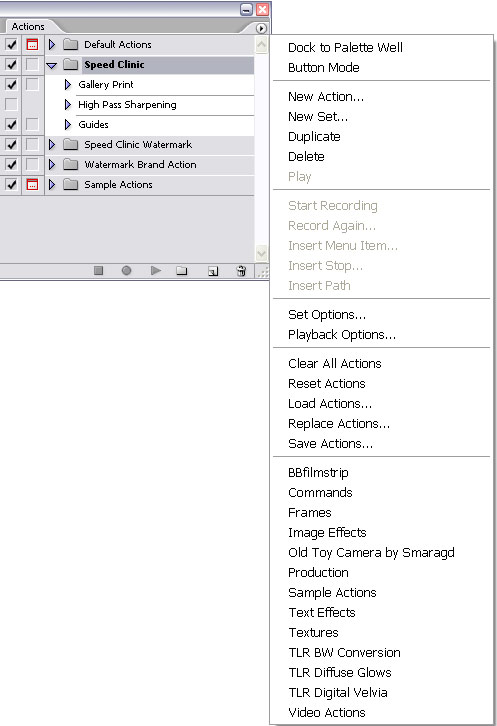
The first thing you’ll need to find is the Actions palette. If you don’t see it open already, just go to Window>Actions. Using the palette is pretty simple. Like many presets in Photoshop, you can load or save action sets by clicking on the Actions palette flyout menu and choosing the corresponding option.
Sets are like folders for actions and they help you stay organized. You can put one or many actions into an action set. These sets come in the form of an ATN file that someone would either give to you or you’d download from the Web. Just point the Load Actions dialog to that file and you can load those same actions into Photoshop. The other three main things you can do with the Actions palette involve the actions themselves. You can play an action, which is the most common choice; you can create an action; and finally, you can edit existing actions.
Playing an action
Playing an action is really simple. First, from the Actions palette flyout menu in Photoshop CS2, choose Sample Actions. That will load the sample actions that come with Photoshop. [Insert SampleActions] Now open any photo. A portrait photo will work great for this type of effect but any photo will do. Next, click the small right-facing arrow to the left of the name Sample Actions to expand the action set. (Remember that a set is just like a folder to hold your actions.) In that set you’ll see an action called Sepia Toning (layer). Click on that action and then click the Play Selection icon at the bottom of the palette to run the action. Photoshop will automatically apply the steps to create a sepia-toned effect on your photo. That’s it! You’ve just played an action and there’s nothing else to it.

—CREDIT: ©ISTOCKPHOTO/SHELLY PERRY
Creating an action
Sure you need to know how to play an action, but if you really want to take advantage of the power of actions, then you’ll probably want to start creating your own.
Let’s say that we want to create an action that applies sharpening to a photo. There’s actually a great technique for sharpening that involves switching to Lab mode, so let’s try that one. First, make sure you have the Actions palette open, then open a photo that needs some sharpening.
To begin, click the Create New Action icon at the bottom of the Actions palette. You’ll see a small dialog asking you to name your action. Let’s name this one “Lab Sharpening.” Then, select the set you want to save this action in from the Set pop-up menu, and click Record. The next step is to switch over to Lab color mode, so choose Image>Mode>Lab Color. Notice that after you do this a step appears in the Actions palette.
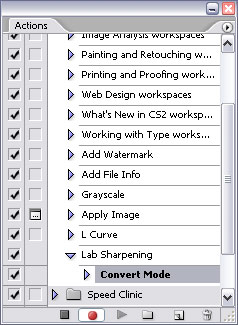
Next, go to the Channels palette, and click once on the Lightness channel. Go under the Filter menu to Sharpen>Unsharp Mask and enter 85% for Amount, 1.5 for Radius, 3 for Threshold, and click OK. Press Command-F (PC: Control-F) to apply Unsharp Mask a second time. Now that the sharpening is applied, it’s time to switch back to RGB mode, so choose Image>Mode>RGB Color. After each command another step is added to the action in the Actions palette. The last step here is to press the Stop Recording icon at the bottom of the Actions palette to complete the action.
Now open another photo, select the Lab Sharpening action in the Actions palette, and just press the Play Selection icon. The action will sharpen that photo using the same method. If you want to save this action, just click on the name of the action set (not the name of the action itself) and choose Save Actions. This will create one of those ATN files mentioned earlier, and you can share this file with anyone who has Photoshop.
Editing an action
Editing an action is also really easy. In fact, action steps work just like layers in the Layers palette. Take the Sepia Toning action that we looked at earlier. If you want to move the Desaturate step to a different place in the action so it executes sooner (or later), then you can just drag that item as you would a layer in the Layers palette. You can also drag actions from one action set to another.
If you forget to record a step in an action, there’s no need to re-record the entire action. Just select the action, press the Begin Recording icon, do the step that you forgot, and press Stop Recording. Now you can reposition the step to where you need it in the action.

Scripts
Now we’re getting into the deep stuff here. Scripts are certainly the most powerful of any automation feature in Photoshop; however, with that power comes added complexity. I won’t lie to you, writing scripts can be a difficult task, but fortunately, you don’t have to know how to write scripts to use scripts. In fact, using a script is just as easy as using an automation in Photoshop.
The first thing you’ll want to do is go into Photoshop and look under the File>Scripts menu. Here you’ll see a few scripts that come with Photoshop right out of the box. Some are pretty self-explanatory. For example, Export Layers to Files does just what it says: It exports all layers in your PSD document to separate files. Toward the middle of the list you’ll see Layer Comps to Files, PDF, or WPG. These scripts simply take any layer comps you have in your PSD files and convert them to one of the options listed. The moral of the story is that if you’re not using layer comps then you should probably start because there are many benefits to doing so.
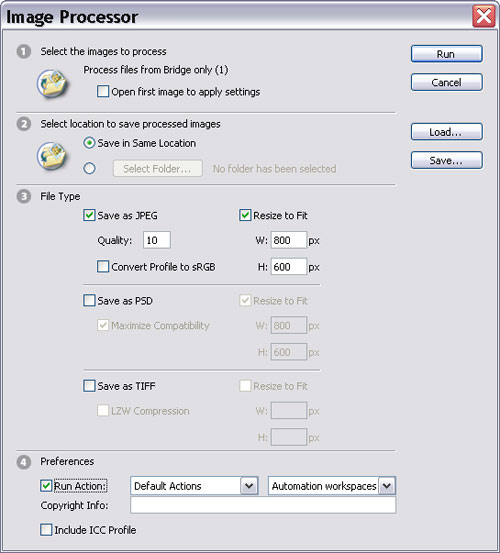
Some scripts that aren’t so self-explanatory include the Image Processor and the Script Events Manager. Image Processor will convert an entire folder of images from one format into another. You can even resize them so if you need to put some photos into a Web gallery, Image Processor can take care of it for you. This is especially useful if you shoot using RAW mode. With Image Processor you can easily convert all of your RAW photos to JPEG, PSD, or TIFF (or all of the above if you like). You can even specify an action to run during the conversion process to say, sharpen your photos.
—CREDIT: ©MATT KLOSKOWSKI
Another great script-related feature is the Script Events Manager. When Photoshop CS2 was introduced this was a feature that went largely unnoticed, but as more and more people got ahold of the latest version of Photoshop, they began to question what this new feature was under the File>Scripts menu. At first I didn’t think much of it but as soon as I realized what it did I remember saying, “Sweet!” The Script Events Manager gives us a revolutionary way to automate things in Photoshop. Essentially, you can program Photoshop to automatically run any action when you open, save, close, or even print an image. If you like using actions and automations then you’re going to absolutely love this new feature. If you want to learn more about the Script Events Manager, I’ve created a video tutorial at www.layersmagazine.com/magazine/downloads showing how easy it is to use.
One of the essential things to walk away with after reading this is that the Script Events Manager isn’t just for those programming-code-savvy people who know how to write and use scripts. If you can create an action in Photoshop, then you can use (and I mean really take advantage of) the Script Events Manager—it’s that simple.
Getting more done in less time
That’s really what it’s all about, isn’t it? Plus, these tools help you work smarter, not harder. I’m going to leave you with a few places to go if you want to learn more about working faster in Photoshop.
Adobe Studio Exchange (http://share.studio.adobe.com)
This is a must-visit for anyone who wants to get things done faster in Photoshop. This website is filled with a ton of actions, presets, and scripts that you can download for free.
Jeff Tranberry’s Photoshop Crawlspace (http://blogs.adobe.com/crawlspace)
Jeff is a Quality Engineer Product Lead at Adobe and has some excellent information regarding scripting and automation in Photoshop.
The Photoshop CS2 Speed Clinic by Matt Kloskowski (www.scottkelbybooks.com)
For a comprehensive resource to make Photoshop fly, check out my latest book. It’s all about helping you work faster in Photoshop. It’s not a cookbook of actions or shortcuts. Instead, it’s about teaching you what speed-related features are in Photoshop and showing you how to use them to get your work done faster.
