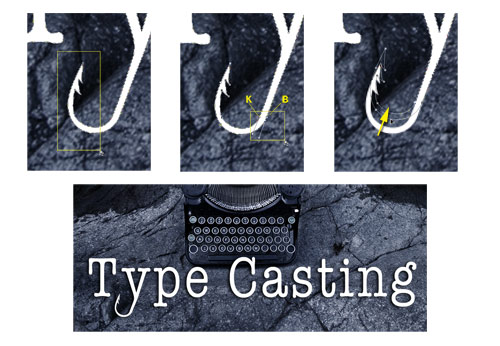
There’s an entire universe of typefaces available for your design and typographical needs, but some projects call for a letterform that’s a bit more customized than the fonts in your typographic tool kit. Take the case of this issue’s tutorial: a movie poster for a fictitious thriller not coming soon to a theater near you. For this torrid suspense tale set in the remote backwoods along a wilderness river, the letter “y” in the word “Type” needs to be transformed into a fishhook. We’ll explore one way to go about this by turning an existing text layer into a new work path, and then modifying it using the Pen tool to create a precise vector outline. Along the way, we’ll also explore a couple of timesaving tips for applying layer styles and changing type attributes on several layers at once.
Change Type Attributes on Multiple Layers
STEP 1 Select Multiple Type Layers
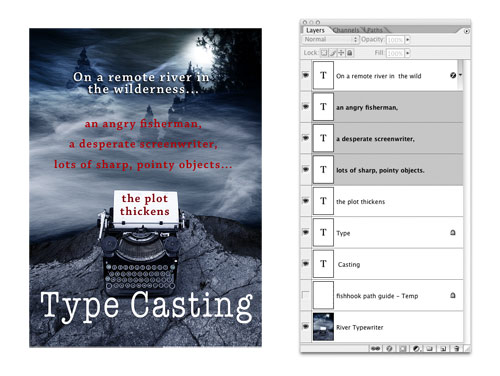
If you want to change the type attributes, such as color, point size, or font, on multiple type layers at the same time, there’s an easy way to do this. In the Layers palette, select the type layers you want to work with. If they’re all adjacent to each other, click on the first layer and then Shift-click on the last one; the layers you clicked on and any layers in between them will be selected. If the type layers are not adjacent, Command-click (PC: Ctrl-click) to select the layers you want.
SEÁN DUGGAN ALL RIGHTS RESERVED
STEP 2 Change Attributes with the Options Bar
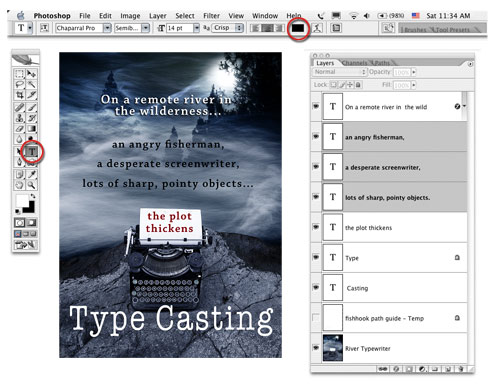
With the type layers selected, choose the Type tool from the Toolbox. Now, in the Options Bar, change an attribute for all the selected layers at once. For our example, we changed the color of three type layers from red to black by clicking the color swatch in the Options Bar and choosing a new color in the Color Picker, but you could just as easily change the size or the typeface.
Apply Layer Styles to Multiple Layers
STEP 3 Apply an Outer Glow Layer Style
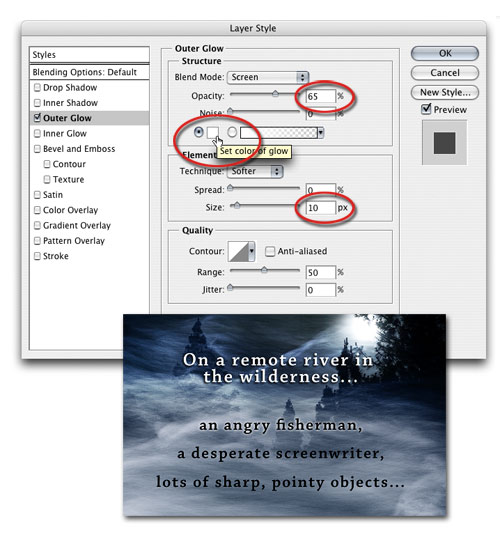
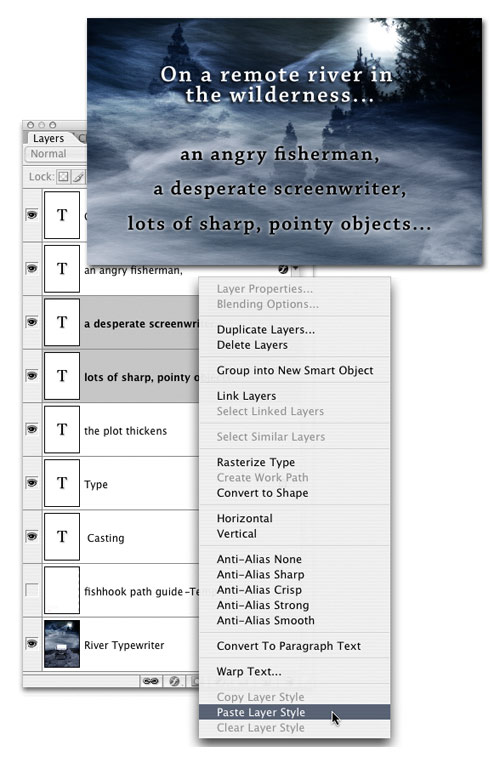
If you’re following along with the Type Casting poster image, click on the “angry fisherman” type layer to make it active. At the bottom of the Layers palette, click on the Add a Layer Style icon (the small italicized f) and choose Outer Glow. In the Layer Styles dialog, click on the small color swatch and change the glow to white. Set the Opacity to 65% and the Size to 10 pixels. Click OK to apply the Outer Glow.
STEP 4 Copy the Layer Style to Multiple Layers
Control-click (PC: Right-click) on the “angry fisherman” type layer, and from the contextual menu, choose Copy Layer Style (it’s near the bottom). Now, click on the “screenwriter” type layer and then Shift-click on the “pointy objects” type layer to select them both. Control-click (PC: Right-click) on these layers and choose Paste Layer Style from the contextual menu. You can also copy layer styles by holding down the Option key (PC: Alt key) and dragging the Layer Effects icon from one layer to other layers.
Create the Fishhook
STEP 5 Turn Type into a Work Path
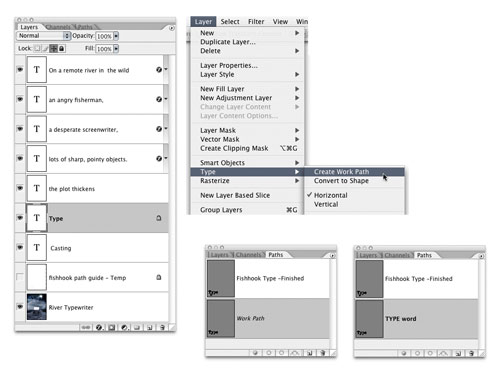
Click on the “Type” text layer to make it active. From the Layer menu, choose Type>Create Work Path (if you don’t have the American Typewriter font installed on your system, try changing it to Courier if you get a warning about this). A new work path will be added to the Paths palette. Double-click on the path and rename it “TYPE word.” For the rest of the tutorial we’ll modify the bottom of the letter “y” and turn it into a fishhook. (There’s a completed Fishhook Type path for you to use if you want to skip the path modification steps.)
STEP 6 Align the Path with a Guide Layer
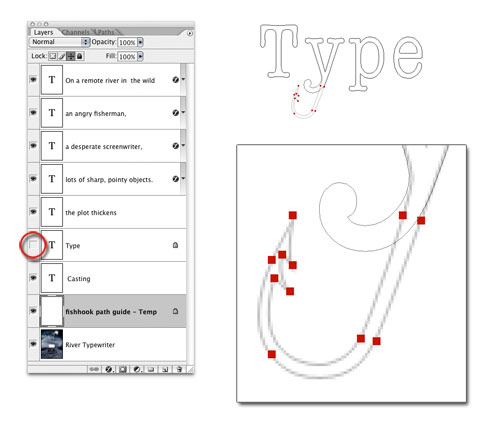
To make the path modification easier for those who are new to the Pen tool, we created a guide layer that’s above the main image layer. Turn on the visibility of the “fishhook path guide” layer and turn off the Eye icon for the “Type” text layer. The path you created from the word “Type” should already be aligned with the letters on the guide layer, but if it’s not, select the Path Selection tool (the black arrow), click-and-drag a box around all the path letters, and move the path until it aligns with the guide layer.
STEP 7 Delete the Bottom of the Y
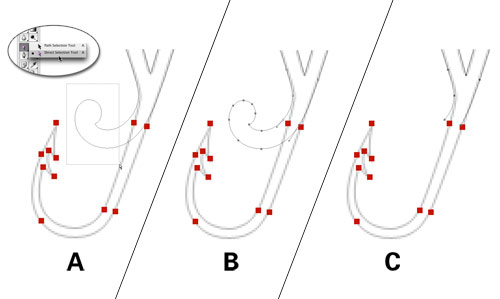
In the Navigator palette, highlight the zoom percentage in the lower-left corner, type in 500, and press Return (PC: Enter) to zoom in close. Press-and-hold the Spacebar to bring up the Hand tool and click-and-drag until you can see the letter “y.” In the Toolbox, select the Direct Selection Tool (the white arrow). Drag a box around the lower curled tip of the letter “y” (A) to select the anchor points that define that part of the letter (B). Press Delete (PC: Backspace) to remove those points and the line segments connected to them (C).
STEP 8 Adjust Anchor Points
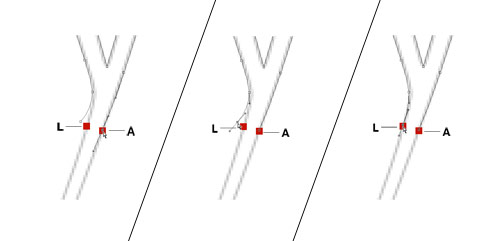
Deactivate the anchor points by clicking in a white area next to the path. With the Direct Selection tool (white arrow), adjust the position of the two points where the lower part of the letter was removed. Click on each point and move it so that it aligns with the corresponding red square on the “fishhook path guide” layer (points A and L as shown above). You may also need to adjust the control handles that extend from the anchor points to align the line segments connected to those points so that the lines conform to the guide as closely as possible.
STEP 9 Add a New Segment to the Path
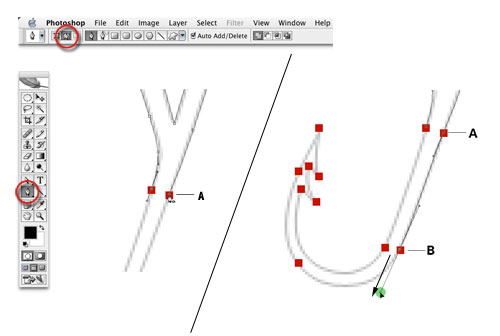
Choose the Pen tool then click on the Paths icon on the left side of the Options Bar. Move the tip of the tool over the point on the lower-right side of the tail of the letter “y.” A small square with a horizontal line through it will appear, indicating that you’ll connect a new line segment to the existing anchor point. Click on the point (A) and move the cursor down to the next red square (point B). In one movement, click-and-drag down at the same angle as the upper part of the line, pulling out a control handle.
STEP 10 Trace the Fishhook Shape
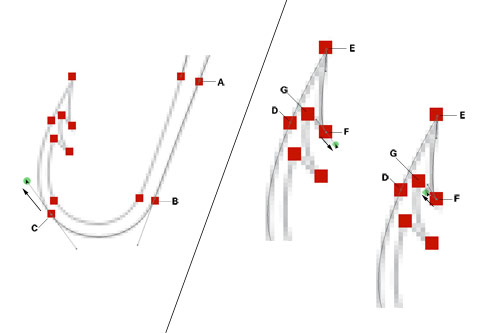
Click on the next point (C) and drag up in the direction of the curve after the point. Click-and-drag on the next point (D) and then on the tip of the hook (E). Next, hold down the Option (PC: Alt) key, click on the end of the right control handle of point E, and pull it down to change direction and create a cusp point. Click on the tip of the first barb (F) and drag out away from the tip. Now hold down Option (PC: Alt) and click-and-drag the right control handle back in the direction of the barb.
STEP 11 Create the Barbs
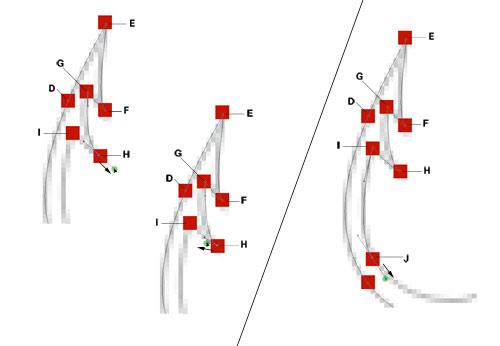
Click on the next point (G), hold down Option (PC: Alt), and change the direction of the control handle to follow the barb, as in the previous steps. Click on the tip of the second barb (H) and stretch out the handle to fit the line to the slight curve of the barb. Option-click-and-drag (PC: Alt-click-and-drag) to change directions back toward the final red square on the inner part of the barb (I). Option-click (PC: Alt-click) on this point and drag down toward the next point (J) on the inner side of the bottom part of the fishhook shape.
STEP 12 Close the Path and Fine-Tune
Keep tracing the shape of the lower curve by continuing to points K and finally up to L to connect to the final open point and close the path. Use the Direct Selection tool (white arrow) to fine-tune any of the curves or control handles to get the hook shape looking the way you want it. When you’re finished, click the Eye icon of the “fishhook path guide” layer to hide it.
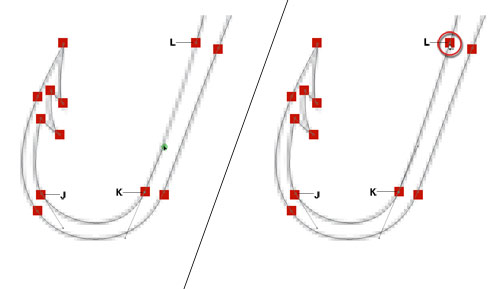
STEP 13 Add a Shape Layer Based on the Modified Path
Press D to set the default Foreground/Background colors, then press X to place white into the Foreground swatch. With the modified “Type” fishhook path still active, click on the Create New Adjustment Layer icon at the bottom of the Layers palette and choose Solid Color from the contextual menu. The color for the layer should already be white since that’s the Foreground color. Click OK to add a white fill layer in the shape of the modified path.
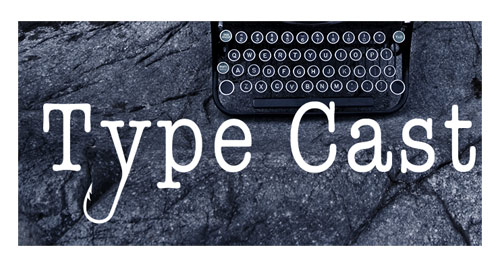
STEP 14 A Final Tweak to the Hook
After seeing the finished Color Fill 1 layer, we decided to make the hook shorter. To do this, use the Direct Selection tool to drag around the barb of the hook. Then hold down the Shift key and drag around points B and K as shown to add them to the selection. Click on the lower part of the hook and drag upward along the same angle as the shank to bring it closer to the upper part of the “y.” Finally, we added a drop shadow layer style to both the fishhook Color Fill 1 layer and the “Casting” type layer.
