
Hello all and welcome to the challenging world of black and white photography. Everything should be simpler when processing B&W images, right? After all, everything exists in shades of gray, doesn’t it?
In this tutorial I describe color toning of a black and white image using tools available within Photoshop CS3. All you need to follow along with this tutorial is a black and white image, your CS3 software, and some quirky ideas.
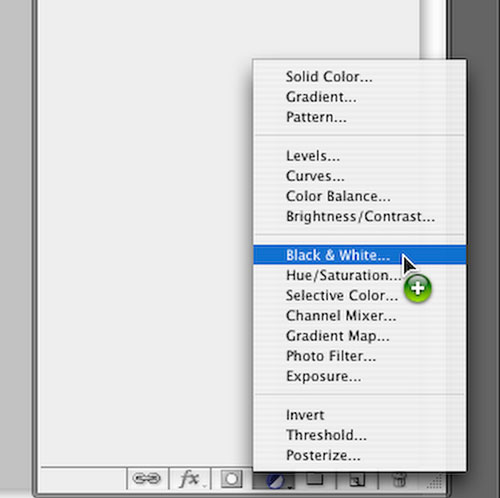
The first thing you do is convert one of your color images (select one of your favorites) into a black and white image. There are many ways to do this, however, for this tutorial you simply use a black and white adjustment layer. Select the New Adjustment Layer icon in the bottom of your Layers Palette. Choose Black & White. Then click OK at the New Layer dialog. Presto, the black and white adjustment layer tool converts your color image to a gray scale image and you now have a black and white image.

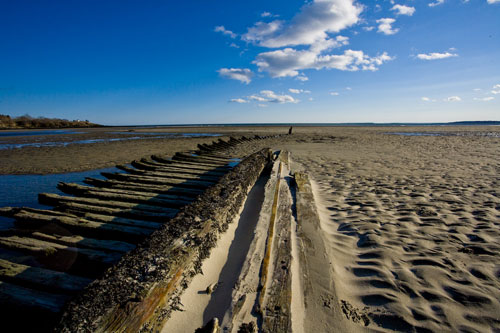
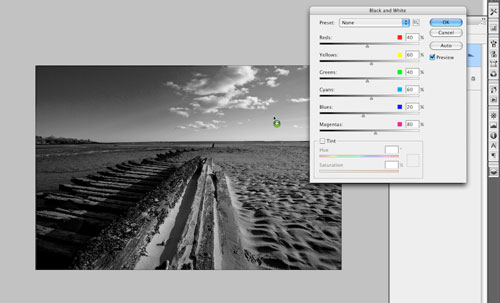
The reason I prefer this method, as opposed to simply changing your Image Mode to gray scale (a common way of converting to black and white) is that by using the Adjustment Layer you are able to adjust each color channel individually. This allows you to adjust different sections of the image separately to your personal liking. For instance, on my shot of the remains of a shipwreck, I wanted to darken the sky. To do this I selected Layer>New Adjustment Layer>Black & White. After clicking OK, when the slider dialog opened, I simply moved my cursor inside the image and using the eye dropper tool on the sky, dragged my cursor to the left.
Once you have your black and white image adjusted, you are ready to perform the color toning process. To do this, open a new curves adjustment layer by clicking on Layers>New Adjustment Layer>Curves.
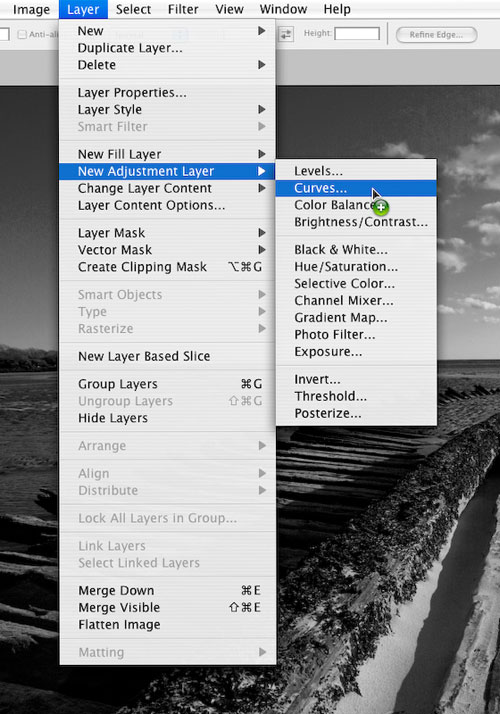
There’s a reason here for opening the new adjustment layer using your tool bar, rather than using the Adjustment Layer icon in your Layers Palette. By using the tool bar you are able to choose your blending mode. Under the Mode drop-down menu, choose Color.
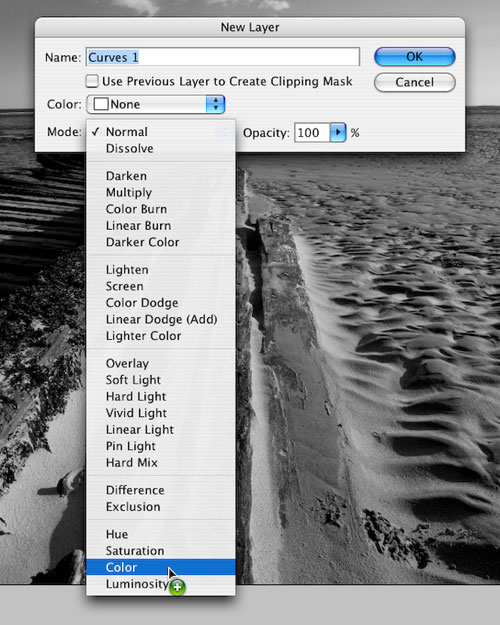
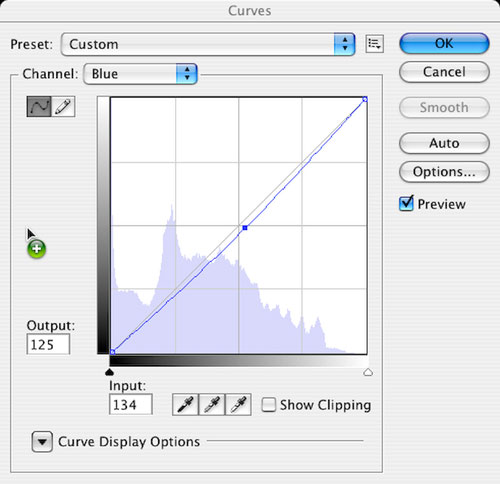
After clicking OK to create the new layer, the Curves Adjustment Panel will be opened. Select each color channel individually from the RGB drop down menu.
This is where your personal preferences kick in. At this point, ask yourself questions like, ‘What mood am I looking for?’ ‘Is there a particular darkroom toning method I am trying to reproduce?’ or even, ‘I wonder if I can recreate the colors from my old college tie-dye t-shirt?’ These questions will help you choose which colors to increase and which ones to leave alone or maybe even decrease.
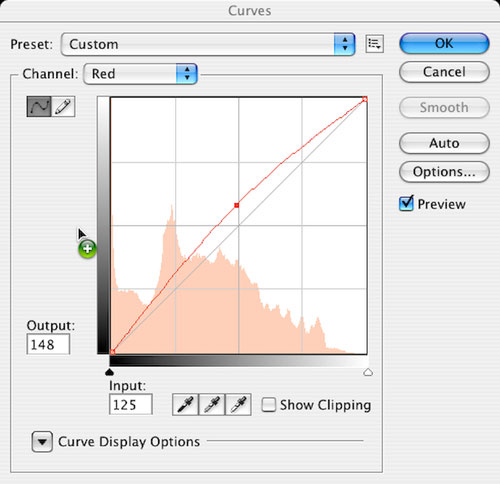
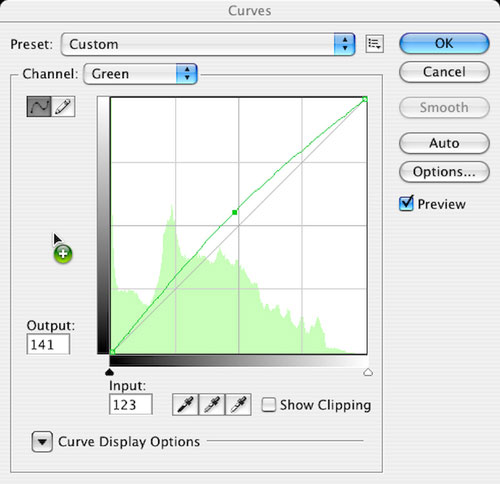
For example, for my shipwreck shot, I was going for a vintage look, almost like the sepia toned prints of the days of yore. To accomplish this look, I first grabbed my red channel curve – by the way, I recommend grabbing right in the middle – and pulled up.
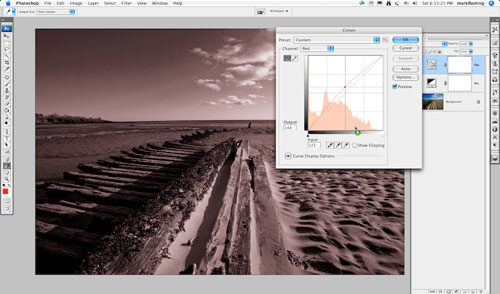
Keep in mind that this is all by ‘feel’ at this point. Let me point out, however, that the image will appear a bit wacky until you have adjusted each color channel. After I boosted the red quite a bit, I moved on to the green channel. I pushed the green channel up a bit as well, though not as much as the red. Finally, I moved on to the blue channel. In this channel I grabbed the middle of the curve once again. This time, however, I pulled it down a bit.
It is at this point you begin to get the feel of how your image will look. Once you have created a look you like you can then go back through each layer and tweak as necessary.
After tweaking, and a bit of fun pushing each channel to the max, you will have your finished a toned black and white image.

Don’t forget, sepia is just one option. I have also included a shot where I used the opposite effect, toning it more blue than red. This feeling has a much more dramatic look, focusing your eye on the texture and detail of the scene. Remember, there are no rules here. If you want to tone an image green – then go for it! Gold? Sure, why not! It’s up to you from here gang. Good luck and happy toning.

