
Screencast Success
Question: My company has given me the task of creating training videos for the various applications we use here in each department. I have a year-old laptop that I will use to capture the training clips. Can you suggest any hardware upgrades I should make, along with any tips for recording the best video clips possible of the screen?
Answer: For many years now, capturing high-quality “screencasts” has been one of the most difficult chores faced by instructors and corporate trainers tasked with educating as many people as possible, as fast as possible, with as few resources as possible. I don’t envy you one bit! But I definitely have some tried-and-true tips that will make the whole process go a lot smoother for you.
Many people are under the misconception that recording your screen is an easy task that doesn’t demand many physical or technical resources. The reality of the situation is exactly the opposite. For example, let’s say that you wanted to capture a screencast of a tutorial on Adobe After Effects. You first need a computer system that can run After Effects smoothly and without incident and then have enough overhead to run a video capture utility that can record all of the multilayer video clips that are playing as you apply filters, color correction, animated text, moving graphics, and assorted effects—all at the same time! This is definitely not something you want to tackle on a weak system.
Rejuvenate your laptop
So on the hardware side, besides buying a brand-new multiprocessor computer that’s used exclusively for capturing recordings of your screen actions, the next best thing you can do is add as much memory as your system can support. On most laptops, that usually ranges from 2 GB to 4 GB of RAM. Do I think 4 GB is too much? Not at all. This is because many of the most popular video screen capture utilities for both Mac and PC use a postprocessing method to actually record the clips to your hard drive. It works like this: You start the utility, which immediately begins caching into RAM all of the video frames that will eventually make up your final video clip. If the program runs out of physical RAM, it moves to virtual RAM, which is a scheme that uses the free space on your hard drive to store information dynamically. When you finish your tutorial and stop the screen recording, the program then starts to compile the video clip into your preferred codec and save it to your hard drive as if your were rendering out a video clip from your favorite nonlinear video editor. The advantage of this postprocessing method is that it ensures that the video is captured without any sort of interference or dropped frames. The only downside is that you will have to wait for the video to render after you’re done with your recording session.
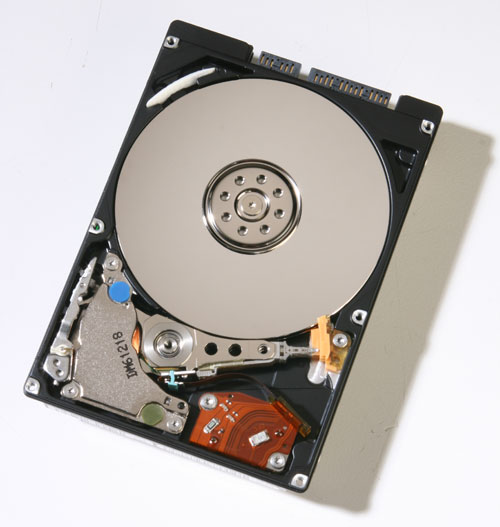
Another piece of hardware to look at is your internal hard drive. Historically, laptop drives are usually twice as slow as their desktop counterparts, so odds are yours needs to be replaced. When you’re looking for a replacement, you want to find the largest capacity (200 GB+) and fastest spindle speed (7200 RPM+) 2.5″ drive you can afford. After reading some reports online, I recently purchased a 200-GB, 7200-RPM, 16-MB buffer, Serial ATA/15 Hitachi Travelstar 7K200 (model # 0A50940). It beats all other 7200-RPM spindle drives in its class in all speed tests and is by far the best laptop drive I have ever owned. Highly recommended! [For a review of the Hitachi Travelstar, turn to page 110.—Ed.]
Time to record
Now that you’re ready to record your screencast, you’ll want to present your message as clearly and as focused as possible. Here are some quick tips on how to best hold your audiences’ attention while causing the fewest distractions possible:
1. Avoid unnecessary mouse movements while you’re recording your clip. Besides the fact that this can cause a larger file size than necessary (especially at lower frame rates), it can also be terribly annoying. It usually happens with people who are used to gesturing with their hands as they speak in person and then they transfer that behavior to their mouse when they record a video. While gesturing can help tell a story during a face-to-face conversation, it’s terribly distracting when you’re watching a screencast where the cursor has been possessed by the devil.
2. Clean up your desktop of all miscellaneous icons. Nobody likes to walk into a cluttered and messy room and no one likes to be distracted by a cluttered and messy desktop.
3. Have a neutral or solid color desktop pattern/picture. A picture of your favorite NASCAR driver with his pit crew, or you on vacation at Mardi Gras is just not appropriate for this type of video presentation. Even company logos can be distracting. You want the viewers’ attention to be 100% focused on the information you’re presenting to them.
4. When capturing video of the whole screen, hide your computer’s clock if it’s visible. The changing time will distract the viewer and if you have to do any editing, it will make it a whole lot easier. (I always laugh when a clock jumps several hours during a 15-minute video clip!)
5. Set your screen resolution to something smaller than what you normally use. Odds are you’re not going to need to deliver a screencast at 1440×900, so change your screen resolution to something smaller and make the clip easier to edit, download, and view.
6. Consider setting up a new user account on your computer exclusively for capturing screencasts. This way you can set up all of the above tips just one time in a separate, pristine environment specifically for your recording sessions and then switch to that account (and those settings) in just a few quick seconds (while leaving all your current work—and mess—behind).