
For those of you who are either parents and shoot your kids playing sports or photographers who practice sports photography at local events, you've probably used the easy access at school and youth league levels to hone your skills and develop a good eye for the best kind of action shots. If you've ever watched Scott Kelby's class on KelbyOne.com, "Beginner Sports Photography," you'll have learned how to capture those great shots from those key moments in a game. If not, go sign up and watch now!
A lot of these images will probably go straight into your portfolio, but think about some of those great shots that only ever end up online. These are the types of photos that would look great adorning the front cover of a magazine and other sports memorabilia, so why not use your Photoshop skills to create something simple but effective for your kids. Or even better, if you're a working photographer, you can create these kinds of products to add to your sales portfolio. For the following techniques, we'll be using a combination of photographic images, smart objects, layer styles, shapes, and the Type tool.
ON THE COVER
We're going to show you how to lay out and build a quick sports magazine cover template that can be used for multiple sports and images. We'll then use those same images and template to create trading cards. Let's start with the cover.
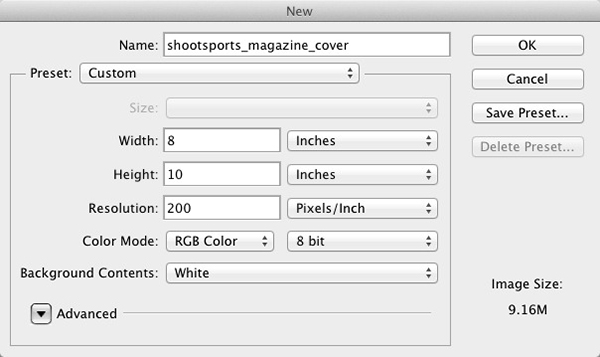
STEP ONE: First, you need to create a new file in Photoshop, so go to File>New. We're using Photoshop CC here but this will work in older versions, as well. Keeping in mind that this will be output to an online print service, we'll use the specifications required by that service for this particular tutorial. So create a file that's 8×10″ (203.2x254mm) at 200 ppi.

STEP TWO: Press Command-R (PC: Ctrl-R) to turn on the Rulers. Turn on View>Snap so you can drag guides from the Rulers to the top, bottom, and sides of the document. This is because we need to add a bleed for printing, but unlike Illustrator and InDesign, Photoshop doesn't include a bleed setting option.
STEP THREE: Go to Image>Canvas Size. We want to add a 3-mm bleed for both the Width and Height, so click the Relative box, select Millimeters in the drop-down menu next to the Width field, and type the number 6 in each field to add 3 mm to each side of the document. Ensure that the Canvas Extension Color drop-down menu is set to white, and click OK.
You'll now see the canvas extends beyond the guides that you set in Step Two. This is your bleed area. Ensure that anything that you want printed is not in this area, including text or any important parts of your images. Our canvas is now ready to begin adding layers.

STEP FOUR: This project will show you how to create three different magazine covers in one easy file. You can later tailor this to suit your own needs depending on what you want to create for your client or yourself. The first images we'll place into the file are the themed background images; in this case, stock photography images of a football field, a dirt track, and a baseball image. Choose File>Place, navigate to one of your images, and click the Place button to place the first image.

STEP FIVE: A placed image will already be in Free Transform so you can resize it to fit the page however you prefer. Always hold down the Shift key to resize proportionally. In this case, we want some of the yard numbers on the football field to show on the right edge of the final design. Keep the bleed area in mind when resizing and positioning; anything outside of the guides will be cut off. Press Enter to commit the placement.

CREDIT: PHOTODUNE.NET, ANTPKR

STEP SIX: Then, we'll place the other two images and resize and position them to suit the canvas for the best effect. Each background image will appear on its own layer in the Layers panel. We also reordered the layers by clicking-and-dragging them in the Layers panel.

CREDIT: PHOTODUNE.NET, SCUKROV

CREDIT: PHOTODUNE.NET, BONNINSTUDIO

STEP SEVEN: We're going to work on the football image first, so click the Eye icons next to the other two image layers so their visibility is turned off. Then, click the top layer and Shift-click the bottom image layer to select all three layers in the Layers panel. Right-click any of the selected layers and select Convert to Smart Object. Double-click the name of this smart object layer and rename it "sport-theme-layer." This will allow us to later go back into the smart object and turn the layers on and off as we need them.

STEP EIGHT: Now we'll place our first main player photo. As mentioned above, we'll be using three different types of images—football, baseball, and motocross—just to show how this layout can work with any sport and how the above backgrounds will complement these images. We'll also be using smart objects to easily swap out these main images, as with the backgrounds.
So go to File>Place and place your first edited image into the canvas. Again, use the Free Transform handles to resize and position the image so that the background image still shows behind. Keep in mind we have to add a title and some fun text to the cover, as well. Repeat with the other two images, and once again, stack them in the same order, per the background image layer order.
STEP NINE: Hide the visibility of the baseball and motocross layers for now. As before, select these three layers and convert them into a smart object. So now we have our three background images loaded and converted to smart objects, as well as three player images loaded and converted into smart objects. This gives us a total of three layers, but we can actually delete the original Background layer, as we don't need it anymore. Just click on it to make it active in the Layers panel, and press Delete (PC: Backspace). All we need is the background theme and the player layers.

CREDIT: MELISSA REYES-ABBEY

STEP TEN: Next, we need a font suitable for a magazine-style template. For this fun project, we can look at places such as www.dafont.com. Remember that not all of those fonts can be used commercially, especially for those people looking to sell this kind of project as part of a service to customers; for fun, you'll be okay.
I recommend www.fontsquirrel.com, as they have a great selection of commercial usage fonts. When designing something like this, we need to have an idea of a suitable kind of font. Look online for magazine covers and posters. Google will provide a lot of information. In this case, we obviously need a sports font. For football, we can use a traditional college football-style font but this will restrict us to just football when creating a template. Research some fonts for other sports and keep them noted somewhere. A good idea is to create a Photoshop file called "Sports Fonts" and type the names of fonts using that font style for future reference.
For this first project, we're going to use just two fonts but there's nothing stopping you from using different fonts for each cover title. By typing "sport" into the search field on FontSquirrel.com, I came across the font Sportrop, which is a nice, modern font with a retro multiline kind of feel.
In the results, you'll also see two college football-style fonts. We can use these later on for the additional text on the cover. And remember, for those on the Creative Cloud, you'll have access to Typekit and there will be an abundance of fonts on there that can be used commercially. For now, we'll continue as though we don't have Typekit.

STEP ELEVEN: Press D then X to set your Foreground color to white. Now, with the Type tool (T) active and the Sportrop font selected in the Options Bar, we'll type the word "SHOOTSPORTS." Unless you specifically set a font size, you'll have to resize your font to fit. You can do this a couple of ways. Either double-click the text with the Type tool to select all the letters, and then hover the cursor over the TT icon next to the font size field in the Options Bar and scrub left or right to resize, or just hold the Command (PC: Ctrl) key and Shift-drag the bottom corner of the type onscreen to resize proportionally until the title fits.


STEP TWELVE: Next we'll add a stroke to the type to make it stand out. Click on the Add a Layer Style icon (fx) at the bottom of the Layers panel and choose Stroke. We'll select a color from the player image to keep the style the same. For this, we'll click on the Color swatch, go to the Options Bar and set Sample Size to 5 by 5 Average, and Sample to All Layers, and click a blue color on the shirt. Click OK to close the Color Picker. Make the stroke Size about 18 px to beef the font up a bit. Click OK.


STEP THIRTEEN: Let's add another stroke. To do this, convert the type layer to a smart object, click back on the Add a Layer Style icon, and apply another stroke of approximately 3 pixels in white, and click OK. Because it's a smart object, we can change the title or font and the layer style will still apply. To change the text, double-click the smart object thumbnail for the text, make your changes in the file that opens, and then save and close that file. Some fonts may need the layer styles readjusted, as the stroke may be too bold or too thin for them.


STEP FOURTEEN: We'll also add a stroke to the player image layer of about 30 px in white to make the image pop from the background. Because this is a smart object it will apply to all three images in the smart object when we swap them out. Make sure you set the Position drop-down menu to Inside to give a nice, square, sharp corner on the image. Click OK. Press Command-T (PC: Ctrl-T) for Free Transform. Click the cursor just outside of the bounding box and drag to apply a small rotation to the image, just enough to still fit within the print area. Press enter to commit the transformation.


STEP FIFTEEN: Now we'll add some "furniture" text to the cover. You can make this very specific to the person in the image, but for this example, we'll make it generic to show the layout and use of spacing around the player image. As we're going to make this into a trading card, as well, keep that design style in mind.
Select the Rectangle tool (U), and make sure the Foreground color is set to white. In the Options Bar, select Shape in the drop-down menu on the left, and drag a rectangle across the bottom third of the image, as shown here.

STEP SIXTEEN: Click the Add Layer Mask icon (circle in a square) at the bottom of the Layers panel, switch to the Gradient tool (G), and click on the Linear Gradient icon in the Options Bar. Right-click in the image and select the Black, White gradient in the Gradient Picker. With the layer mask active in the Layers panel, hold the Shift key and click-and-drag your cursor in the rectangle about a third of the way from the left to about a third of the way from the right. When you release the mouse button, you'll see that a gradient mask is applied, fading out the white rectangle on the left.
Now that we have the text set, let's make the white rectangle shape match a color from the shirt; the light gold is a good choice. Double-click the rectangle shape layer thumbnail in the Layers panel to open the Color Picker, and then click on different areas in the photo with the Eyedropper until you find a tone that suits the layout. Click OK.


STEP SEVENTEEN: Now we'll type some fun text. Using the same dark blue from the stroke on the header title and selecting the Sports World college football font that we downloaded from FontSquirrel.com, we'll add the following two lines of copy: #1 JUNIOR CHAMP 2013, and EXCLUSIVE INTERVIEW. Again, here you can add the player's name and team details to make it more personalized.
Select both text layers in the Layers panel, Right-click on one of them and select Convert to Smart Object, and apply a 3-pixel white Stroke layer style to the smart object layer. Also, click on Drop Shadow in the list of Styles on the left side of the Layer Style dialog to apply a 10-px drop shadow to the layer using the settings shown here. This means that if we were to change the text in the smart object, the layer style will apply to the new text. Click OK to close the Layer Style dialog.


STEP EIGHTEEN: This step is more of a marketing tip. Create a Google shortener URL on goo.gl, click on the Details link, Right-click on the QR code it creates, and select Copy Image. Paste this onto the front of the cover in the bottom left-hand corner. When your clients show their cover to friends and family, they can scan the QR code, which is programmed to go to your chosen website—you can even track the clicks.

STEP NINETEEN: Now that we have a quick magazine-style cover ready to print, let's go back to the other images to show how we can easily create two more covers. Double-click the sport-theme-layer smart object thumbnail in the Layers panel. When this file opens, hide the visibility of the football field layer and turn on the baseballs layer, ensuring the bike-tracks layer is also turned off. Close the file and click Save. This will update that layer in our magazine image. Now repeat this with the player layer and turn on the baseball pitcher image and turn the visibility of the other two layers off in the smart object.

CREDIT: MELISSA REYES-ABBEY
STEP TWENTY: Now that you have the baseball theme and image, repeat this again for the motocross theme and image. If you only had one theme layer and one player layer, another way to quickly replace these images is to Right-click each smart object layer and choose Replace Contents. In the Place dialog that appears, locate the file you want to replace this with, and click Place. This will update the image and give the same result.

CREDIT: PHOTODUNE.NET, DOTSHOCK
THE TRADING CARD
Now we'll build a trading card using the same images and file size but a different layout. For this layout, we don't need the rectangle shape, QR code, or the text that we used for the magazine cover layout, so go ahead and delete those layers in the Layers panel.
STEP ONE: Use the Move tool to drag the player image up and over to the left so that it bleeds off the canvas, as shown in the example. We need room to add some text and ribbon shapes at the right side and bottom of the card for the player's name, team name, and position of the player.


STEP TWO: Let's change the color of the stroke around the player image and add a glow. Double-click the word "Stroke" that appears below the image layer in the Layers panel to open the Layer Style dialog. Click the Color swatch and sample a color from the image. Click OK to close the Color Picker.

STEP THREE: Click on Outer Glow in the list of Styles. Click on the color swatch and pick a similar color to the Stroke color. Increase the Size until you get the glow that you want, and click OK.


STEP FOUR: For the ribbon shapes on the trading card, we'll use some custom shapes. There are many custom shape resources on the Internet. The shapes we're using here cost $4 from an online vector resource. The more advanced user could make these in Illustrator but for ease and speed, we'll use a custom shape. Select the Custom Shape tool (nested under the Rectangle tool [U]) in the Toolbox, and then in the Options Bar, select the shape you want to use from the Custom Shape Picker. If you downloaded a set of shapes, click on the gear icon at the top right of the Custom Shape Picker, and select Load Shapes.

CREDIT: RIBBON SHAPES: GRAPHICRIVER.NET, IDEAOFART
STEP FIVE: Make sure Shape is selected in the drop-down menu on the left side of the Options Bar, and then click on the Foreground color and sample a color from your image (gold in our example). Draw your shape, then duplicate the shape layer by pressing Command-J (PC: Ctrl-J) twice so that we now have three ribbons. Using the Move tool, distribute them approximately where you want them, select all three layers, and then click the Distribute Vertical Centers icon followed by the Align Left Edges icon in the Options Bar.

STEP SIX: With all three layers still selected, convert them to a smart object. We can now add a couple layer styles that will apply to all three ribbons at the same time. Apply a Bevel & Emboss using a 3-px Inner Bevel, followed by an 8-px Stroke, sampling some of the red from the player's shirt. This is just to introduce a vibrant color to the card.


STEP SEVEN: Next, we'll type the player's name, position, and year of season (we're using the college font that we downloaded from FontSquirrel.com). Set your Foreground color to white, type the player's name first, and place it over the top ribbon. After adjusting the font size to fit, use Free Transform to angle the word to align with the ribbon. Then, add a simple 3-px Drop Shadow layer style to make the text pop.

STEP EIGHT: To get the next two layers of text exactly the same, we'll duplicate the current text layer twice, and align each layer over the ribbons. Then, use the Type tool to edit each layer with the player position and season year in the final two ribbons. We're going to add a larger ribbon for the team name at the bottom of the card, so select all the ribbon and text layers in the Layers panel and drag them further up the card using the Move tool.

STEP NINE: Now let's add the additional larger ribbon at the bottom for the team name. Set your Foreground color to the same color that you used for the original ribbons. Select a new ribbon shape from the Custom Shape Picker, and while holding the Shift key, drag it out so it's proportional in shape to the original. Then, Right-click on the original ribbon layers smart object in the Layers panel and choose Copy Layer Style, then Right-click on the new ribbon layer and select Paste Layer Style. This keeps all the effects uniform.

STEP TEN: Next, we'll add the text for the team name, OUTLAWS. This time, choose the bold version of the font that you used for the other ribbons. Set your Foreground color to white, click outside of the ribbon shape so that you're not typing on a path, and resize the text over the ribbon. We're going to use the Warp Text tool (Type>Warp Text) to arc the word over the ribbon, rather than using the shape and typing on a path. Center the ribbon and name, apply another 3-px Drop Shadow to the text, and click OK.


STEP ELEVEN: To see how this card will look for the baseball player, just repeat the steps from the magazine cover for replacing the player and background images, and then all you need to do is change the text to something more of a baseball-style font. We used Marcelle Script from dafont.com, but remember the licensing if selling the image. You can also play around with the ribbon shapes or add new ones. Just experiment and make sure you group each set of ribbons and text so that you can easily swap them back and forth.

This article courtesy of Photoshop User magazine, the official publication of KelbyOne, which provides quality online education for creative people. For more information, visit KelbyOne.com.
