
The goal of many photographers is a well-exposed photograph where you can see all the important details, but sometimes less is more and the overall aesthetic of an image can actually be improved by adding a generous dose of darkness to the scene. In the shadows and dimly lit areas there’s more room for the imagination to wander. By presenting just the framework of the image, the viewer becomes a more active participant at filling in the details of the story the image is telling, or perhaps finding a new story. In this tutorial we’ll visit the “dark side” and take a look at some examples of this concept in action.
Enhance an Image with Darkness
STEP 1 Select an Appropriate Image
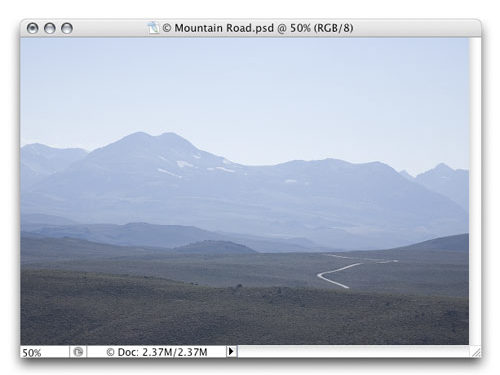
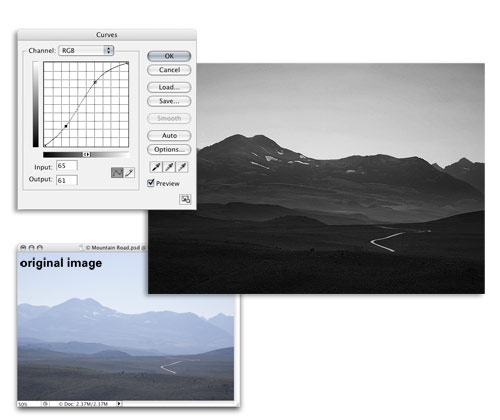
Sometimes, the direction of the sunlight and other conditions leave photos looking a bit blah. Take this example of a lonely road climbing into the mountains; it was late afternoon, very hazy, and I was shooting into the sun. The result is a washed out, almost monochromatic image that lacks all of the dramatic punch that would have been present early in the morning. Unfortunately, returning when the light was better wasn’t an option on that day. But by drastically darkening the image we can transform this into something very cool.
CREDIT: SEÁN DUGGAN ALL RIGHTS RESERVED
STEP 2 Apply Grayscale Effect
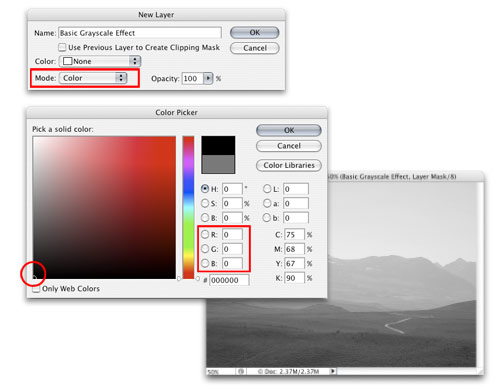
Because this image has very little color in it, the first step to improve it is to add a grayscale effect. There are several ways to accomplish this but we’ll use a simple method that works well for images that don’t have a lot of inherent color differences. From the menu bar, choose Layer>New Fill Layer>Solid Color. In the New Layer dialog, name this layer “Basic Grayscale Effect.” At the bottom of the dialog, click on the Mode drop-down menu and choose Color. Click OK. In the Color Picker that appears, set the color to black and click OK.
STEP 3 Overall Darkening with Multiply
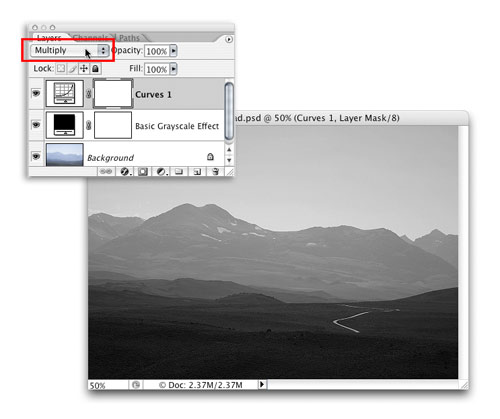
Now that we have created the grayscale effect, it’s time to turn down the lights and liven up this image. Click on the Create New Adjustment Layer icon (the half-black, half-white circle at the bottom of the Layers palette) and choose Curves. Click OK without making any changes to the curve. With the new Curves 1 layer active in the Layers palette, change its blend mode to Multiply. This will create a strong darkening effect. The image is looking better already, but we still have some more targeted darkening to apply.
STEP 4 If Your Original Is a RAW File…
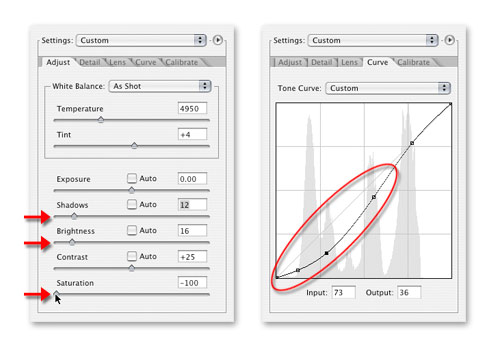
If you’re working with a RAW file, you should apply both the grayscale affect and the initial darkening in the Adobe Camera Raw dialog because changes applied there will not degrade the tonal qualities of the image. This is important because the modifications we’re making here involve significant changes. In the Adjust tab of the Camera Raw dialog, move the Saturation slider to –100 to create the grayscale effect. Move the Brightness and Shadow sliders to darken the image, and you can also use the Curve tab to further refine the darkening effect.
STEP 5 Darkening Just the Top Half
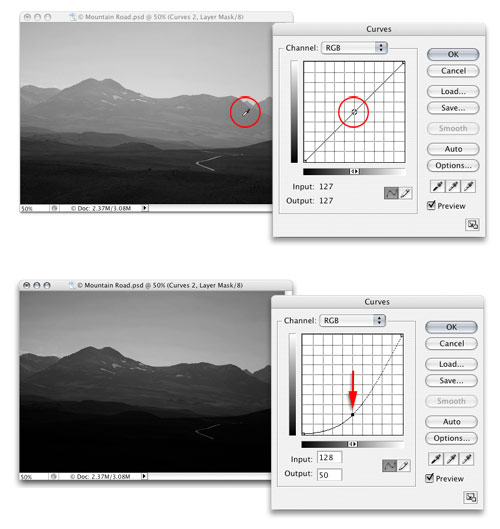
The top half of this image is still too light. To fix this, click the Create New Adjustment Layer icon and choose Curves. Move your cursor over the mountain in the photo and click-and-hold to see a circular indicator on the curve that shows where you need to target the adjustment. Command-click (PC: Control-click) on the mountain to place a point on that part of the curve. Drag down on this point in the Curves dialog to darken the image (as shown). The Input value on our curve is 128 and the Output value is 50. Click OK.
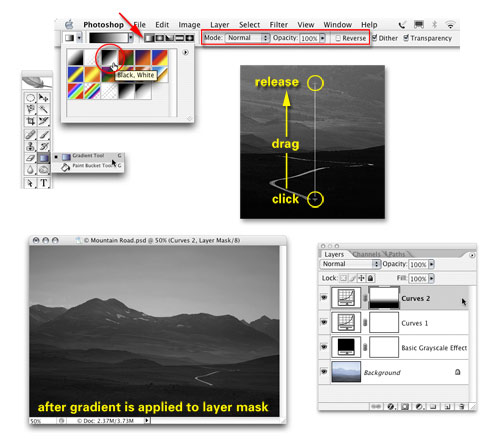
STEP 6 Add a Gradient Mask
Choose the Gradient tool (G). Click the Gradient Picker up in the Options Bar and click the third swatch from the left to choose a Black, White gradient. Click on the first icon to the right of the Gradient thumbnail in the Options Bar to select Linear Gradient. The Mode should be Normal, the Opacity 100%, and Reverse should not be checked. In the image, click at the bottom tip of the road, hold down the Shift key, and drag up to the middle part of the right side of the mountain. Release the mouse button to add the gradient.
STEP 7 A Final Contrast Tweak
The addition of the gradient mask really helps to balance out the tones on the image. If you’re unhappy with how your gradient is affecting the image, simply keep dragging new gradients in the layer mask until you get something you like. Each new gradient will replace the previous one. As a final tweak to this image, I added another Curves adjustment layer to boost the contrast a little and add to the stark, moody appearance created by the empty landscape and the lonely road.
Day for Night
STEP 1 Add Darkness and Contrast with Curves
Photographing at night is rewarding and can produce great results, but you don’t have to wait until the sun goes down to achieve this effect. You can use the old movie-making trick of shooting “day for night”; that is, photograph in the day and create the nocturnal effect afterwards. Let’s explore this concept with a photograph of an abandoned desert train station. The first thing is to darken the image and add some contrast. Click on the Create New Adjustment Layer icon, choose Curves, and add a darkening curve like the one shown here. Click OK when you’re done.

CREDIT: SEÁN DUGGAN ALL RIGHTS RESERVED
STEP 2 Copy the Curves Layer
Next, increase the darkening by making a copy of the Curves 1 adjustment layer. To do this, drag the layer to the Create a New Layer icon at the bottom of the Layers palette, or just choose Duplicate Layer from the Layers palette flyout menu. The effect of both the curves layers is a bit too dark, so lower the Opacity on the Curves 1 copy layer to 60%.

STEP 3 Add a Hue/Saturation Layer
Now the image is darker and has more contrast but the colors are much too bright and saturated for how this would really look in the moonlight. To fix this, click the Create New Adjustment Layer icon and choose Hue/Saturation. In the Hue/Saturation dialog, click the Colorize checkbox and set the Hue to 210 and the Saturation to 40. Click OK. This adds a bluish monochromatic tint to the image to suggest moonlight. But even in moonlight, colors can still be apparent, so lower the Opacity for this layer to 50%.

STEP 4 Select the Sky
Now let’s darken the sky. Click the Eye icons for all the adjustment layers to hide them and click on the Background layer to make it active. Choose Select>Color Range. In the Color Range dialog, make sure that Sampled Colors is selected and Fuzziness is set to 40. Click in the sky area of the image to start the selection. Look at the black-and-white mask preview and then Shift-click in the image in parts of the sky that don’t show as white in the preview. Continue until all of the sky in the preview is white and click OK.

STEP 5 Darken the Sky
You should now have a selection active in the sky area of the image. Turn on the Eye icons for the other adjustment layers and click on the top layer in the layer stack to make it active. Add a Curves adjustment layer. In the Curves dialog, drag down slightly on the curve to darken the sky to taste (for our control point, the Input is 155 and the Output is 128). Click OK. The selection has been turned into a layer mask so any changes you make here will only affect the areas that are white in the mask.

Brooding Skies and Silhouettes
STEP 1 Add a Color Fill Layer
This technique works well with images that already have cool clouds, some amount of backlight, and silhouetted elements, as in the Manzanar Tree image shown here. From the menu bar, choose Layer>New Fill Layer>Solid Color. Click OK and in the Color Picker dialog, set the fill color to black. Click OK. The entire image will turn black but we’ll fix that in the next step.

CREDIT: SEÁN DUGGAN ALL RIGHTS RESERVED
STEP 2 Blend with the Blending Options
Double-click to the right of the layer’s name to bring up the Layer Style dialog. In the Blend If section, move the highlight slider (on the right) for Underlying Layer to 250. Hold down the Option (PC: Alt) key, click on the left half of the slider, and move it left to split it into two sliders. Move the left half of the slider to 55 and click OK. To reveal more of the image below the mountains, we added a Black, White gradient using the same procedure as shown in Step 6 of the mountain road example.

