2-LIGHT DRAMATIC SETUP: Dramatic Glamour Lighting
Excerpt from Light It, Shoot It, Retouch It: Learn Step by Step How to Go from Empty Studio to Finished Image
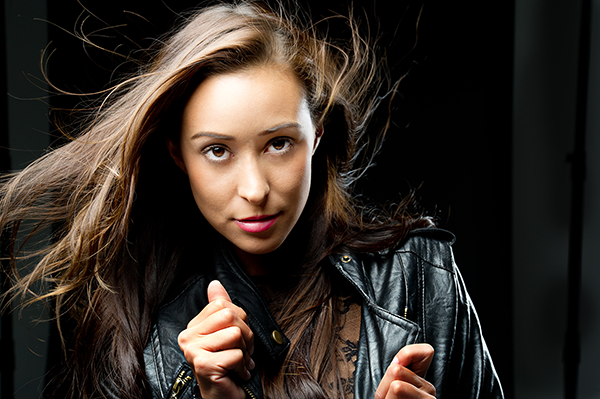
The Setup
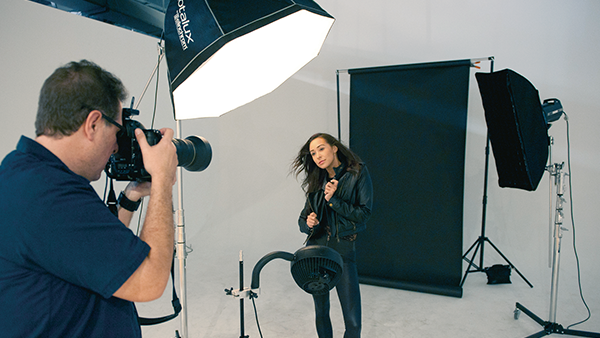
The idea here is to create a very dark, dramatic look. You can create this look with either one or two lights, and if you look at the thumbnails on the previous page, you’ll see my shoot started with just the one main light you see here to the right. But, because her hair was dark against the dark black seamless paper, I added a strip bank in the back to light the other side of her hair, yet still leave some shadows and drama on the left side of her face.
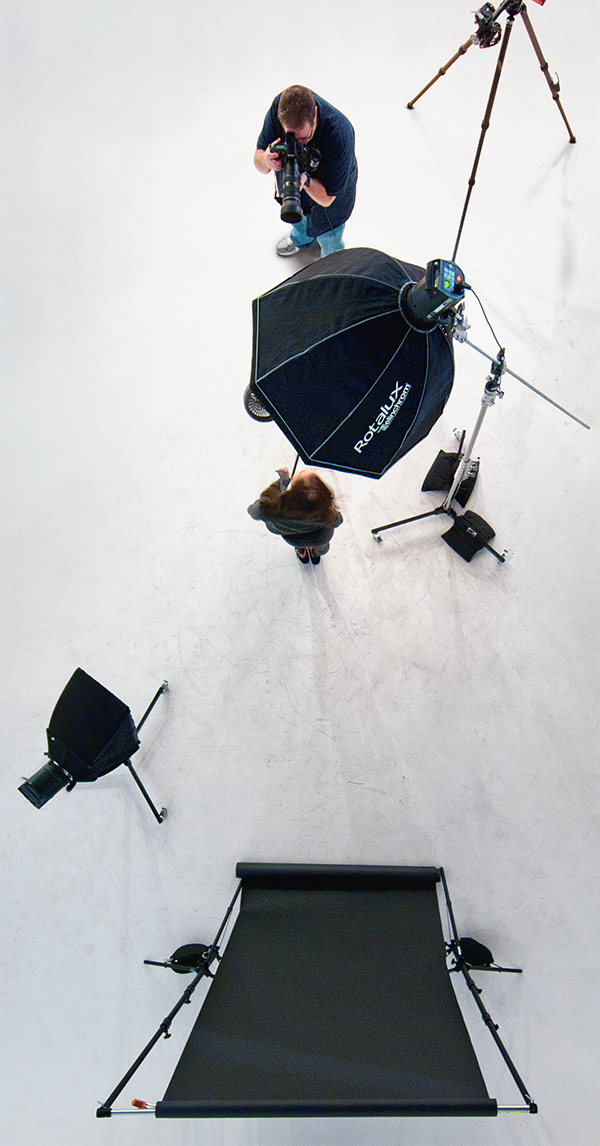
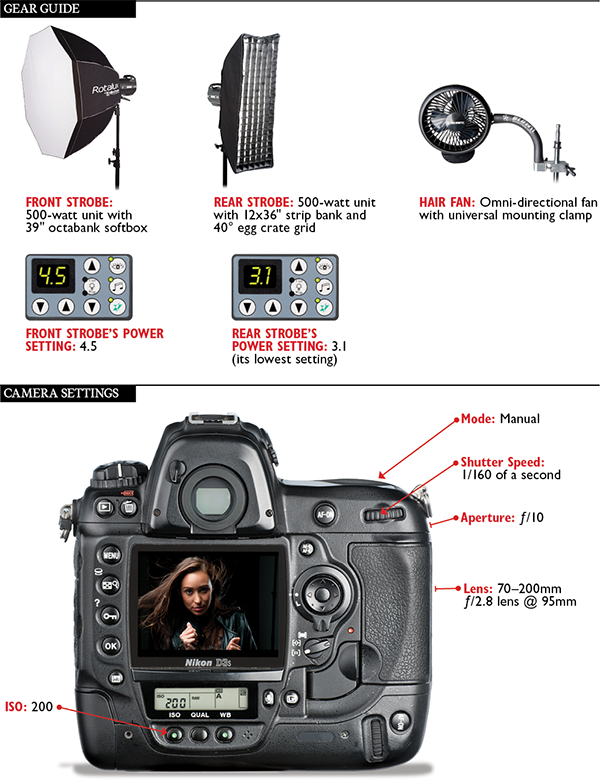
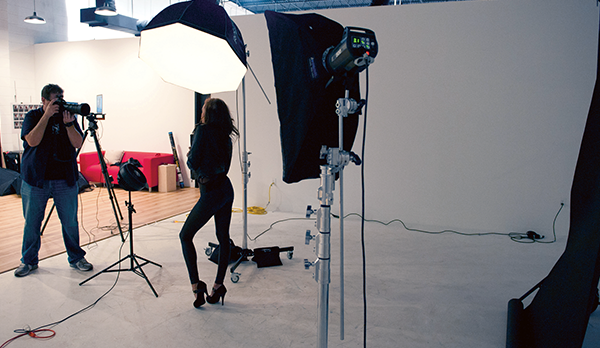
FRONT VIEW: You can see from this shot, our subject is positioned nearly behind the main light. The softest light is near the edges, and you’ll hear this technique of putting your subject right near the edge of the light called “feathering the light.”
LEFT SIDE: This view lets you see the sharp angle of the main light, which is angled down at the subject almost like a showerhead. In this shot, we’re using a boom stand to hold the light, but this also works with a regular stand by just tipping the light down as far as it will go, and then raising it up high.
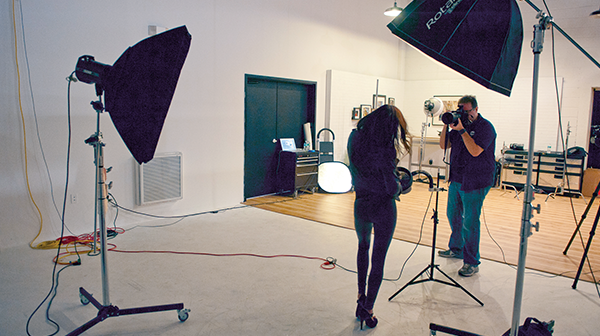
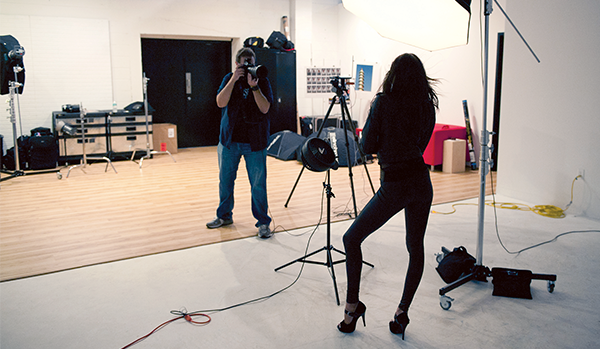
RIGHT SIDE: You can really see our subject’s position, relative to the main light, in this shot. You can see the kicker light (the strip bank) from here, as well. It’s opposite the main light (look at the position of the light stands, not the angle of the Deep Octa softbox up front).
BACK VIEW: From this view (shot from the kicker light’s position), you can also see the light-stand-mounted fan I’m using to give some movement to the subject’s hair.
The Post-Processing
A lot of our retouching here is using Photoshop to take the quality of our lighting up a notch by brightening certain areas and darkening others. Also, we have to paint over one of the supports for the black seamless (you can’t really see it right now, but when you brighten things up a bit, all of sudden it appears, so we have to deal with it. Don’t worry—it’s easy).
Step One:
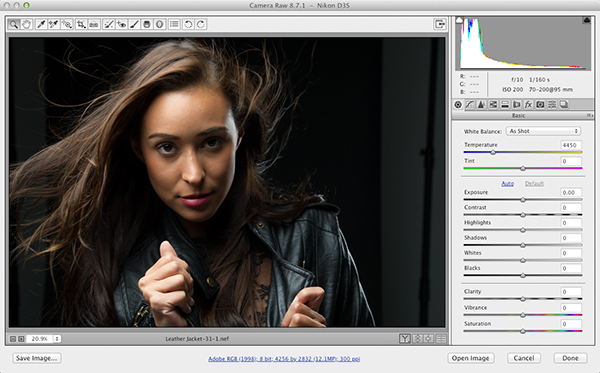
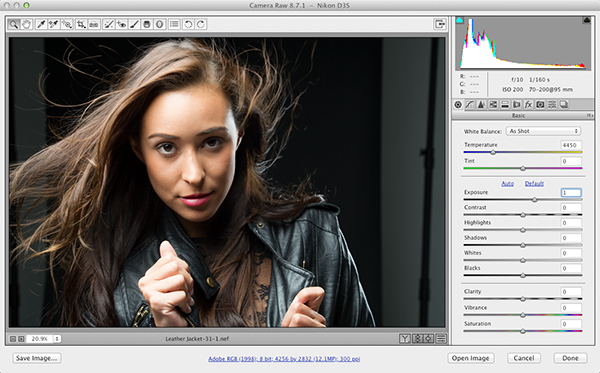
Here’s the image open in Camera Raw. There are only two things we need to do here, and they are: brighten the overall exposure (I meant it to be dark and dramatic, but this might be a little too dark), and add a little more light in her eye sockets.
Step Two:
To increase the overall exposure, just drag the Exposure slider to the right until it reads +1.00 (as shown here). Now you can see that background support stand on the right side of the image—we’re going to have to darken that area to hide it, and we might as well do that now in Camera Raw.
Step Three:
Before we fix that background, though, let’s brighten the eye sockets: Get the Adjustment Brush from the toolbar (K; it’s shown circled here in red), and then in the Adjustment Brush panel, check that all the sliders are zeroed out, then increase the Exposure to +25. Now, take the brush and paint over the right eye to brighten it up a bit. Once you’re done painting, if you think +25 is not quite enough, you can drag the slider to the right to make it brighter (I ended up dragging it to +70). Click the New radio button, and then click the – (minus sign) button to the left of the Brightness slider two times to set the Brightness to –2.50. Now, paint over the far-right side of the image (right over the background support) with this brush to darken it enough so that you can’t see the stand any longer. Click the Open Image button to open it in Photoshop.

Step Four:
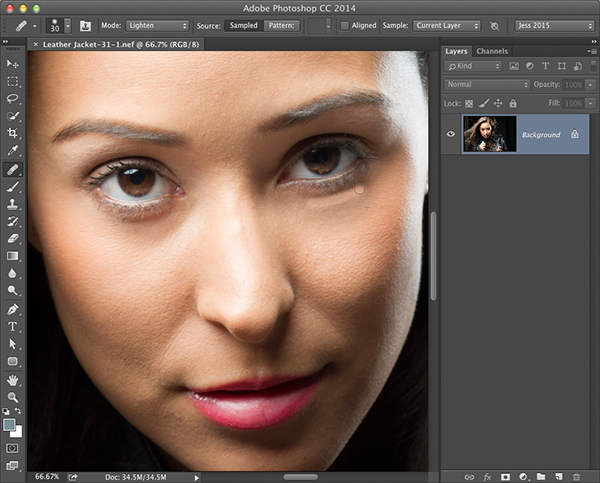
Now that we’re in Photoshop, let’s do some portrait retouching. Of course, start with removing any obvious blemishes or lines using the Healing Brush (as shown in Chapter 1). Then, let’s get rid of the dark circles under her eyes (caused by the lighting coming down at such a steep angle). Get the Healing Brush tool (J), and up in the Options Bar, change the brush’s Mode to Lighten. That way, it only affects the pixels that are darker than where you sampled. Press-and-hold the Option (PC: Alt) key, and click in a clean area right below the dark circles, then paint them away (as shown here).
Step Five:
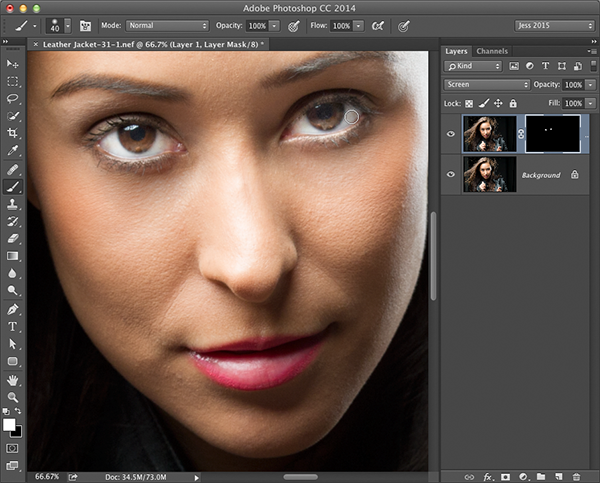
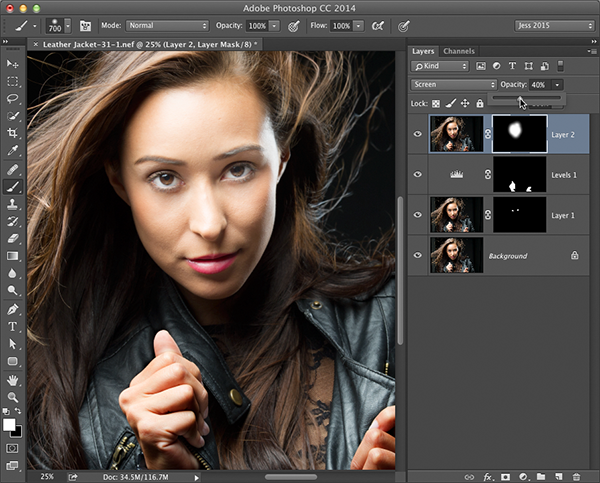
Now let’s brighten the whites of the eyes and her irises (they’re both fairly dark). Press Command-J (PC: Ctrl-J) to duplicate the Background layer, then change the blend mode of this layer from Normal to Screen. This makes everything much brighter, but we only want parts of her eyes brighter, so Option-click (PC: Alt-click) on the Add Layer Mask icon at the bottom of the Layers panel. This puts a black mask over that brighter Screen layer. Now, get the Brush tool (B), set your Foreground color to white, choose a small, soft-edged brush from the Brush Picker, and paint over the whites of her eyes and the insides of her irises (but stay away from the dark ring around the edge of the iris). When you’re painting over the whites of the eyes, don’t sweat it if you spill a little below the whites, onto her lower eyelid (like I have here), just switch your Foreground color to black and paint away those mistakes.
Step Six:
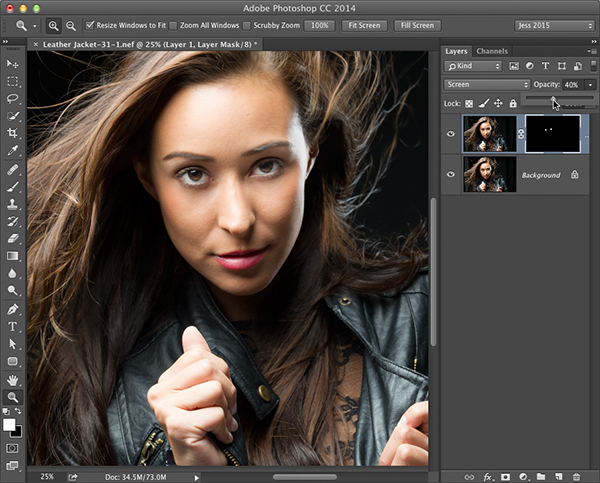
Now, zoom back out and let’s lower the opacity of this Screen layer. The reason we zoom back out at this point is that it’s really hard to judge how bright the whites should be when you’re zoomed in tight, and generally, I’ve found that we’re more likely to overdo the whitening, which looks really bad, so zoom out to make better decisions on stuff like this. When we zoom out, it looks like we should lower this eye whit-ening layer’s Opacity to around 40% (as shown here).
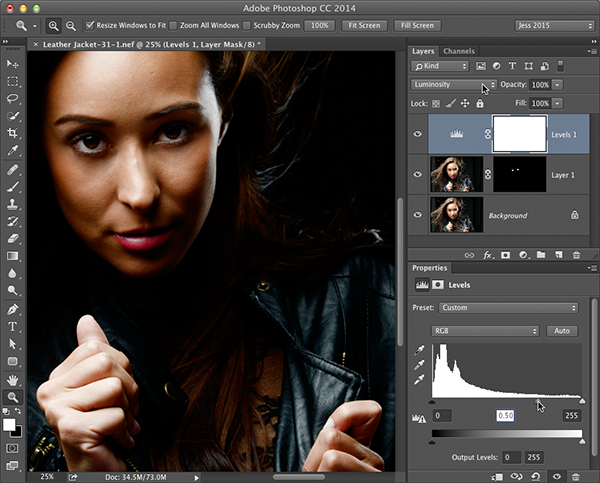
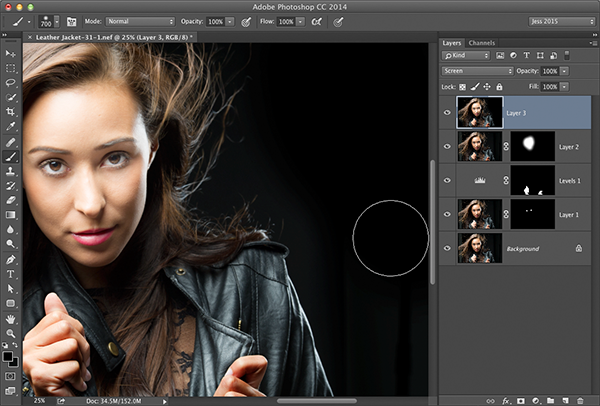
Step Seven:
You might not have noticed this, because it’s one of those things that doesn’t drive everybody crazy like it does me, but if you look at her hands in the previous step, they look a lot brighter than they should (her face should be the brightest thing in the image). As a matter of fact, they’re so bright they’re almost glowing. Luckily, it’s an easy fix. Go to the Adjustments panel and click on the Levels icon (the second one in the top row). Then, in the Levels options, drag the center midtones slider to the right, until her hands look much darker and better match the skin tone in her face in the last step (here, I dragged it to 0.50). By the way, if you try this and it makes the skin tone change color (not just darken), then change the blend mode of this adjustment layer to Luminosity.
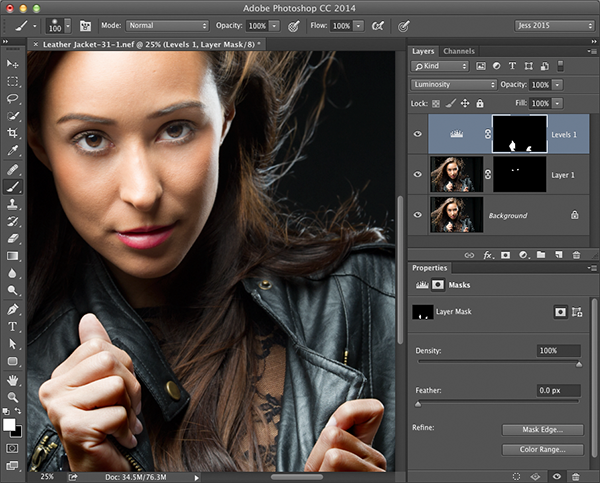
Step Eight:
Now, since we only wanted her hands to be darker, press Command-I (PC: Ctrl-I) to Invert the layer mask and make it black. This hides the Levels adjustment. So, set your Foreground color to white, get the Brush tool, and with a medium-sized, soft-edged brush, paint over her hands.
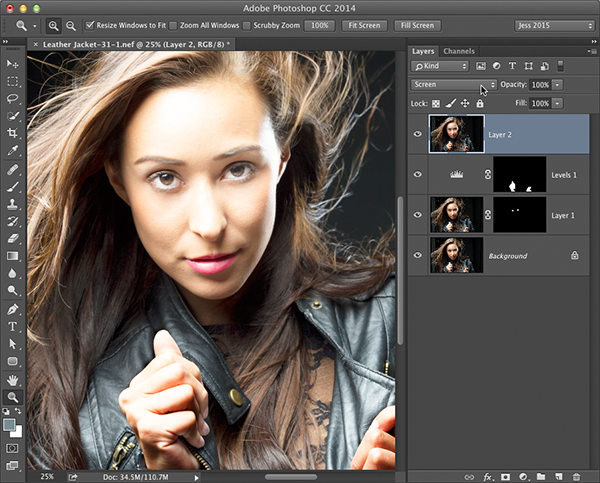
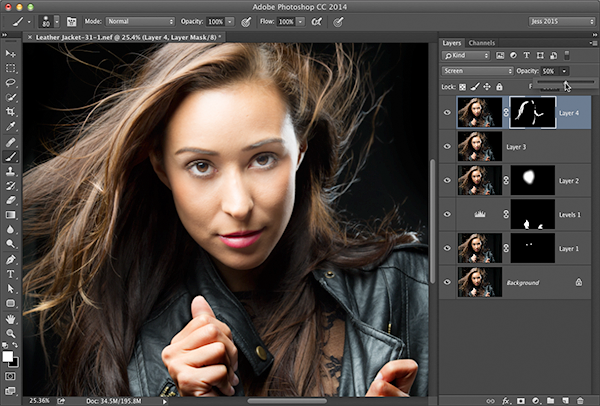
Step Nine:
Looking at the image in the previous step, her face could still be a little brighter, so start by making a merged layer by pressing Command-Option-Shift-E (PC: Ctrl-Alt-Shift-E), which basically creates a new layer on top of the layer stack that looks like a flattened version of your image. Now, to brighten her face, change the layer’s blend mode to Screen. This makes the entire image much brighter, and it also makes the background stand a little bit visible again, but we’ll deal with that in a minute.
Step 10:
Press-and-hold the Option (PC: Alt) key and click on the Add Layer Mask icon to put a black mask over that Screen layer. Now, choose a large, soft-edged brush, set your Foreground color to white, and click a few times right over her face to brighten just that area (remember, the rest of the brightening is hidden behind that black mask). Of course, it’s too bright, but we’ll fix that in the next step.
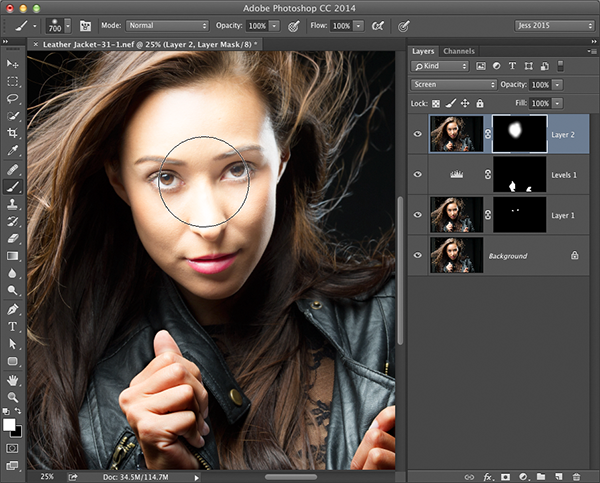
Step 11:
Go to the Layers panel and lower the Opacity of this Screen layer until it looks about right to you (here, I lowered it to 40%).
Step 12:
The background stands are still a little visible, so let’s go ahead and fix that. Create a new merged layer then set your Foreground color to black, get the Brush tool, and just paint right over that stuff. You’ll have to paint a little on the left, too.
Step 13:
Now let’s enhance the lighting in her hair. Create another merged layer, and change its blend mode to Screen, too. Hide this Screen layer behind a black layer mask (like we did before), then take the Brush tool and paint over the highlights in her hair in white to make them brighter. Finally, lower the layer’s Opacity to around 50% (as shown here).
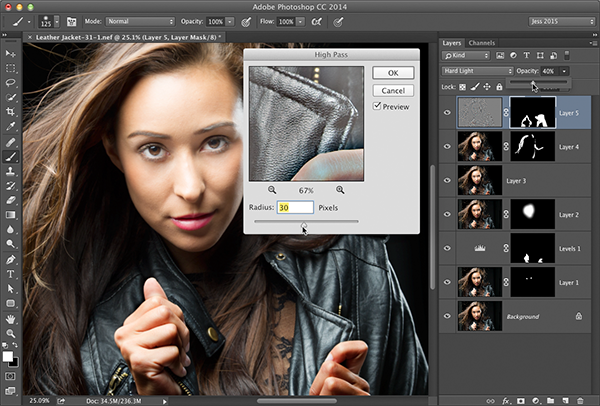
Step 14:
Our last step is to bring out the detail in her jacket by adding a High Pass filter to the entire image, and then hiding that behind a black mask and just painting over the jacket. Start by creating a new merged layer, then go under the Filter menu, under Other, and choose High Pass. When the High Pass dialog appears, increase the Radius to 30 pixels, and click OK. Now change the layer’s blend mode to Hard Light. This should look pretty awful on everything but the leather jacket. So, Option-click (PC: Alt-click) on the Add Layer Mask icon to hide this super-sharpened layer behind a black mask, then get the Brush tool again, and paint over her jacket with white. Lastly, lower the Opacity of this sharpening layer to around 40% to complete the image.
Learn how to do more in Light It, Shoot It, Retouch It: Learn Step by Step How to Go from Empty Studio to Finished Image here: http://kel.by/LSR_Book