Excerpt from Professional Portrait Retouching Techniques for Photographers Using Photoshop
Retouching hair is one of the trickiest retouches, because the Clone Stamp tool and the Healing Brush tool usually give you pretty lame results. So, you usually have to move hair from one place to another to cover the problem, and this is one of the situations where you need to do just that—covering a gap in the hair caused by your subject's position, or movement, or a fan, or one of the dozen things that cause a gap to appear temporarily and mess up your shot. Here's the best way I found to fix it:
Step One:
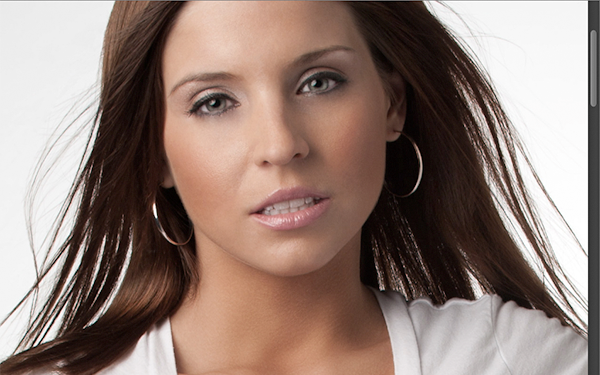
Here's the image we want to retouch, and you can see the gaps in her hair, just above her shoulders. Again, using the Clone Stamp tool or Healing Brush tool here would be a nightmare (and a dead giveaway), so instead, we're going to pick up chunks of nearby hair and use them to cover the gaps.

Step Two:
Get the Lasso tool (L) and draw a selection over a chunk of hair that's near the gap you need to remove (as shown here, where I've selected an area just to the right of the gap on the left). You're going to need to soften the edge of this selection, so it blends in when we move it over the gap. So, go under the Select menu, under Modify, and choose Feather. When the Feather Selection dialog appears, enter 4 pixels and click OK. By the way, 4 pixels isn't a magical number—it's just my starting place. The higher the number, the softer (and more transparent) the edges will be, so if they seem too soft, try 3, or even 2.

Step Three:
Now, press Command-J (PC: Ctrl-J) to place that chunk up on its own separate layer. Switch to the Move tool (V) and move that chunk layer over to the left until it covers the gap. Now, although it does sometimes happen, more often than not, it's not going to cover the gap perfectly and just blend right in with the hair around it. So, in the next step, you're going to have to tweak it, but don't feel like you made a bad selection—you nearly always have to transform the copied hair chunk a bit to make it work.

Step Four:
Press Command-T (PC: Ctrl-T) to bring up Free Transform, so you can rotate the chunk clockwise to match up with the existing hair around it better (as shown here). Just move your cursor outside the Free Transform bounding box, and your cursor changes into a two-headed arrow (seen here). Now, just click-and-drag in a small circular motion to your right and the chunk rotates. Once it's rotated, you may have to move your cursor inside the bounding box to reposition the chunk a little to make the hair match up better. Granted, it's not perfect, but that's okay—we still have more tweaking to do.

Step Five:
Press Return (PC: Enter) to lock in your Free Transform rotation. You can kind of see an edge area on the right side of the chunk that isn't quite blending very well, so we're going to mask that away in just a couple of brush strokes. Click on the Add Layer Mask icon at the bottom of the Layers panel to add a layer mask to this layer. Now, get the Brush tool (B), press X to set your Foreground color to black (because your layer mask is white), set your brush Opacity to 100%, and choose a small, soft-edged brush. Paint a few small strokes over the top of the chunk to help blend that part in with the surrounding hair.

Step Six:
If you look at the top of the copied area in Step Five, you can tell pretty easily that it is a duplicate of that area next to her earring, so we're going to copy a darker area of hair just above the gap we're fixing. Click back on the Background layer, use the Lasso tool to make a new selection, feather the selection, and copy it up onto its own layer. Since we're trying to cover the top of our first fix, click-and-drag this new copied layer above the first copied layer. Then, use the Move tool to drag it into place, and use Free Transform, if you need to, to rotate it.

Step Seven:
In this case, it looks like we covered most of that bright spot, but there's still a small bright area beneath our last fix. So, press Command-J (PC: Ctrl-J) to duplicate that last fix, then use the Move tool to drag it down a little, add a layer mask, and paint some of the edges away to make it blend better.

Step Eight:
Use the same process to fill in a little more on the left side. After you get some of it filled in, you may want to press Command-Option-Shift-E (PC: Ctrl-Alt-Shift-E) to create a merged layer, then make your selection from it. When you're done with the left side, move over to the right side and fill those gaps, too. Now, we got lucky with this one, that all it took was a little rotation to get these chunks pretty close to where all we had to do was a little masking. Some-times, you'll have to actually flip the hair horizontally, so it doesn't look like a copy of hair sitting beside itself (a dead giveaway). If that's the case, once you bring up Free Transform, just Right-click inside the bounding box and when the menu appears, choose Flip Horizontal. Then you'll have to rotate it back into place, but this little horizontal flip can really help hide that fact that you "borrowed" hair from a nearby area. See the next page for a before and after.


Learn how to do more in Professional Portrait Retouching Techniques for Photographers Using Photoshop here: http://kel.by/ProPortraitRetouching.


