Use a Video Monitor to Check Your Quality
BY RICHARD HARRINGTON & MARCUS GEDULD
One of the most common errors made by video pros and amateurs alike is an over-reliance on their computer monitors. You see, computer monitors use the RGB color space, and video functions in the YUV color space. While colors are similar, they won’t match up exactly right. For example, pure white in the RGB space has a value of R:255, G:255, and B:255. On the other hand, a video white is R:235, G:235, and B:235. But things don’t stop there. Video devices and computer monitors also have different gamma curves, which handle how midtones (like a subject’s skin) are displayed.
So can you get truly accurate color on a computer monitor? The short answer is no, and trying to make this work will just frustrate you. The solution? Attach a video monitor to your video editing and graphics workstation. Let’s explore the hardware setup, as well how to harness the monitor from Premiere Pro, Photoshop, and After Effects.
Hardware Setup
STEP 1 Hook Up FireWire Device
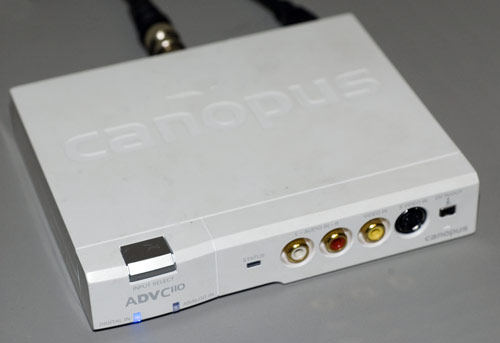
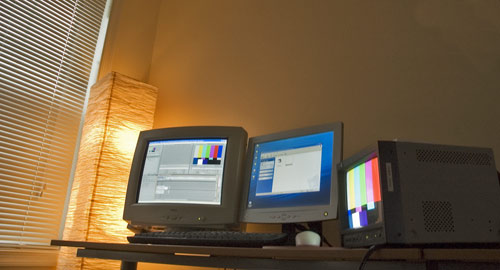
One of the easiest ways to view video when using the Adobe Production Studio is to hook up a FireWire device. This can include a video camera or video deck, which connects via a FireWire cable to your computer. These devices function as a digital-to-analog (DA) converter, taking the digital signal and formatting it to work on analog equipment. One category of device is the standalone DA converters from companies such as Canopus (www.canopus.com). These will give you the same functionality at a lower cost than buying a new tape deck. A standalone converter also frees up important gear such as cameras.
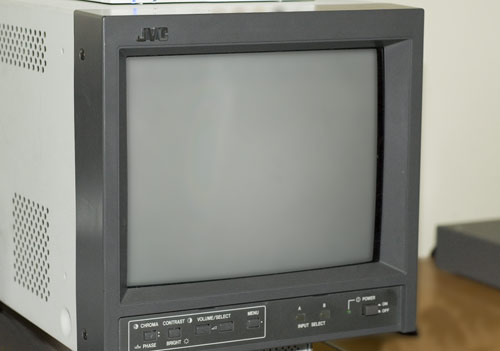
STEP 2 Hook Up Broadcast Monitor
Another misperception about checking broadcast color is that any TV will do the trick. This is just not the case. A broadcast-quality field or studio monitor offers features such as a high-resolution display and color-calibration controls. This extra quality and level of control are very helpful in getting the most accurate color. You can purchase professional video monitors through professional video equipment dealers (such as B&H Photo [www.bhphotovideo.com]). If this level of quality is out of your reach, then a regular consumer television is still better than a computer monitor.
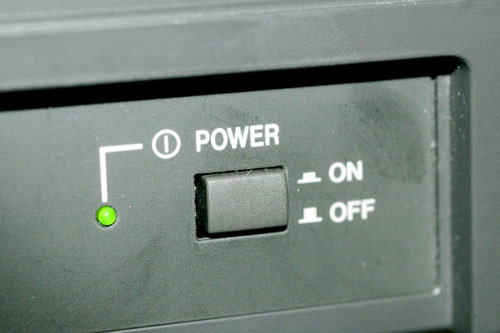
STEP 3 Power Up Both Devices
You’ll need to power up both devices and give them a chance to warm up. Launching your computer before the devices have registered can cause them to malfunction. Additionally, giving the devices a few minutes to warm up will improve the accuracy of the color. Once the devices are on, double-check your FireWire and video cable connections. When connecting the video devices, use the best quality cables. For the video monitor, a component connection is the best (but expensive). If component is not a choice, choose S-Video over a standard composite (RCA) cable as it delivers twice as much picture information.
STEP 4 Prepare the Room
The next step for checking color is to prepare your environment. Dim the lights of the room to about one-third brightness; this will make it easier to see color without having to strain your eyes. You’ll also want to cut down on any reflections on the screen, so close blinds or any doors that create reflection problems.
STEP 5 Color Calibrate Broadcast Monitor
In order to get the most accurate color, you’ll need to calibrate your broadcast monitor using color bars. You can play these back on videotape or send them directly from many cameras or decks that are hooked up to the monitor. If you don’t have these as an option, you can use Premiere Pro to send color bars to the monitor. For detailed instructions on calibrating a monitor (there are a lot of steps), see the helpful article at Video University (http://videouniversity.com/tvbars2.htm).

Premiere Pro
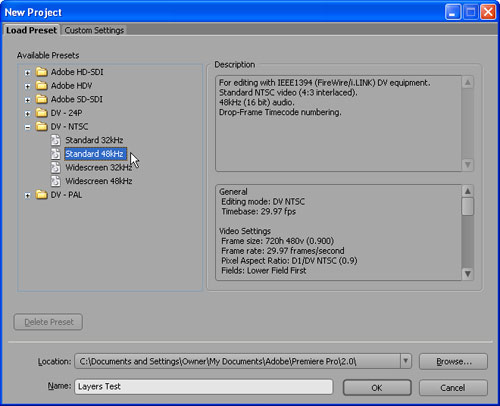
STEP 1 Set Up the Project
Be sure that the device is connected and powered on before launching Premiere Pro. Launch Premiere Pro, and the New Project window opens. Choose a preset that matches your hardware, such as DV NTSC. Name the project, set a destination, and click OK. The project opens and is ready for editing. Add a video clip or graphic into the Timeline. If you need color bars (to calibrate the monitor) you can add them to your project. At the bottom of the Project pane click the New icon (next to the Trash icon) and choose Bars and Tone.
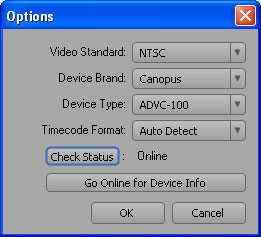
STEP 2 Set Options for Device Control Settings
After creating a new DV project, you’ll need to modify the Device Control settings (Edit>Preferences>Device Control) in Premiere Pro to recognize the device. Be sure the device is set to DV/HDV Control, and then click the Options button. Set the Video Standard to match your format, change the Device Brand to match the manufacturer of the hardware, and then pick the correct device (or closest equivalent). Click the Check Status button if the device says Offline. When all is correct for your hardware, click OK to close the Options window, then click OK to close the Preferences window.
STEP 3 Render In to Out
For the most accurate results, it’s best to render out the content you want to preview. You do this by defining the Work Area. Near the top of the Timeline window are handles you can drag to set the area that will be previewed. After adjusting the handles, choose Sequence>Render Work Area. If the video doesn’t appear on your video display (and you’re sure that the device is properly connected), choose File>Export to Tape. Uncheck the Activate Recording Device and click Record. The video should now be visible over FireWire and viewable on your video monitor.
After Effects
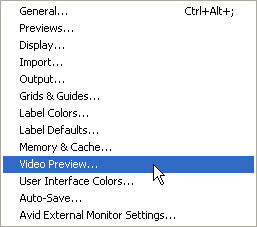
STEP 1 Access Video Preview Preferences
In order to use a video device, you’ll need to modify your Video Preview preferences. You can choose After Effects (PC: Edit)>Preferences>Video Preview. From the Output Device list, choose IEEE 1394 (aka FireWire). For greater quality when monitoring, change Output Quality to More Accurate (see image in next step).
STEP 2 Set Video Preview Preferences
You have several other options to choose from. Choose to Output During Previews (with Mirror on Computer Monitor enabled). You’ll also want to see during Interactions and Renders. Choose the Video Monitor Aspect Ratio that matches your hardware (not the composition settings). If you have a 16×9 monitor hooked up, you’d choose Widescreen (16:9). Check the box next to Scale and Letterbox Output to Fit Video Monitor, which will cause After Effects to adjust the size of the video output display to match your hardware. Click OK to apply. Previews are now enabled.

Photoshop
STEP 1 Work with a Video-Sized Document
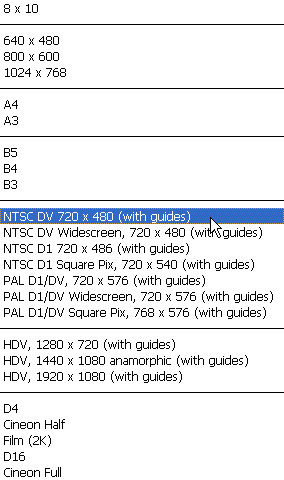
In order to get accurate video previews, your document needs to be set up correctly. The easiest way to ensure that your document is properly configured is to use the built-in video presets. Choose File>New. From the Preset drop-down menu, choose one of the DV presets such as NTSC DV 720×480 (with guides). This document has the proper resolution and pixel aspect ratio for standard NTSC digital video projects.
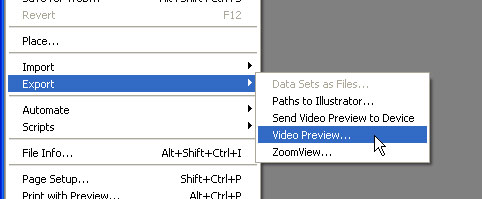
Step 2 Choose Device Settings
You now need to open up the video hardware settings. Choose File>Export>Video Preview. The Output mode will be automatically set by your document preset. If you used an NTSC preset (North America & Japan) then the computer will pick NTSC. If you used a PAL preset (Europe and most of the world) then Photoshop will pick PAL. In the Aspect Ratio drop-down, choose Standard (4:3) or Widescreen (16:9) based on your hardware configuration (see image in next step).
STEP 3 Adjust Options
Photoshop gives you several options for how the image is placed. In the Placement drop-down menu, you can choose to crop widescreen images for display on a standard set or have them display in letterbox mode. Other options are available depending on how your hardware is set up. For maximum image quality, choose Do Not Scale in the Image Size drop-down menu. You’ll also want to Apply Pixel Aspect Ratio to Preview in order to get the correct shape on the video monitor (otherwise your image will appear slightly distorted). Click OK to start the Preview.

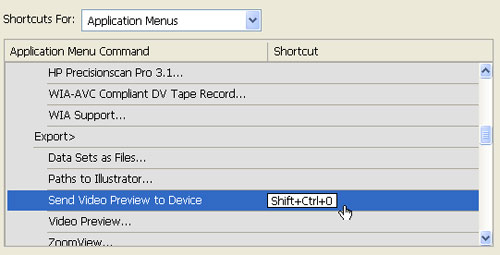
STEP 4 Set Hotkey for Quick Previews
Photoshop’s video preview is not a live update like Premiere Pro or After Effects. There is, however, a command that lets you bypass the setup box for additional previews. By default, a keyboard shortcut has not been assigned, so choose Edit>Keyboard Shortcuts. Twirl down the File menu triangle and scroll down to Send Video Preview to Device. Click in the shortcut field and choose a shortcut (such as the empty combination Shift-Command-0 [PC: Shift-Control-0]). Click Accept to save the change, then click OK. Now future previews (using the same settings) can be invoked by just hitting the shortcut keys.