
The Adjustment Brush in Adobe Photoshop Camera Raw
In this article, we’re going to unlock the power of the Adjustment Brush in Adobe Photoshop Camera Raw.
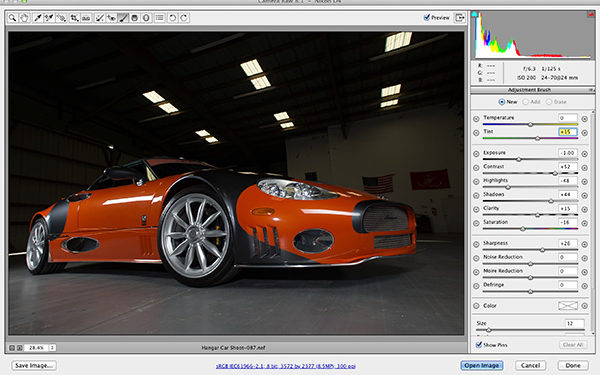
When you select the Adjustment Brush (K), you’ll see the same sliders you have in the Basic panel—with the exception of Whites, Blacks, and Vibrance—plus four new sliders: Sharpness, Noise Reduction, Moiré Reduction, and Defringe. These sliders will be set to whatever you last used, so if you just start painting, you’ll be painting with old settings.

To reset the sliders, click one of the plus (+) or minus (-) signs to the right or left of one of the sliders, respectively. This will reset all the other sliders to 0, and if you clicked on the plus sign, it sets that slider to +25 (if you click it again, it goes to +50, and so on); if you clicked on the minus sign, it sets that slider to −25 (click it again, and it goes to −50 and so on). The one exception is the Exposure slider, which changes in increments of 0.50. The four sliders at the very bottom (Size, Feather, etc.) aren’t affected by this since they’re just the preferences for your brush.
Open an image in Camera Raw, click on the minus sign to the left of the Exposure slider twice to zero out all the other sliders and set the Exposure to −1.00, and then paint. The area you paint will get darker, or "burned" in traditional darkroom lingo (the floor in this example).

AUTO MASK: 90% OF THE TIME, IT’S AWESOME!
If the brush seems a little slow, it’s probably because Auto Mask is turned on. Auto Mask tries to sense the edges of areas to keep you from accidentally painting something you don’t want to paint. For example, in this case, if you were brightening the area around the headlamps, it would keep you from brightening the orange paint on the car. Auto Mask is controlled by the crosshair in the center of the brush. As long as you keep that crosshair within the silver headlamp area, it will ignore the orange paint surrounding it, even if the brush itself extends into the orange paint.

Auto Mask is really pretty amazing (I wish it were in regular Photoshop). It’s great for small areas that you want to adjust, and it’s super handy when you’re painting near the edges of anything. Auto Mask has to do a lot of math as it analyzes the area beneath that crosshair, and that makes the brush move slower as you paint. That’s why you might find it helpful to turn Auto Mask off when you’re painting large areas like the floor in this example, because the brush will paint much faster. To turn it off, either uncheck the Auto Mask box near the bottom of the Adjustment Brush panel, or just press the letter M on your keyboard.
If you don’t think an area that you’ve painted is dark enough, just drag the Exposure slider to the left until it looks good to you. You can change the size of your brush using the Left and Right Bracket keys on your keyboard: the Left Bracket ([) makes the brush smaller; the Right Bracket (]) makes it larger.

WORKING WITH MULTIPLE ADJUSTMENTS (OR PINS AS THEY’RE CALLED)
When you drag the Exposure slider, it affects the areas that you painted, but what if you want to brighten a different area? By default, any additional strokes you paint will be added to the one you originally created (that’s why the Add button at the top is already selected for you). To tell Camera Raw to paint different adjustments somewhere else, you’ll need to click the New button.
So click the New button, click the plus icon to the right of the Shadows slider twice, and then paint the area you want to brighten (the front wheel in this example). Don’t forget turn on Auto Mask if you need it. If opening the shadows isn’t enough, drag the Exposure slider to the right. I dragged it to +1.00, and now the wheel’s brightness really comes out. That’s the great thing about the Adjustment Brush—once you’ve painted an area, any sliders you adjust will affect that masked area. If you want to add some contrast, just drag the Contrast slider to the right (I dragged it to around +55 for the wheel).

Do you see how there’s a green pin on the wheel? That lets you know which of the two areas you’ve adjusted so far is the active area. If you were to click on the white pin, now you’d be working on the areas you darkened earlier (those pins appear at the point of your first brush stroke). So, if you want to go back and change the darkness of the area your originally painted, just click on the white pin. It will turn green, letting you know it’s now the active pin, and you can pick up right where you left off. Pretty slick, isn’t it?
In this example, the door area looks a little bit dark and the color looks a little flat, so I’m going adjust that area. I clicked the New button, clicked the plus sign to the right of the Exposure slider to zero out all the other sliders and set the Exposure to +0.50, and painted the door area. I also added some Clarity (to add midtone punch), and Saturation to punch up the color. Again, these adjustments are only applied to the door area I just painted, and now I have a third pin.

Tip: If the pins are distracting, you can turn them off by unchecking the Show Pins box (this is called Overlay in the latest version of Camera Raw) at the bottom of the panel, or you can toggle them on/off by pressing the letter V.
SEEING YOUR MASK
A helpful feature is the ability to see the mask (the area you’ve painted). If you want a quick peek to see if you missed an area or accidentally painted an area, turn on the Show Mask checkbox at the bottom of the panel, or just press the letter Y to toggle it on/off. You can change the color of the mask by clicking on the swatch next to the Show Mask option. Now you can see that when I painted the floor, I accidentally painted (and thus darkened) the wheel.

Luckily, you can paint away areas you didn’t mean to mask. Just hold the Option (PC: Alt) key and it temporarily changes your brush into an Erase brush. Shrink the size of your brush, and paint the area you want to remove while Show Mask is turned on. As you paint, it removes the red tint, which removes the darkening. You can check all three pins one at a time to quickly and easily paint away any errors.

This article is courtesy of Photoshop User magazine, the official publication of KelbyOne, which provides quality online education for creative people. For more information, visit KelbyOne.com.
