
Retouching Portraits in Camera Raw
Excerpt from The Adobe Photoshop CC Book for Digital Photographers (2014 Release)
One of the main things we've always had to go to Photoshop for was retouching portraits, but now, by using the Spot Removal tool, along with the Adjustment Brush, we can do a lot of simple retouching jobs right here in Camera Raw, where they're completely non-destructive and surprisingly flexible.
Step One:
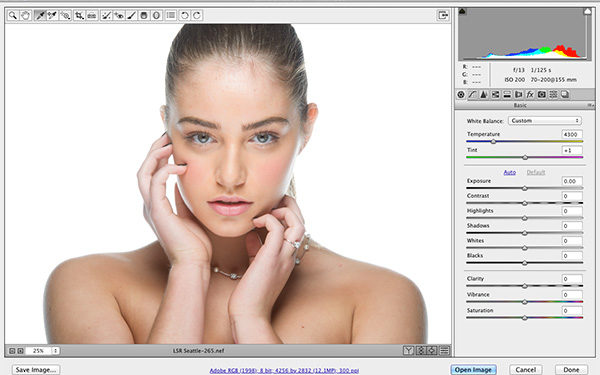
In the portrait shown here (which I shot on stage during my Light It, Shoot It, Retouch It tour, we want to make three retouches: (1) we want to remove any blemishes and soften her skin, (2) we want to lighten the whites of her eyes, brighten her eyes in general, and add contrast, and (3) we want to sharpen her eyes, eyebrows, and eyelashes.

Step Two:
We'll start with removing blemishes. First, zoom in on her face, then get the Spot Removal tool (B) from the toolbar up top (it's shown circled here in red) and set your brush Size to where it's just slightly larger than the blemish you want to remove. Now, move your cursor over the blemish and just click. Don't paint a stroke or anything—just click once and it's gone. If the removal doesn't look quite right, it just means that Camera Raw chose a bad place to sample clean skin from to make its repair. So, click on the green sample circle and drag it to a nearby area and it redoes the retouch (as shown here). Now, remove the rest of the blemishes with just a single click each, adjusting the position of their green sample circles, if necessary.

Step Three:
Next, let's do some skin softening. Click on the Adjustment Brush (shown circled here) in the toolbar, then click the – (minus sign) button to the left of Clarity four times to set the Clarity amount at -100 (this is called "negative clarity" by people who love to give everything a name). Now, increase the Sharpness slider to +25 and you're ready to go. Increase the size of your brush (by using either the Size slider or the Right Bracket key on your keyboard), and then paint over her skin to soften it (as shown here), but be careful to avoid any areas that should stay sharp and retain lots of detail, like her eyebrows, eyelids, lips, nostrils, hair, etc. While you're painting, you might not feel like it's really doing that much, but press the P key to toggle the preview on/off, and you'll see that it's doing a lot more than you might think. Of course, once you're done painting, if you think you've applied too much softening, just raise the Clarity (try -75 or -50).

Step Four:
Let's work on the eyes next. Click the New radio button at the top of the panel (to work on a new area), then reset the Clarity and Sharpness sliders to 0 by double-clicking directly on the slider knobs. Now, drag the Exposure slider a little to the right, decrease the size of your brush, then paint over the whites of her eyes (as shown here). Once that looks good, click the New radio button again and zero out the sliders, so we can work on adding contrast and brightness to her irises.

Step Five:
To add more contrast, we're really going to crank up the Contrast slider (here, I dragged it over to +73), but to brighten and enhance the texture of the irises a bit at the same time, increase the Exposure to +85 and the Clarity to +18, then paint directly over the irises, and see how much better they look! Lastly, let's sharpen the eyes, eyelashes, and eyebrows. Click the New button once again, reset all the sliders to 0 (just click the + [plus sign] button to the right of Sharpness and it resets them all and moves Sharpness up to +25). Now, paint over her pupils and irises (but not out all the way to the edge of the iris), then paint over her eyelashes and eyebrows to help make them look sharper and crisper, completing the retouch (a before/after is shown below).


Learn how to do more from The Adobe Photoshop CC Book for Digital Photographers (2014 Release) here: http://kel.by/skccbook

