
All digital images can benefit from some sharpening. Translating the continuous tones of the real world into a mosaic of square pixels will inevitably introduce some softness into an image. With digital captures, this is more noticeable with RAW files because cameras typically apply some amount of in-camera sharpening to JPEG captures but not to RAW captures.
There are a variety of ways to sharpen files in Photoshop and, depending on the type of sharpening (input, creative, or output sharpening), different times when you might apply it. Output sharpening is designed to compensate for the type of output. That can vary from small images destined for your website or an online gallery, to large, fine art inkjet prints. In this tutorial, we’ll take a look at the primary ways to apply overall output sharpening in Photoshop CS3 and take a closer look at some additional things to keep in mind when addressing this important part of the digital imaging workflow.
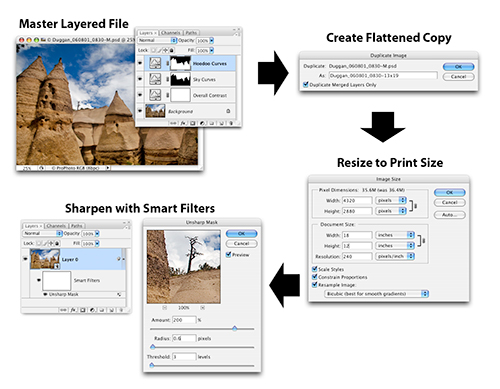
STEP 1 When to Apply Output Sharpening
Output sharpening should always be applied after the photo has been resized to final output size because the amount of sharpening you apply is influenced by how large the image is. Also, upsampling a file can introduce anti-aliasing, which can soften any sharpening that’s applied prior to resizing. To preserve the flexibility of the master layered file, choose Image>Duplicate and check Duplicate Merged Layers Only in the dialog. Then resize the file to the desired print size and resolution before the primary output sharpening is applied. For the most flexibility, use Filter>Convert for Smart Filters before applying sharpening.
Unsharp Mask
STEP 1 Amount and Radius
Unsharp Mask has been overshadowed by the Smart Sharpen filter, but it’s still an effective sharpening tool. The Amount slider determines how much contrast is increased along the visible edges (i.e., where light and dark pixels meet). Darker pixels are darkened and lighter pixels are lightened (top). The Radius slider is the most dangerous control here. It determines how far out from an edge the contrast is increased. When used properly, a good Radius setting can accentuate detail and make the photo appear sharper, but too much can create detail-destroying halos (bottom). I rarely set the Radius higher than 0.8.

ALL IMAGES SEÁN DUGGAN
STEP 2 Threshold
Threshold is the difference in tonal values necessary for pixels to be affected by the sharpening. If it’s set to 8, for example, then there must be a difference of 8 tonal levels (on a scale of 0–255) between pixels for them to be sharpened. Threshold is useful for restricting sharpening from areas of similar value that you want to remain smooth, such as the face of a woman or child in a portrait. For files from digital SLRs, begin with a Threshold setting of 2 or 3. For scanned film images, a slightly higher setting is often necessary.

STEP 3 Finding the Right Balance
A good way to begin with Unsharp Mask is to overdo it. Start with a high Amount setting (350–450%). Experiment with Radius settings, beginning with low values, such as 0.6, and gradually increase the amount. Be sure to view the image at 100% (View>Actual Pixels) for the most accurate display. As you increase the Radius, be on the lookout for obvious halos that suppress edge detail. Find the balance point between the Amount and the Radius where the sharpening is just right. Set the Threshold last, fine-tuning it for the subject matter in the image.

Smart Sharpen
STEP 1 Basic Mode
In Basic mode, Smart Sharpen (Filter>Sharpen>Smart Sharpen) offers the same Amount and Radius sliders as Unsharp Mask, but it lacks a Threshold slider. The one thing that Smart Sharpen does have is a Remove feature, which changes the algorithms used to create the blur halos. The default of Gaussian Blur makes the filter behave the same as Unsharp Mask. Lens Blur creates halos that are more refined, so you can get by with higher settings for the Amount and Radius. Motion Blur attempts to correct for slight blurring caused by camera motion. I recommend using Lens Blur for most images.

STEP 2 Fade Shadow
Click the Advanced button to reveal additional functionality. The Sharpen tab contains the same settings as in Basic mode. These create the overall sharpening effect. The Shadow tab lets you fade back the sharpening from the darker areas. This is useful if the sharpening accentuates noise in the shadows. The Fade Amount minimizes the effect: 0% applies the sharpening at full strength while 100% applies no sharpening to those areas. Tonal Width specifies how wide a range of shadows is affected. Smaller numbers indicate only the darkest shadows, while larger numbers specify a broader range of those tonal regions.

STEP 3 Fade Highlight
The Highlight tab lets you fade back the sharpening from the brightest tones in the photo. This can be effective when very bright highlight edges or specular highlights take on an oversharpened look. Increase the Fade Amount to reduce the sharpening effect on the brightest tonal regions. In the example above, you can see how a Fade Amount and Tonal Width value of 60 help to minimize the sharpening on the bright, reflective highlights on the bronze statue.

Create a Sharpening Test Strip
STEP 1 Select Area for Test Strip
Test strips, a staple of traditional darkroom work, can be just as useful in the digital darkroom to evaluate sharpening on the actual print. To create test strips for sharpening, start with a flattened copy of the master image (choose Image>Duplicate and check Duplicate Merged Layers Only). Use Image>Image Size to resize the photo to the desired print size and resolution. With the Rectangular Marquee tool (M), make a selection of an area in the photo that contains a section of important image detail. To save paper, select an area that can be printed on letter-size paper.

STEP 2 Create Test Strip Layers
Copy the selection (Edit>Copy) and then choose File>New. In the New dialog, set the size to 8.5×11″ and enter the print resolution you’ll be using. Paste the copied selection as a new layer (Edit>Paste). Make two copies of the test strip layer by choosing Layer>New>Layer via Copy (Command-J [PC: Ctrl-J]). Use the Move tool (V) to reposition the layers so you can see them all as separate strips. If you Shift-drag with the Move tool, it will constrain the movements of the layers and keep their edges aligned.

STEP 3 Sharpen with Smart Filters; Print & Evaluate
Next, convert each layer to a Smart Object by Control-clicking (PC: Right-clicking) on it in the Layers panel and choosing Convert to Smart Object from the contextual menu. Now apply a sharpening filter to each layer as a smart filter, varying the settings for each. I typically choose a couple of variations that are close to what I think it should be and then one that looks a bit oversharpened onscreen. Make a print of this file on the paper you’ll use for the final print and evaluate the sharpening under good light.

