Let’s face it, even though you should always try to get the best exposure in the camera so you don’t have to spend a lot of time fixing it in Photoshop, every once in a while you end up with a badly underexposed image. In this tutorial, we’ll focus on ways to improve a severely underexposed RAW file using both the controls in Adobe Camera Raw and Photoshop.
[If you’d like to download the image used in this tutorial to practice the technique, click here. This file is for practice purposes only.]
1 A RAW RANT
Before we get into the tutorial, indulge me for a moment in a brief rant: For the best results in rescuing a severely underexposed image, you need to be shooting in RAW. Period! Although underexposed JPEGs can be improved, manipulating the RAW capture information gives you much more potential for saving exposures that are truly desperate. Okay, end of rant (I’ll get off my soapbox now).
The first step for this tutorial is to open the RAW DNG file in Camera Raw to see how much underexposed detail we can recover.
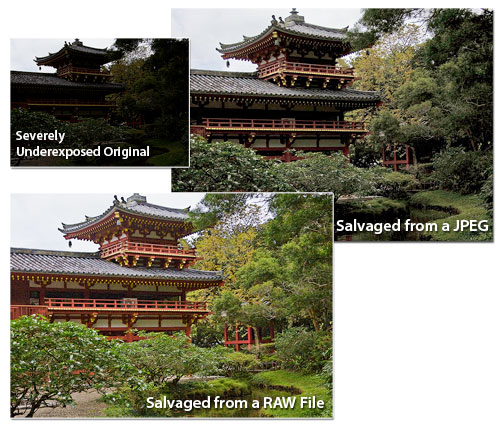
©SEÁN DUGGAN
2 RECOVER “LOST” SHADOW DETAIL WITH FILL LIGHT
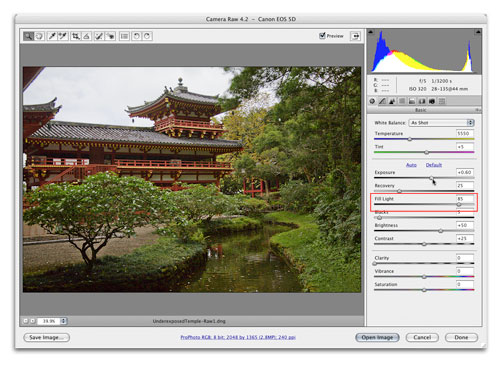
You may be able to recover detail that you thought was gone for good by using the Fill Light slider—we moved it up to 85 for our temple image. Moving the Exposure slider to the right is also useful for this photo since there’s some room on the right side of the histogram where lightening can be applied without losing detail in the highlights. To bring back any overexposed highlights, use the Recovery slider. The dark areas of the image have been lightened significantly, though as we shall see in the next step, this does come at a cost.
3 CHECK FOR ARTIFACTS AT 100% VIEW
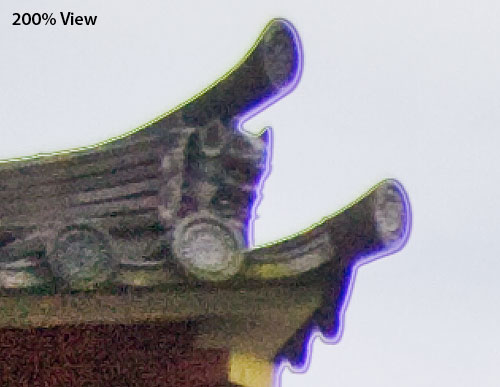
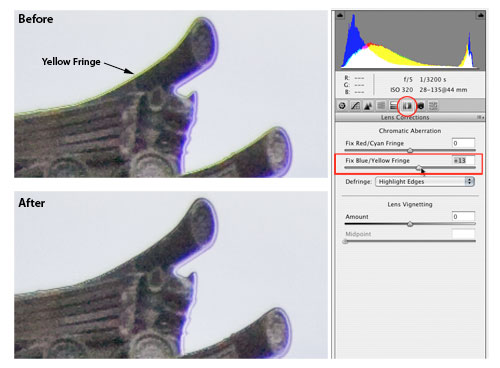
Double-click the Zoom tool to zoom in to 100% and check for artifacts caused by the Fill Light adjustment. Use the Hand tool to scroll over to the far left side of the image. Dramatically lightening the image with Fill Light has produced an unnatural outline fringe around the temple roof. There’s also a noticeable purple coloration along the roof edges. This is called “blooming,” a digital capture phenomenon created by the overly bright sky behind the darker temple. The brightness of the sky pixels has “spilled over” onto the pixels of the roof edge. We’ll address the noise later.
4 CORRECT CHROMATIC ABERRATION
Along the top edge of the roof on the left side is a slight yellow fringe. This is caused by chromatic aberration and can be fixed in Camera Raw. We’ll use another method to fix outline fringe and the purple coloration. Click on the Lens Corrections icon (circled) and set the slider for the Blue/Yellow fringe to +13. Zoom back out to fit the image in the preview window. Click on the Basic icon and increase the Vibrance to +40 to boost the saturation without affecting colors that are already saturated.
5 OPEN RAW FILE AS A SMART OBJECT
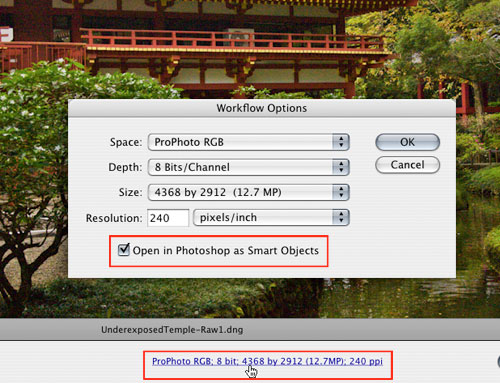
The image looks a lot better than the original, but there’s still work that needs to be done in Photoshop to fix the roof fringe. To preserve the ability to tweak the Camera Raw adjustments after the image is opened in Photoshop, we’ll open it as a smart object. Click on the blue Workflow Summary link under the main preview window and in the Workflow Options dialog, click the checkbox for Open in Photoshop as Smart Objects. Click OK and then click Open Object to bring the file into Photoshop.
6 CREATE A COPY OF THE RAW SMART OBJECT
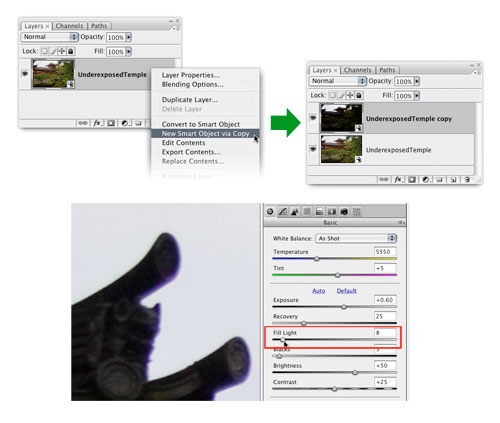
To fix the fringing around the roof, we need to undo the Fill Light adjustment, but only in those areas. Control-click (PC: Right-click) on the layer name and choose New Smart Object via Copy to make a copy of the RAW smart object. Using this method of copying is very important because simply duplicating the smart object won’t let you apply different RAW settings to the copy while preserving the first RAW adjustments. Double-click the Smart Object copy’s thumbnail to reopen Camera Raw. Set the Fill Light to 8. Zoom in to verify that the fringing has been removed. Click OK.
7 CREATE A MASK FOR THE ROOF EDGES
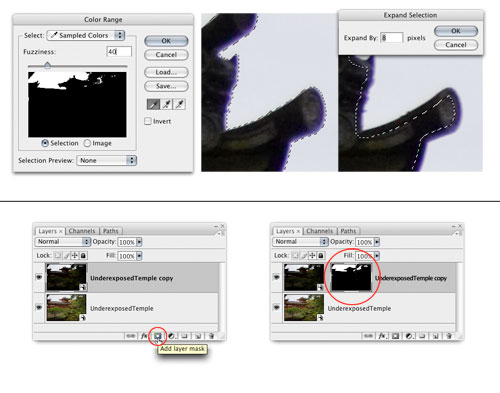
Choose Select>Color Range. Set the Fuzziness to 40 and click in the white sky areas to build a selection mask for the sky. Click OK to create the selection. To overlap the selection onto the roof edge, choose Select>Modify>Expand. Enter 8 pixels and click OK. With the selection active, click the Add Layer Mask icon at the bottom of the Layers panel to add a layer mask to the Smart Object copy layer. This covers up the offending edge fringe but the layer mask needs some modification.
8 EDIT THE LAYER MASK
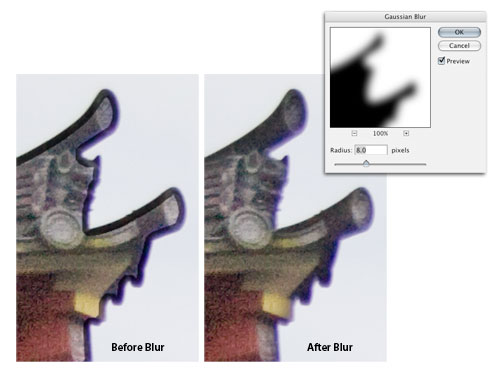
Zoom in close to see the edges of the mask. Choose Filter>Blur>Gaussian Blur, set the Radius to 8, and click OK. This blurs the mask and creates a much better blend with the rest of the image. The next task is to retouch the purple color fringing. Click the Create a New Layer icon to add a new, empty layer to the top of the layer stack. Rename this layer “Retouching” and set its blend mode to Color.
9 RETOUCH THE COLOR FRINGING
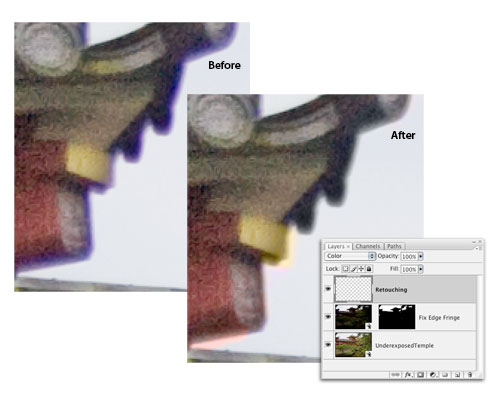
Select the Clone Stamp tool (S) in the Toolbox and in the Options Bar, set the Sample menu to Current & Below. To retouch areas that should be grayish, sample the white sky by Option-clicking (PC: Alt-clicking) and then clone that color over any areas of purple fringing. For other areas, such as the red or yellow parts of the roof, sample from similar colors. Don’t be concerned if you have overspill onto the sky; we’ll fix that in the final step. Inspect all of the roofline and retouch the color fringing.
10 REMOVE OVERSPILL WITH BLEND IF SLIDERS
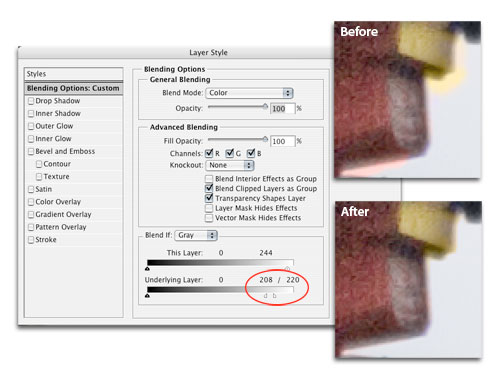
Finally, double-click to the right of the Retouching layer’s name. In the Layer Style dialog’s Advanced Blending section, go to the Blend If sliders and move the highlight slider for Underlying Layer to 220. Hold down Option (PC: Alt) and click on the slider to split it, and move the left half to about 208. This creates a gradual transition and prevents any of the retouching from showing in the brighter parts of the sky. One thing we haven’t covered is noise but we’ve run out of space. I’ll delve into noise-reduction strategies in the next issue.
