
Time to Burn
With a photo collage that’s preplanned, you have the ability to set things up and shoot the images so that your Photoshop collage work will be easier than if you were starting with photos that were taken at different times or different locations. In the example for this tutorial, we’ll be using three photos of a stove taken using a tripod so that they all align perfectly. The first shot is a clock on top of the burner. Next, the clock was removed and the burner was turned on to record it red hot. Finally, the lights in the kitchen were turned off to capture the intense heat glow from the burner. Along the way we’ll cover several useful masking and collage techniques, as well as explore some methods for adding burn damage and creating smoke.
Creating the Collage
STEP 1 Combine Source Files as Layers
The first step is to bring the three source images together into one file as separate layers. We’ll use the Stove-Burner-1 image (the one with the glowing burner) as the base image. Make the Stove-Burner-2 file active, select the Move tool (V), hold down the Shift key, and drag that image on top of Stove-Burner-1, releasing the mouse button before the Shift key. It’s important to release the mouse before the Shift key in order for the images to be properly aligned. Repeat that process with the Stove-with-Clock file. Double-click directly on each layer’s name and give them descriptive names.

CREDIT: ©SEÁN DUGGAN ALL RIGHTS RESERVED
STEP 2 Lock Layer Position; Add a Layer Mask
The first collage task will be to combine the two glowing burner images. To prevent the layers from accidentally moving, make each one active and click the Lock Position icon at the top of the Layers palette. Next, click on the Eye icon for the top layer (clock on stove) to turn it off. Click on the middle layer (burner on) to make it active, and then click on the Add Layer Mask icon at the bottom of the Layers palette. This will add a white layer mask to the middle layer. White in a mask shows everything on that layer.

STEP 3 Modify the Layer Mask with the Brush Tool
Press D then X to set the Foreground/Background colors to black and white. In the Toolbox, select the Brush tool. In the Options Bar, choose a soft-edged brush of about 100 pixels, and set the Opacity to 50% and the Flow to 100%. Click on the thumbnail for the layer mask to be sure it’s active. Carefully paint over the areas where you want to show the glowing qualities of the layer below: the burner, the reflected glow on the tea kettle, the side and front edge of the stove top, and the indicator light on the front of the stove.

STEP 4 Copy the Stove Burner Layer Mask
We can use most of the stove burner layer mask on the top layer that contains the clock. To copy the layer mask, click on it to make it active, hold down Option (PC: Alt), and drag the layer mask up to the clock on stove layer. Part of the clock will be obscured; we’ll fix that shortly. Click on the copied layer mask, and make the stove and clock layer visible. Use the Brush tool to paint with black at 100% Opacity over the burner area to let all of the information from the underlying layers show through.

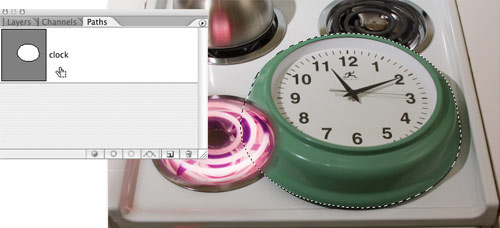
STEP 5 Select the Clock
Next, a selection of the clock is needed to fix the part where the clock overlaps the burner. You can do this either by using the Elliptical Marquee tool with a feather of 0 to select the curved side of the clock, or use the Pen tool (P) for the greatest accuracy and flexibility. We chose the latter method to create a path of the clock. To speed things up, I’ve included this saved path for you. To load it as a selection, click on the tab for the Paths palette and Command-click (PC: Ctrl-click) on the Clock path.
STEP 6 Copy the Clock to a New Layer
With the clock selection active, click on the layer thumbnail for the top layer to make the actual clock photo the active element. Press Command-J (PC: Ctrl-J) to create a copy of the clock on a new layer. This fixes the problem of the clock edge being obscured by the stove burner (you could have also filled the selection with white on the layer mask of the clock on stove layer). Double-click the layer name and rename it to “Clock,” and click the Lock Position icon for this layer so it stays aligned in the correct position.

Scorching the Clock
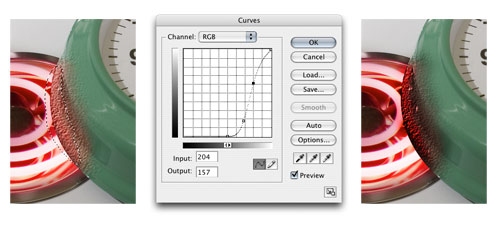
STEP 7 Add a Curves Adjustment Layer for the Burner
Now let’s “turn up the heat” a bit on the stove. Click on the bottom layer (the glowing burner) to make it active. Select the Lasso tool (L) and in the Options Bar enter a Feather value of 15 pixels. Draw a loose selection around the burner. Click the Create New Adjustment Layer icon at the bottom of the Layers palette and choose Curves. In the Curves dialog, drag down substantially on the RGB curve, drag slightly up on the Red channel curve, and drag slightly down on the Blue channel curve (which adds yellow). Click OK.

STEP 8 Add “Heat Blistering” to the Clock
Now we get to play around and imagine what might be happening to the clock if it really were resting on a hot burner. Click back on the Clock layer. With the Lasso tool set to the same settings as the previous step, create a loose selection of the left side of the clock. Press Command-J (PC: Ctrl-J) to copy this up to a new layer. Lock the layer’s position and rename it “heat blistering.” From the Filter menu, choose Texture>Texturizer. Set the Texture to Sandstone, the Scaling to 195%, the Relief to 10, and the Light to Top Left.

STEP 9 Mask the Heat Blistering Layer
Hold down the Option (PC: Alt) key and click the Add Layer Mask icon at the bottom of the Layers palette to add a black layer mask that completely hides the texture layer. Press D on the keyboard to set white as the Foreground color. Select the Brush tool in the Toolbox, and in the Options Bar set the Opacity to 30%. Gradually brush in the blistered texture on the side of the clock. The area closest to the edge of the burner should show the most blistering with it gradually becoming less toward the top edge of the clock.

STEP 10 Add a Reddish Glow
Choose Layer>New>Layer to add an empty layer to the top of the layer stack. In the New Layer dialog, name it “red glow,” select Color in the Mode pop-up menu, lower the Opacity to 75%, and click OK. With the Eyedropper tool (I), sample some of the reddish color under the burner coils. Select the Brush tool, set the Opacity to 100%, and paint on the empty layer on the side of the clock near the burner coils. Add a black layer mask as in the previous step and paint with white at lower opacities to customize the glow effect.

STEP 11 Refine the Glow and Add Scorch Marks
Now we’ll refine the red-hot glow effect. Hold down the Command key (PC: Ctrl key) and click on the layer mask for the red glow layer to add it as a selection. Click on the Create New Adjustment Layer icon at the bottom of the Layers palette and choose Curves. Move the lower-left corner black point over to the middle of the curve grid (Input: 128; Output: 0). Add a point to the lower part of the curve and pull down slightly, and then a point to the upper part and raise it slightly (refer to the illustration). Click OK.
Creating the Smoke
STEP 12 Create Alpha Channel; Shear, Blur, and Render Clouds
From the flyout menu in the Channels palette, choose New Channel to create a new alpha channel. Use the Rectangular Marquee tool to select the left half of the channel. Press D to set white as the Foreground color, then Option-Delete (PC: Alt-Backspace) to fill the selection with white. Choose Select>Deselect. From the Filter menu, choose Distort>Shear. For the Undefined Areas, choose Repeat Edge Pixels. Manipulate the vertical line in the grid to create a gentle vertical curve as shown above. Click OK. Choose Filter>Blur>Gaussian Blur and add a 60-pixel blur. Click OK. From the Filter menu, choose Render>Difference Clouds.

STEP 13 Refine Smoke Trail
Choose Image>Adjustments>Curves. Create tonal separation between the center black “smoke trail” and the rest of the channel by modifying the curve as shown. Click OK. Choose the Brush tool with a large, soft-edged brush tip. Paint with white at 100% Opacity to remove any remaining gray areas, leaving only the center black smoke trail. Press Command-I (PC: Ctrl-I) to invert the channel, then Command-click (PC: Ctrl-click) the alpha channel to load the white areas as a selection.

STEP 14 Position, Fill, and Adjust Opacity
In the Layers palette, click on the top layer to view the color image. With a selection tool, click inside the selection and drag it into a logical position for the smoke. Press D to set black as the Foreground color. Choose Layer>New Fill Layer>Solid Color. Click OK in the Color Picker. Adjust the layer Opacity, as well as painting in the layer mask, to modify the translucence and appearance of the smoke as needed. As a final touch, I selected the smoke, distorted the selection, and added a Curves adjustment layer to create a shadow for the smoke.

