
Images and Catalog Information in Lightroom and Photoshop

I recently returned from a trip to Hawaii with lots of new photos. In this article, I’ll cover how to integrate the images and Lightroom catalog information from a trip or a location shoot into your main Lightroom catalog back home. We’ll also take a look at synchronizing Develop settings, launching a panorama merge from Lightroom, and essential “round-tripping” techniques for moving files between Lightroom and Photoshop.
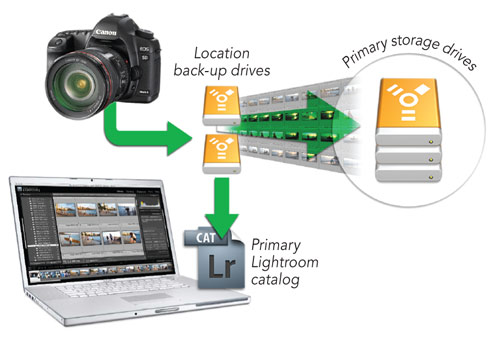
1 [CATALOG TRAVEL STRATEGIES, METHOD 1]
There are two ways to work with your images while you’re traveling and I’ll cover both in this article. First, if your laptop is your main computer, you can add any new images you take on your trip to your main Lightroom catalog. Then once you return home, all you need to do is transfer the image files to the primary hard drive where your image archive is stored (more on that below). To ensure that your files are protected when you’re on the road, you should have at least two copies on separate hard drives.
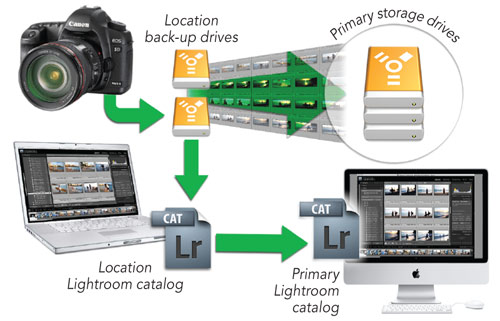
2 [CATALOG TRAVEL STRATEGIES, METHOD 2]
If your laptop is used only for travel and isn’t your primary imaging computer, then an easy way to keep track of your images while you’re traveling (or on a location shoot) is to create a new catalog just for that trip (File>New Catalog). Once you return home, this separate catalog can be integrated into your main Lightroom catalog, and in addition to your images, any work you’ve done in Lightroom, such as virtual copies, collections, ratings, keywords, Develop module settings, etc., will be preserved.
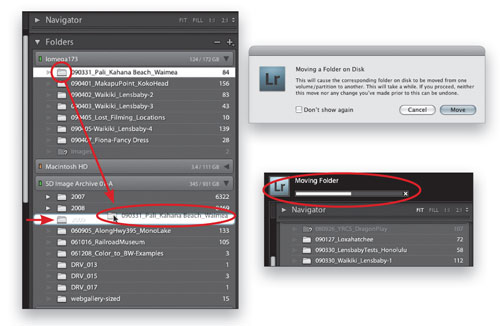
3 [MOVE FOLDERS USING THE LIBRARY MODULE]
If you’ve used Method 1 as described above, once you return home you need to move the images from the external hard drive to the primary drive where your image archive is stored. The easiest way to do this so that Lightroom sees the move and keeps track of where your images are is to move them within the Library module. To do this, open the Folders section in the left Panels area of the Library module and drag the folders to the correct location on the primary storage drive. You can only move one folder at a time.
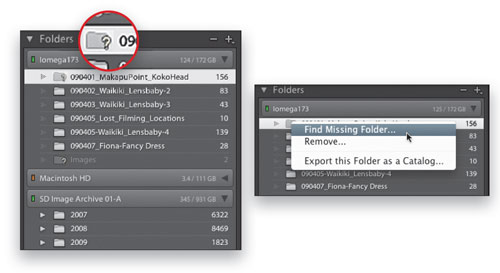
4 [UPDATE FOLDER LOCATIONS]
If you choose to move the image folders outside Lightroom, or have inadvertently done so, then you’ll see a question mark next to those folders, as well as on the thumbnails of the images in that folder. This means that Lightroom can’t locate the folder. Control-click (PC: Right-click) on the folder icon and choose Find Missing Folder to re-establish the link between the catalog and the folder. In the subsequent dialog, navigate to the actual location for the folder, highlight it, and click Choose.
5 [IMPORT NEW CATALOG INTO MAIN CATALOG]
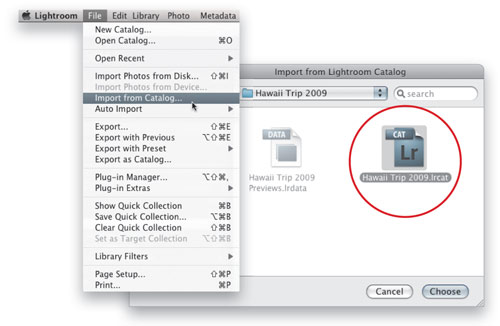
If you’ve used Method 2 as described above, and have created a separate catalog for all of the photos you created while on your trip, then you can import this catalog into your main catalog. From the File menu, choose Import from Catalog. Navigate to the location of your Lightroom catalogs, select the one from your trip or location shoot, and click Choose.
6 [CHOOSE LOCATION FOR CATALOG IMPORT]
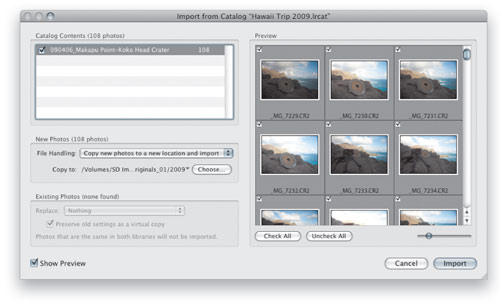
In the File Handling section of the Import from Catalog dialog, choose Add New Photos to Catalog without Moving if you’ve already moved the image folders from the travel hard drive to the primary storage drive (as described in Step 3). If you want Lightroom to move the images for you, choose Copy New Photos to a New Location and Import. Click Choose to specify the folder where you want the photos copied (in the case of this example, this is my 2009 folder). Click Import and Lightroom will create a copy of the folder that the images are currently in.
7 [MAKE TIME ZONE ADJUSTMENT]
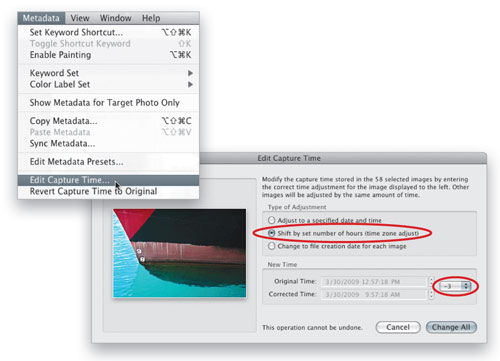
I rarely remember to change the date in my camera to the local time zone when I’m traveling, and if I do, then I usually forget to change it back to my home time zone when I return. Fortunately, Lightroom has a fix for this. In the Library module, open a folder of images that need a time zone adjustment. Choose Edit>Select All, and then Metadata>Edit Capture Time. Select the Shift By a Set Number of Hours (Time Zone Adjust) option, and in the New Time drop-down menu, select the correct time difference adjustment.
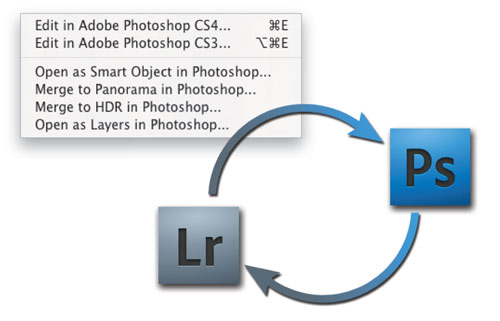
8 [ROUND-TRIPPING WITH PHOTOSHOP]
Although you can use Lightroom to apply a lot of adjustments to your images, for some tasks you still have to use Photoshop. To make this transition easier, Lightroom provides several menu commands that lead to specific Photoshop features. In the rest of this tutorial, I’ll cover a scenario for using Lightroom to launch a panorama process and “round-tripping” the files from Lightroom to Photoshop and back again.
9 [PANORAMA PREFLIGHT: GLOBAL ADJUSTMENTS]
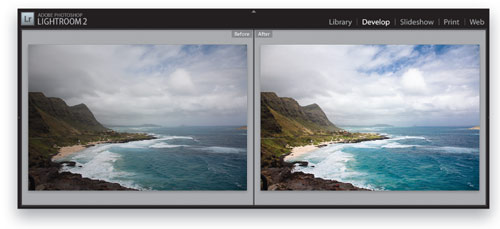
Several of the images from my Hawaii trip were photographed specifically to make panoramas. Before the panorama is assembled, however, global (overall) adjustments are needed. For this image of the view taken from Makapu’u Point looking up Oahu’s windward coast, the file was brightened with the Exposure slider, Clarity and Vibrance were increased, contrast was boosted with a Tone Curve, and changes were made to the Luminance section of the HSL controls to brighten the foliage colors and darken the blues. (Note: You can download the DNGs from www.layersmagazine.com to follow along. Only one of the images has been adjusted as described above.)
10 [PANORAMA PREFLIGHT: SYNC SETTINGS]
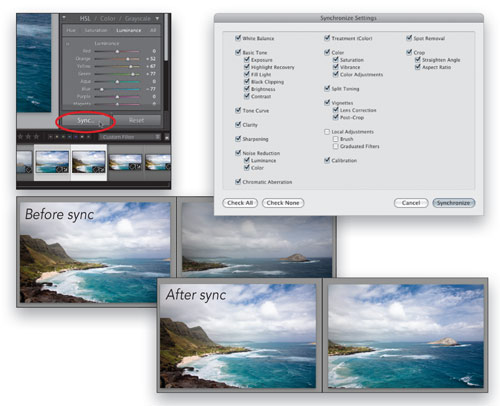
Once the adjustments have been applied to one of the panorama source images, they can be applied to others in the series if the exposure of the different shots is similar, as was the case for the two files in this Hawaii panorama. With the corrected image thumbnail selected in the Develop module, Command-click (PC: Ctrl-click) on the second image of the panorama series to add it to the selection, then click the Sync button on the lower right. In the Synchronize Settings dialog, check all the settings that apply (Local Adjustments settings such as the Brush should probably be unchecked), and click Synchronize.
11 [LIGHTROOM TO PHOTOSHOP: MERGE TO PANO]
With the source thumbnails for the panorama selected, choose Photo>Edit In>Merge to Panorama in Photoshop. When the Photomerge dialog appears you can choose the type of layout for the merge. If you’re unsure, leave it set to Auto. For scenes with obvious near-to-far relationships, Perspective works best, and for landscape panoramas such as this example, I usually choose Cylindrical. Make sure that Blend Images Together is selected. Click OK to create the panorama. (Note: Panoramas can also be launched from Bridge by selecting the thumbnails and choosing Tools>Photoshop>Photomerge.)
12 [STRAIGHTEN HORIZON WITH RULER TOOL]
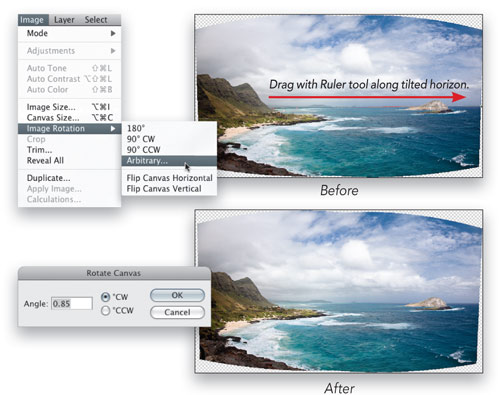
Once Photomerge has created the panorama, you can decide if you want to keep it or return to Lightroom for further fine-tuning of the RAW files. In this image, the horizon isn’t straight. To fix it, use the Ruler tool in Photoshop (grouped with the Eyedropper) and draw a line along the tilted horizon. Then choose Image>Image Rotation>Arbitrary. The angle measured by the Ruler tool is already entered in the Rotate Canvas dialog, along with the correct direction needed to create a level horizon. Click OK to apply the correction.
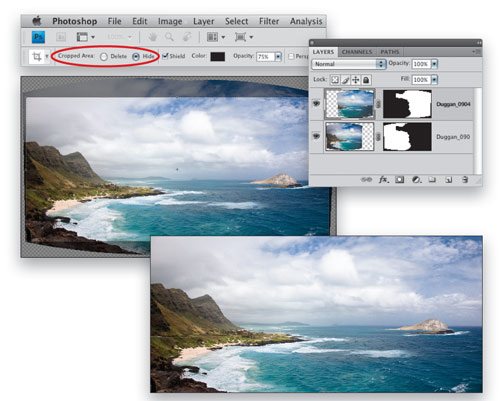
13 [APPLY NONDESTRUCTIVE CROPPING]
If you want the image shape to be more of a standard rectangle, the next step is to crop the panorama. Use the Crop tool (C) to define a rectangular crop box around the image, then click the Cropped Area: Hide radio button in the Options Bar, and press Return (PC: Enter). This will allow you to undo the crop at a later time if you decide to go with the original “organic” Photomerge edges. (This only works if your image has layers with no Background and isn’t re-sized.) To restore the hidden cropped areas, choose Image>Reveal All.
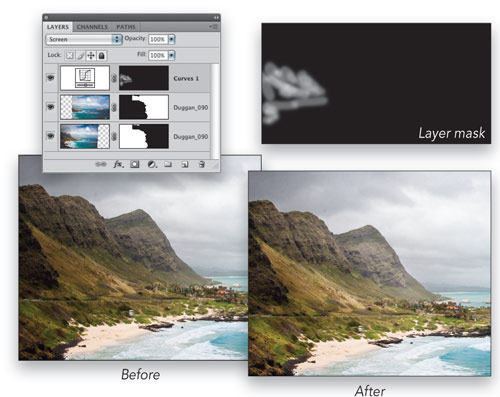
14 [APPLY ADJUSTMENT LAYERS]
Overall, I was pleased with the way the image looked, but it still needs some tonal fine-tuning in Photoshop. Select Curves in the Adjustments panel and set the layer blend mode in the Layers panel to Screen without making any changes to the curve. In the Masks panel, click the Invert button to change the Curves layer mask from white to black. Then use the Brush tool (B) and paint with white at 30% Opacity over the lighter areas of the mountain. At this point, Save and Close the file and return to Lightroom.
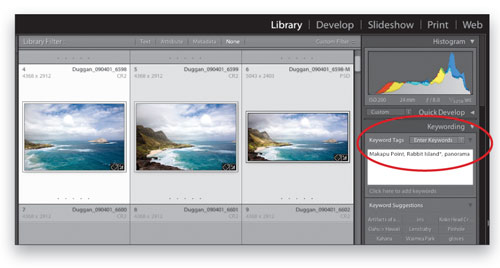
15 [ADD PANORAMA KEYWORDS]
Since this image, as well as the two original files that created it, is either a panorama or panorama components, let’s add the keyword “panorama” to these files, as well as any other files in this folder that qualify as pano source images. This makes it much easier to find potential panorama images in your catalog in the future. To do this, find the Keywording panel in the right Panels area of the Library module and enter the keyword “panorama.”
16 [BRING THE PSD FILE BACK TO PHOTOSHOP]
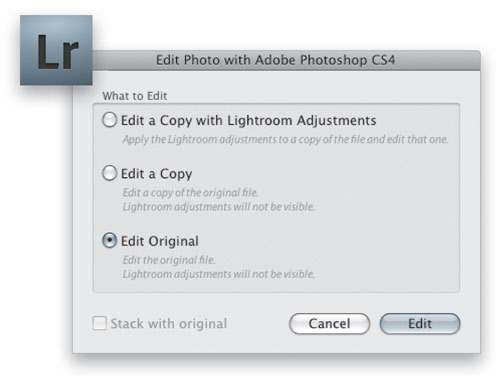
The layered PSD file is now a part of your Lightroom catalog. At this point you can apply further edits in Lightroom, or reopen the current file into Photoshop and work on it there. To do this, select the thumbnail of the PSD file and choose Photo>Edit In>Edit in Photoshop CS4 (you can also get this option by Control-clicking [PC: Right-clicking] on the image or thumbnail). A dialog will appear giving you three options of what data will be brought into Photoshop. Let’s take a closer look at these choices.
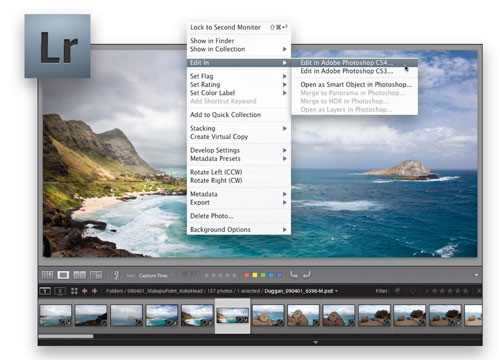
17 [EDIT IN PHOTOSHOP OPTIONS]
Edit a Copy with Lightroom Adjustments: Lightroom edits you have made to the PSD file will be applied to a flattened copy (i.e., no Photoshop layers) and opened into Photoshop. Edit a Copy: Does what it promises—opens a copy of the file into Photoshop with all layers preserved (but no Lightroom adjustments are visible). This is useful if you want to take the file in a different direction than the original PSD file. Edit Original: Preserves all the layers but no Lightroom adjustments are visible. This last option is what I use most of the time.
18 [EDIT AS SMART OBJECT]
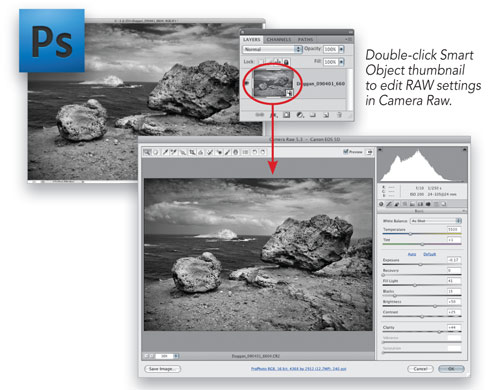
A fourth option appears in the Photo>Edit In menu: Open as Smart Object in Photoshop. This works well for RAW files where you want to embed the original RAW file within a layered PSD file. Once the file is open in Photoshop, you can double-click on the Smart Object layer thumbnail to open up the Camera Raw dialog. But for a file that already has layers, it doesn’t open up an embedded file with all of the layers preserved, which is how this would function if you made a group of layers into a smart object in Photoshop.
ALL IMAGES BY SEÁN DUGGAN UNLESS OTHERWISE NOTED
