
HDR Pro in Photoshop CS5
[If you’d like to download the images used in this tutorial to practice these techniques, visit www.layersmagazine.com and navigate to the Magazine section. All files are for personal use only.]
The new HDR Pro features in CS5 have greatly expanded the HDR capabilities in Photoshop. In addition to basic exposure blending, you can now apply tone mapping effects similar to those found in stand-alone HDR software. In this tutorial, we’ll use a landscape image to take a closer look at HDR Pro as well as applying HDR Toning to a single image.
Shooting for HDR
1 HDR OVERVIEW
If you’re new to High Dynamic Range (HDR), here’s a quick overview: The process makes use of multiple shots of the same scene exposed differently to cover the entire range of brightness in a scene. It’s particularly useful for high-contrast scenes where you can’t capture the entire brightness range in a single exposure. Multiple shots should ideally be exposed one stop apart with the aperture consistent for each exposure. Use as many shots as needed to cover the contrast range (3–7 shots is common, but some situations may require more).

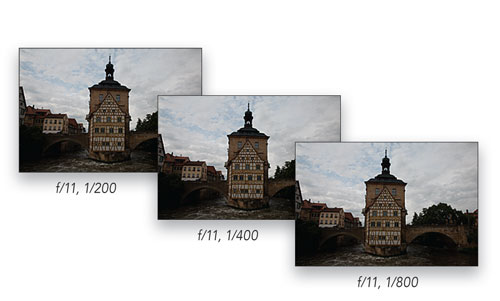
2 TRIPOD/AUTO EXPOSURE BRACKETING
Using a tripod will ensure the shots line up perfectly, but in some cases you can carefully handhold the camera (or stabilize it by other means) and use the Auto Exposure Bracketing mode (AEB) to quickly capture a range of shots at a specified exposure difference (the illustration here shows a one stop range on a Canon EOS 5D). Check your camera’s manual for information on AEB. To get the most benefit from HDR Pro (or any HDR software), shoot in RAW to capture as much tonal information as possible.

HDR preflight check
3 PRE-HDR ADJUSTMENTS TO RAW FILES
Before beginning the HDR Pro process, open all the RAW files in Camera Raw or Lightroom and check for anything that needs fixing. This can include simple things such as white balance and dust spotting, to more “stealth” issues like chromatic aberration. To check for the latter, zoom in to at least 100% and scroll to the outer edges of the image. Look for the telltale red and cyan fringing along high-contrast edges. The image here does have chromatic aberration that can be seen along the rooftops on either side of the image.

4 FIXING CHROMATIC ABERRATION
Identifying chromatic aberration is the first step to fixing it, and fortunately, fixing it is pretty easy. Go to the Lens Corrections controls in either Camera Raw 6 or Lightroom 3 and use the Fix Red/Cyan Fringe slider (it’s just called Red/Cyan in Lightroom) to remove the problem. If you’re unsure of which way to move the slider, just move it drastically one way or the other and you’ll soon know which is the correct direction (here, we moved it to –25).

5 SYNCHRONIZING SETTINGS
Once you’ve made the changes to one file, you can apply the same settings to the other files in the HDR sequence. In Camera Raw, click the Select All button at the top left and then click the Synchronize button. In the Synchronize dialog click OK, and then click the Save Images button. Click the Done button to leave Camera Raw. In Lightroom, select the file you just adjusted and then Command-click (PC: Ctrl-click) on the others in the filmstrip to select them. Click the Sync button in the lower-right corner of the Develop module and in the Synchronize Settings dialog click Synchronize.

Using HDR pro
6 GETTING IMAGES INTO HDR PRO
When you’re ready to dive into HDR Pro, you can do so from Bridge by Command-clicking (PC: Ctrl-clicking) each thumbnail from the HDR sequence to select them and going to Tools>Photoshop>Merge to HDR Pro. You can also do the same thing using the Mini Bridge panel (File>Browse in Mini Bridge) in Photoshop CS5. The basic procedure is the same: select each thumbnail you want to work with, click on the Tools icon (rectangle with arrow), and choose Photoshop>Merge to HDR Pro. If working in Lightroom 3, select each thumbnail and choose Photo>Edit In>Merge to HDR Pro in Photoshop.

7 MERGE TO HDR PRO PRESETS
Once the Merge to HDR Pro dialog appears, you’ll see the source image thumbnails arranged below an initial preview of the merged image. Before we get into the controls in detail, open the Preset drop-down menu and take some of these settings for a test drive. Most of these are pretty useless without additional intervention and should only be considered as a starting point for further explorations. What they’re good for is seeing how the sliders are configured to achieve a certain type of look. This is information you can use to help you find the look you want.

8 CHOOSE A STARTING PRESET
Set the Preset to Photorealistic. Though fairly unremarkable, it’s a good place to start. In the two Mode drop-down menus, 16 Bit and Local Adaptation should be selected (if you select 32 Bit, the dialog will look like earlier versions of Merge to HDR; you don’t have all the cool new creative controls, but it’s useful if you want to create a 32-bit merged file to import into other HDR applications, such as HDRsoft’s Photomatix).

9 MODIFYING EDGE GLOW
In the Edge Glow section, move the Strength slider first to the far left and then to the far right and observe how this affects the “halo” edge around contrast edges. Strength controls the level of contrast in the glow effect. Set this slider to 1.00 and move the Radius slider back and forth to see how it affects the glow. Radius controls the size of the glow effect. Set the Radius to 125. The Strength should still be set to 1.00.

10 SET GAMMA AND EXPOSURE
As you did with the previous sliders, experiment with Gamma and Exposure by moving each one in turn to opposite ends. Gamma adjusts the difference between highlights and shadows, while Exposure adjusts the overall image tone and brightness. The Gamma slider is reversed in terms of how sliders normally work; moving it to the left results in higher values, while moving it right results in lower values. Set both the Gamma and Exposure to 0.70.

11 DETAIL, SHADOW, AND HIGHLIGHT
Detail sets the amount of contrast in the detail of the image. Low values create a dreamy, diffuse look, while high values render a stark, high-contrast effect. Set the Detail to 150%. Shadow and Highlight adjust the luminance (brightness) of those regions. Set the Shadow to 100% and the Highlight to –60%. Working with all of the sliders involves a lot of back and forth as they’re interdependent; changes to one may prompt you to make further refinements to sliders you’ve already set. That’s why getting a sense of exactly what each slider does is so important.

12 COLOR SETTINGS
Vibrance and Saturation are fairly self-explanatory, especially if you’re used to how they work in Camera Raw or Lightroom. Saturation affects all colors equally while Vibrance has a more refined approach, affecting less-saturated colors more and more-saturated colors less. Set both to 50% for this image. Next, click on the Curve tab (located next to the Color tab).

13 ADJUST THE CURVE
The Curve is where you can have a great deal of control as to how the image looks. If you know how curves work in Photoshop, then this will be familiar to you. Move the lower-left point on the curve (the shadow point) to the bottom-right corner of the first square in the grid. Then click on the curve three times to place three additional points and adjust as shown here (to remove a point, simply drag it to the left outside of the grid box). This curve lightens the shadows but makes the highlights a bit too bright; change the Gamma setting to 0.50 to compensate for this.

14 SAVE HDR PRESETS
If you’ve created an HDR look that you like, and that you feel might work well on other images that are similar in overall tone and contrast (i.e., such as landscape images), then it’s a good idea to save your settings as a preset so you don’t have to start from scratch every time. Click the Preset Options icon just to the right of the Preset drop-down menu and choose Save Preset. Name your preset and click Save. Your new preset will now appear in the Preset drop-down menu.

15 DOUBLE-CHECK EDGES AT 100%
Before clicking OK in the Merge to HDR Pro dialog, be sure to zoom in to 100% or more and scroll around the image to check the edges. Some combinations of settings can create hard and jagged pixilation along contrast edges. Low Strength settings are often to blame for hard “crackly” edges, so if you see any, try increasing the value of this setting. And, keep in mind that changes to Strength may require slight modifications to Radius, Detail, and other settings. After you click OK in the next step, inspect the edges again as Photoshop provides a much better view than the low-resolution preview in HDR Pro.

16 REMOVE GHOSTS
If your image contains elements that might have traces of motion in them, such as moving water or tree branches, enable the Remove Ghosts checkbox near the top of the dialog. HDR Pro will select the source file that’s best for the motion-affected areas in the image (the thumbnail will be highlighted in green). You can also make your own choice simply by clicking on a thumbnail. After checking for ghosts, now you can click OK.

17 CUSTOMIZE WITH ADJUSTMENT LAYERS
One very important thing to remember is that simply running a series of files through HDR Pro doesn’t necessarily make a finished image. At best, you’ll have a really good combination of all the source exposures that gives you a solid platform on which to continue enhancing the image. The use of additional adjustment layers with layer masks can greatly improve the overall look of the final image. In this example, we adjusted the Levels for the buildings and bridge, added Curves for more contrast in the sky, used Hue/Saturation to change the color of the river, and finished with Vibrance to saturate the overall colors.

HDR toning
18 TONE MAPPING A SINGLE IMAGE
Photoshop CS5 also has a great new HDR Toning feature that let’s you create an HDR look for a single exposure. This is great for those shots where you either don’t have multiple exposures, or making them doesn’t work for the subject (such as people). You can find this by going to Image>Adjustments>HDR Toning. The controls are exactly the same as those in HDR Pro, and you can even use saved HDR Pro Presets. It’s not the same as real HDR, however; the tonal range will be limited to the single exposure you’re using.

ALL IMAGES BY SEÁN DUGGAN UNLESS OTHERWISE NOTED
