By Scott Kelby
Excerpt from The Adobe Photoshop Lightroom 5 Book for Digital Photographers
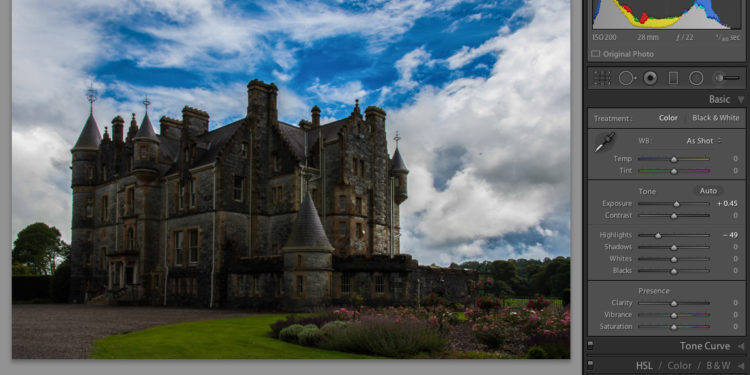
One of the most common digital photography problems is photos where the subject is backlit, so it is almost a black silhouette. I think it's so common because the human eye adjusts for backlit situations so well that, to our naked eye, everything looks great, but the camera exposes much differently and that shot that looked very balanced when you took it, really looks like what you see below. The Shadows slider (which replaced the Fill Light slider in the Basic panel), does the best job of fixing this problem of anything I've ever seen, but there is one little thing you need to add.
Step One:
In this image, the sky looks properly exposed, but the building is totally in the shadows. While I was looking at the scene, everything looked fine because our eyes instantly balance the exposure of the scene, but unfortunately, our camera doesn't—it exposed for just the sky, leaving the building in shadows. Before we fix the backlit problem, increase the Exposure a little to see if that helps (I dragged it over to +0.45 without blowing out the highlights), then drag the Highlights slider to the left to -49 to lower the brightest highlights in the overly bright sky (hey, it helps).
Step Two:
To open up the foreground, click-and-drag the Shadows slider to the right (here, I dragged to around +79). Back in Lightroom 3, you didn't want to drag the Fill Light slider (the Shadows slider's lesser-quality LR3 counterpart) that far, because it made the image look funky. Luckily, you don't get that same heavy-handed look in the current version of Lightroom. If you do crank up the Shadows slider pretty high (like I did here), then the photo may start to look washed out (as seen here), but in the next step, we'll fix that with just one simple move.

TIP: Watch Out for Noise
If an image has noise in it, it's usually in the shadow areas, so if you do open the shadows a lot, any noise gets amplified. Keep an eye out for it as you drag, and if you do see a lot, go to the Detail panel to reduce the luminance and color noise.
Step Three:
The way to get rid of that washed-out look is simply to push a little bit of blacks into the image by clicking-and-dragging the Blacks slider to the left just a little bit (here, I dragged it to -34). Luckily, this washed-out look doesn't happen nearly as often now as it did back in Lightroom 3, thanks to the new process version. In most cases, you'll be able to move it just a little bit to bring back the blacks.

Fixing backlit photos – Learn how to do more from The Adobe Photoshop Lightroom 5 Book here: http://kel.by/Zim7Wz


