
Feathered Transparency With Photoshop & Dreamweaver
If you’ve been working in the world of web design for more than a day, you know all about the struggles and frustrations surrounding the issue of transparency. Well thankfully, with a little 21st century technology and a wee bit of CSS, which we’ll do in Dreamweaver, we can actually achieve some pretty amazing transparent effects—across all the popular web browsers. To do so, we’ll be making use of the PNG (Portable Network Graphics) file format, a format that offers up a lot of potential, but that’s sadly been forgotten by most designers and developers.
Before we really get going, here’s some quick background info. Way back in the web’s stone-age (circa 1995, to be precise), PNG was developed as a response to the licensing controversy surrounding the GIF file format. But developers sought not just to replace GIF, but to vastly improve upon it. And they succeeded. What they wound up creating was a file format that combined the best features of both GIF and JPG, that uses lossless compression, handles a variety of color spaces, 24-bit images, and most importantly, supports feathered transparency. As a matter of fact, PNG comes in two flavors: PNG-8 and PNG-24. It’s PNG-24 that we’ll be lookin’ at here. He’s the version that’ll support feathered transparency.
Now GIF, PNG’s main rival, measures up like a wet noodle in comparison. GIF can only handle 8-bit images with a maximum of 256 colors, compression is often weaker than PNG’s, producing larger file sizes, and GIF only supports binary transparency—that is, in a GIF image, a color is either 100% transparent or it’s 100% opaque. Whereas with PNG, we can have degrees of transparency, known as alpha transparency.
Oh yeah, and GIF also supports animation, which for many designers isn’t a make-or-break issue (what, no circa 1995 spinning globes or burning torches?). So, with all the amazing things PNG’s can do, why the heck aren’t more people using ‘em? Simple. Browser support. Well, let me re-phrase that. It isn’t browser support at all. All the major browsers on both Mac and PC support PNG, except one. Any guesses? Yup, Internet Explorer. Microsoft’s at it again! And with IE being the most popular browser, this lack of support is the nail in PNG’s coffin.
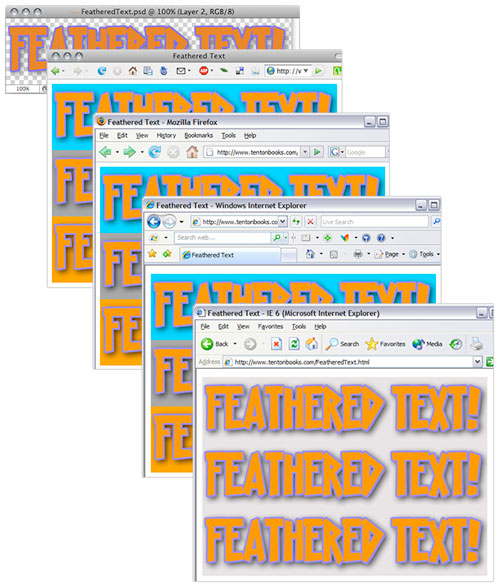
Here’s a look at the same PNG-24 graphic with a feathered drop shadow, saved with alpha transparency, and placed on a few different color backgrounds. The original Photoshop file can be seen at the top. Note how the transparency renders in various browsers: Firefox on the Mac, Firefox on the PC, Explorer 7, and good ‘ol Explorer 6.
As a matter of fact, IE does support PNG—PNG-8 that is, which can only handle binary transparency. PNG-24’s with alpha transparency make the browser choke. Thankfully though, this support issue has been rectified with the release of Internet Explorer version 7, which can handle PNG’s with alpha transparency. So does this mean the PNG format has been raised from the dead, ready for use in modern web design? Hold up, grave diggers. Problem is, there’s still millions and millions of users out there still using older versions of IE, versions that don’t support PNG. And while their numbers (thankfully) are dwindling, we still have to keep them in mind. Otherwise what they’ll see instead of a gently fading transparency is a large gray blob, and we just can’t let that happen!
So as mentioned in this article’s opening, we can rectify the whole issue with a bit of CSS to ensure that users of older versions of IE can see our feathered PNG’s. And best of all, none of the other browsers—browsers that support PNGs already—don’t understand this CSS code, and so they simply display the PNG as they normally would. In other words, the CSS coding that we’ll use will allow older versions of IE to display our PNG’s, while all the other browsers will simply keep doing what they’ve already been doing. Sound sweet? Then let’s take a look at how this works!
Okay, so to get this to work, we’re gonna make use of some CSS image filters—filters that typically do some pretty goofy things like image fades, transitions, and other cheesy effects. However, two of ‘em are gonna help us out here: one called AlphaImageLoader, and another which is simply called Alpha.
AlphaImageLoader is a nifty filter that’s supported from IE 5.5 onward. It allows you to apply an image to the background of an element, so long as that element has dimensions set for it (width and height) that match the image’s dimensions. The second, Alpha, can apply transparency to any element. Great, let’s get this working.
Here’s whatcha do to get this to work:
1. In Photoshop, either open or create an image that has a feathered transparent effect.
For example, you might have some text with a feathered drop shadow that you’d like sitting on a transparent background, or perhaps an image that contains an area of partial transparency, like a bride’s veil. Make sure that your image contains transparency in one way or another—in other words, you can see Photoshop’s gray and white checkered pattern in your transparent areas.
Before going any further, make a note of your image’s pixel dimensions. Choose Image > Image Size if need be, and jot down the width and height pixel values onto a scrap of paper. Photographic memory? Even better. Alright, lets save this fella out.
2. Choose File > Save For Web & Devices.
3. On the right side of the Save For Web & Devices dialog, choose PNG-24 from the Preset pull-down menu.
Double-check that the Transparency option is checked just below the Preset menu. In the dialog’s main viewing window, you’ll see Photoshop’s gray and white checkered pattern showing through the transparent areas of your image once again. Perfect.
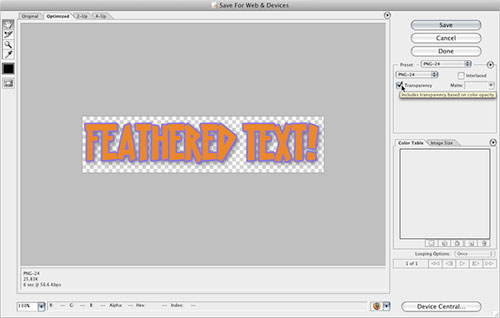
4. Click Save; then in the Save Optimized As dialog that appears, navigate to the directory you’d like to save your image in; give your image a name; then click Save.
I’d suggest saving this image into a site folder that you’ve defined in Dreamweaver—cuz it’s all Dreamweaver and coding from here on in!
5. Launch Dreamweaver; then either create a new page, or open an existing page that you’d like to insert your new graphic onto; then place your cursor where you’d like your image to appear.
Make sure too that your page—or at least the area where you’re dropping your image—has some kind of background set for it already, like a solid color or a graphical background. Otherwise, you won’t be able to tell if this worked!
6. Switch over to Dreamweaver’s code view; then paste in the following code:

Hang in there, you’re almost done. Next we need to tweak the code just a bit for your specific image.
7. In the pasted code, make the following changes:
• In the first line of code, where it reads change the width and height values to the size of your PNG as well.
• In the second line of the code, where it reads filter:progid:DXImageTransform.Microsoft.AlphaImageLoader(src=’Image.png’) set scr=’Image.png’ to the name of your PNG file.
• Finally, towards the end of the code, where it reads src=”Image.png” width=”100″ height=”100″>, set src=”Image.png” to the name of your PNG file.
You’re done! Now for the moment of truth.
8. Save your page in Dreamweaver, then preview it in your various browsers.
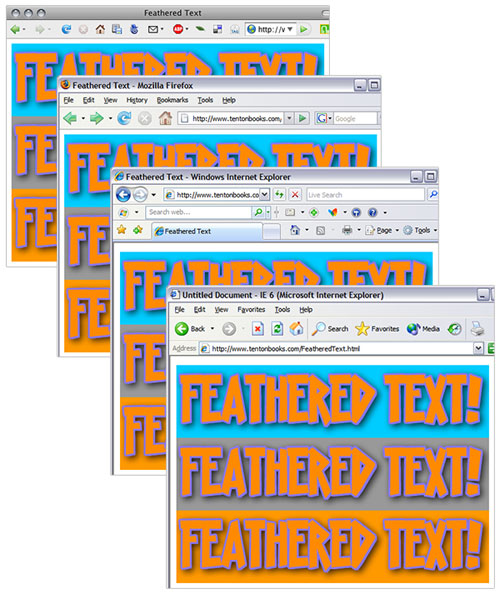
Be sure to preview the page not only in older versions of IE, like version 5.5 and 6, but also check it out in IE7, FireFox, Safari, and any other browsers you have handy. If you have both a Mac and a PC at your disposal (or Parallels on your Mac), check out your page under the different platforms. If you’ve done this correctly, your image should render perfectly across all your browsers.
Awesome!
So there you are; the dramatic tale of PNG, and with a little help from CSS, how he makes a comeback as a file format mainstay. Now that all modern browsers support PNG’s, and with a method for getting ‘em to render those pesky versions of IE, there’s no reason not to make use of this amazing graphic format. You may want to do some further reading on PNG and what he can do for ya, and definitely get fiddlin’ with ‘em in Photoshop and Dreamweaver. Have fun!
