One of the great new improvements of Auto-Blend Layers in Photoshop CS4 is that you can now take a range of shots with different points of focus and Photoshop will composite them together with amazingly precise layer masks to give you a single image where everything is in focus. In this tutorial, we’ll take a look at this ultra-cool capability, as well as check out some simple batch-processing steps for working with RAW images.
If you’d like to download the images used in this tutorial to practice these techniques, visit www.layersmagazine.com and navigate to the Magazine section. All files are for personal use only.
Creating the Source Images
1 OVERVIEW
This technique is for those times when you need extended depth of field in a scene, but for some reason you can’t quite get what you need in a single shot. Now, I know what some photographers might be thinking; just put the camera on a tripod and stop the lens down to the smallest aperture. But sometimes you might not have a tripod. And even with some lenses, stopping all the way down might not get you all the depth of field that you need. The beauty of this feature is that you can take the range of different shots handheld!
2 TAKING THE PHOTOGRAPHS
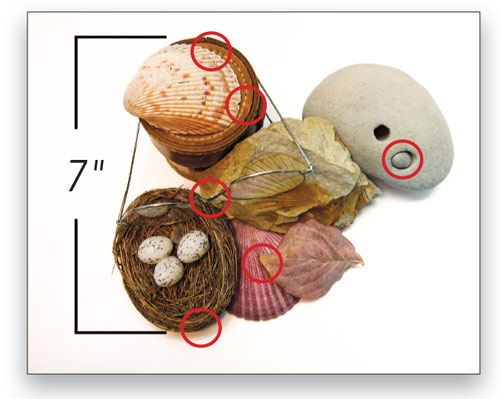
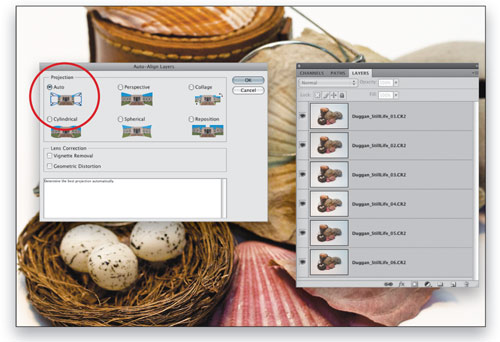
The exact number of exposures that works best will depend on what lens aperture you’re using, the focal length of the lens, and how deep the scene is in terms of the area that needs to be in focus. For this example, I took six handheld shots using an aperture of f/6.3 on a 100mm macro lens. Shutter speeds ranged from 1/125 to 1/200. I started with the leading edge of the scene in focus and then gradually refocused on different areas moving toward the back. The different parts that I focused on are circled in red.
Batch Apply Adobe Camera Raw Adjustments
1 APPLY ADJUSTMENTS TO ONE IMAGE
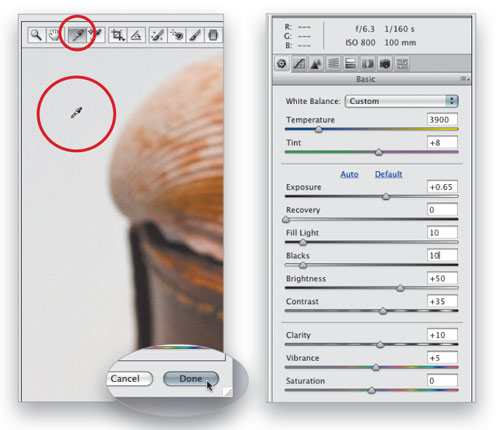
If the images need any adjustments in Camera Raw, then you should apply the adjustments to all of the exposures before the Auto-Blend process. Double-click on the first of the files in Bridge to open it in Camera Raw. For these images, I used the White Balance tool, clicking on the white background to set a white balance, and then adjusted the Exposure, as well as a few other settings in the Basic panel, to brighten the image a bit. Then I clicked Done to apply the changes but not open the image.
2 APPLY SAME SETTINGS TO OTHER IMAGES
Now that we’ve adjusted one image, we can quickly apply those same settings to the other five images. Click on the second image and then Shift-click on the last image in the sequence. You should now have five images selected in Bridge. Control-click (PC: Right-click) on one of the thumbnails and from the contextual menu, choose Develop Settings>Previous Conversion (you can also find this same command in the Bridge Edit menu). The Camera Raw settings from the first image will be applied to all of the selected files.

Bring Images Into Photoshop
1 MAKE IMAGES INTO ONE PHOTOSHOP FILE
Now it’s time to bring the images into Photoshop as layers in a single file. Select all six of the thumbnails by clicking on the first one and then Shift-clicking on the last one. Choose Tools>Photoshop>Load Files into Photoshop Layers. When this operation is finished, we’ll have a single file open in Photoshop and each of the original source exposures will be on a separate layer.

2 AUTO-ALIGN LAYER
If you zoom in close and turn off the Eye icon for each layer, starting from the top down, you’ll see that each layer has a different area that’s in focus. You’ll also see the position of the image shift around a bit. Since these images were shot handheld, we need to make sure that they’re properly aligned before we begin the blending process. Click on the top layer and then Shift-click on the bottom layer to select all the layers in the stack. Choose Edit>Auto-Align Layers. Leave the Projection set to Auto and click OK.
3 IT’S TIME FOR THE MAGIC
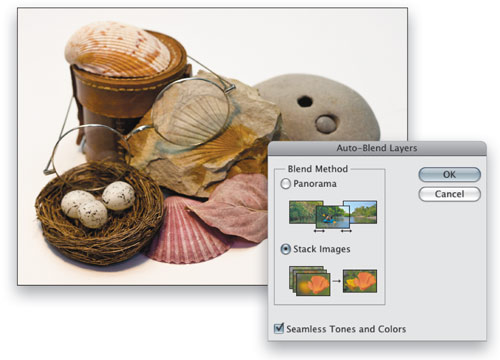
After Auto-Align Layers is finished, the layers have obviously changed position but when your turn off the Eye icons in order, you’ll see that the actual subject in the photo is much better aligned than at the beginning. Now it’s time for the magic! Make sure that all of the layers are still active in the Layers panel. (If not, select them as we did in the previous step.) From the Edit menu, choose Auto-Blend Layers. Set the Blend method to Stack Images and make sure that Seamless Tones and Colors is checked. Click OK.
4 CHECK OUT THE MASKS
Some pretty intense math is going on under the hood for this process. The size of the image, how many layers have to be blended, the complexity of the blend, and the bit depth will all influence how long it takes. When the process is done, you’ll see that a very precise and intricate layer mask has been added to each layer to create the blend into a single image. Option-click (PC: Alt-click) on one of the mask thumbnails to see the mask view. Click back on a layer thumbnail to return to a view of the image.

5 CROP ANY UNEVEN EDGES
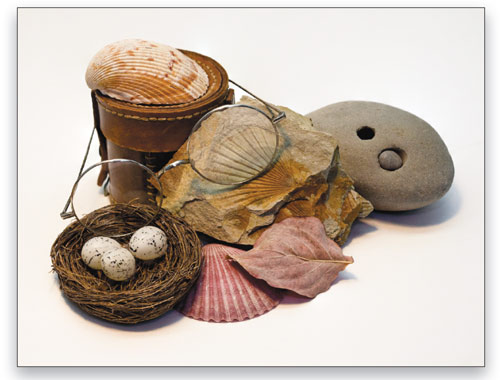
The accuracy of the blended image will vary from scene to scene. The result will be affected by how complex the details are, as well as how many images need to be blended and the depth of the blend. Overall, it’s quite impressive. Even on this still life, with all its intricate, high-frequency detail, the blend is nearly perfect. The only minor glitch is a slight fuzziness at the top of the right-hand lens of the glasses.
The final step is to use the Crop tool (C) to crop off the uneven edges created by Auto-Align.
6 TIPS AND NOTES
Here are some things to consider when shooting for and using the Auto-Blend feature:
• Images for this technique can be shot on a tripod or handheld.
• Sometimes you can get by with fewer shots; it all depends on the type of lens you’re using and the aperture. For this example, I tried using only three exposures but found that the result was more accurate when I used six.
• To ensure accurate layer alignment, always use the Auto-Align layers command before applying Auto-Blend Layers.
• Check for errors at 100% zoom (View>Actual Pixels).