
Dreamweaver: CSS Jump-Start
Whether you’re new to CSS or you’ve been designing with styles for decades, the new CSS layouts built into Adobe Dreamweaver CS3 are a welcome addition to any designer’s arsenal-if you know how to customize them.
But before you rush off to check out these new designs, I must warn you that their grey color schemes aren’t much to look at when you first open them. But fortunately, color styles are easy to alter in CSS, and if you know the basics of editing styles, you can adjust columns, footers, and the alignment of any element on the page.
If you’re new to CSS, altering one of these layouts may seem confusing but it’s easier than starting from scratch. And if you’ve been using CSS for a while, you’ll appreciate the head start these layouts offer. The following tutorial is designed to show you how the new CSS layouts work, what you can do with them, and how to make them your own.
STEP 1 Create Layout for Look of Website
For this column, I’m using a website I created for a dressmaker using a design that includes a sidebar on the left side of the page layout, a header and footer for navigation links, and a banner. It’s a simple site (only a few pages) that showcases a collection of ball gowns. With the new CS3 layouts in Dreamweaver, you can create a variety of designs with columns and sidebars. Starting with a layout made this site fast and easy to create. (If you would like to view the source code for this site or test the pages online, visit www.designsfordancing.com.)

STEP 2 Set Up Your Site
You can add new pages with CSS layouts to an existing site or base your entire site design on them. Either way, before you can dance through the rest of these steps, you should define your site (if you haven’t already). For a new site, choose Site>New Site. I prefer to use the Advanced tab in the Site Definition dialog and then all I need to do is fill in the fields in the Local Info category (as shown). For more detailed instructions on defining a site, check out the tutorial at http://layersmagazine.wpengine.com/defining-a-site-in-dreamweaver.html.

STEP 3 New Document Dialog is All New
Choose File>New in Dreamweaver CS3 and you’ll find a completely redesigned New Document dialog. Use the options on the far left to choose among various template options or choose Blank Page (as we’ve done here) to start from scratch. Under the Page Type column, you can now select from many different file types, including HTML, XML, and PHP. Select the page type you want to create, such as HTML, and a list of CSS layouts appears in the Layout column (a preview of the selected layout is displayed at the far right).

{module:ads/large_rectangle}
STEP 4 So Many Layouts…
There’s a longer description of the layout types in Dreamweaver’s Help files, but here are the essentials: Liquid layouts are designed to expand and contract depending on the size of the browser window; Fixed layouts are centered within the browser and set to a width of 780 pixels; Elastic layouts use the ems measurement to adapt to different text sizes and other variations in display; and Hybrid layouts use a mix of options. We selected a two-column fixed layout with a header and footer. When creating a layout, you can choose to create internal styles or an external style sheet.

STEP 5 Change the Width of a Fixed Layout
In general, fixed layouts are easier, but liquid designs are more flexible. Because we’ve chosen a fixed width, there’s a style that can be used to change the width of the layout area. Following a common practice of using div tags to contain elements on a page, and styles to describe how they should be displayed, Dreamweaver includes a div identified as “container” in every layout. To change the width, you need to change the corresponding style. Choose Window>CSS Styles, click the All button, twirl open the style, and then change the width of the style containing “#container.”

STEP 6 Replace the Header with a Graphic
When you first view this layout, remember that all of the elements can be changed. For example, you can replace any of the text by simply selecting it and typing in your own words. For this design, we’ve replaced the word Header with a graphic that spans the entire width by deleting the text and using Insert>Image to add our banner. Tip: To remove the extra space around the banner, remove the h1 tag from the div by Right-clicking on it and selecting Remove Tag, and then remove the padding from the #header style in the CSS Styles panel.

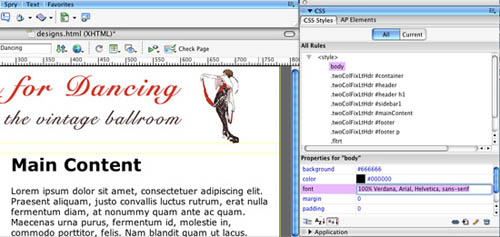
STEP 7 Change the Font Face
You can also change the text font or color by changing the corresponding styles. To change the font style for the page, you’ll need to alter the Body style because the body tag controls page-wide settings, such as font face and link styles. You can use multiple fonts on a page by changing the font style for a specific section of the text but to change the default font for the entire page, click to select the body tag at the bottom of the document window and use the Font field in the Properties panel to select a font collection.
STEP 8 Edit Styles
You can further edit styles by double-clicking on any style name in the CSS Styles panel to open the CSS Rule Definition dialog. In this multi-category dialog, you can define styles to control text, change backgrounds, align elements, and more. In this step, we’ve double-clicked the style containing “#maincontent” and changed the line height to 125% to add space between the lines of text in the main text area.

STEP 9 Add Text and Images
You can replace any of the text in a CSS layout with images, multimedia files, and anything else you can put on a webpage by simply deleting the text and inserting the new content. If you use copy-and-paste to bring in text from another program, choosing Edit>Paste Special will give you more choices about how much of the original formatting you want to preserve. To add images, simply choose Insert>Image or click on the Insert Image icon in the Common Insert bar at the top of the work area.
STEP 10 Adjust Column Widths
If you want to change the column widths in a CSS layout, you need to alter the styles for their corresponding div tags. The style for this sidebar div has a specified width but the div identified as Main Content uses a Margin style to control its positioning in relationship to the sidebar; therefore, to change the left sidebar’s width, you have to change the Width setting in the #sidebar style and the Margin setting in the #maincontent style by the same amount in the CSS Styles panel. This column position is designed to display consistently in a wide variety of browsers.

STEP 11 Adjust Padding and Margins
The simplest way to understand padding and margins is that padding is on the inside of an element and margins are on the outside—whether the element is a div tag, an image, a table cell, or anything else. If you want more space around a photo, add margin space. If you want a gap between the edge of a table cell and its contents, add padding. Note: When you add padding, you increase the overall size; for example, a div that’s 200 pixels wide and has 10 pixels of padding added on each side will expand to 220 pixels.

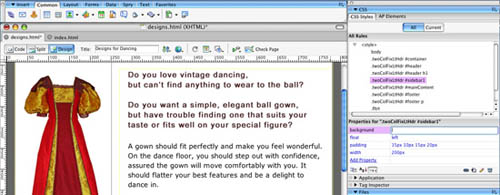
STEP 12 Align Elements Right and Left
If you want to wrap text around an image, as in this example, or position a div tag or any other element on a page, you can use the float right and float left styles that come with all of the Dreamweaver CSS layouts. Don’t be confused by their abbreviations in the style sheet: Fltlft and Fltrt are the styles you want for this task. To apply alignment styles, select an image or other element and choose the style you want from the Class drop-down menu in the Properties panel.

STEP 13 View or Hide CSS Visual Aids
Although the boundaries of div tags don’t display in a browser unless you include a style to create a border, by default Dreamweaver CS3 displays a thin line around divs to aid you in your design work. You can turn these and other invisible elements on and off by clicking on the Visual Aids icon at the top of the workspace and selecting the options you want to display. You can hide all visual elements or choose to display any subset of them by selecting them from the list.

STEP 14 Preview Your Page in Multiple Browsers
Although Dreamweaver is designed to display CSS according to contemporary standards, not all browsers support CSS the same way. Users can control options that affect layout, such as font size, so it’s always wise to test your designs in a variety of Web browsers before you publish them. At the very least, testing in Internet Explorer, Firefox, and Safari, and viewing your pages on both a Macintosh and a PC is good practice. If you don’t have all those options, ask your friends to test your pages for you.

