
Contrast is a key element in any photograph. If there’s too much of it when you’re taking the photo, then you’re faced with extremely challenging lighting conditions and you run the risk of either clipped highlights or blocked-up shadows (or both!). Not enough contrast and the image can look dull and flat.
In this tutorial, we’ll take a look at some interesting techniques for improving contrast using the Shadow/Highlight command, empty adjustment layers, blend modes, and the Blend If sliders in the Layer Style dialog. These techniques work particularly well for subjects made of reflective polished metal. We’ll finish by taking a look at a classic technique for using the High Pass filter to boost contrast along the midtone contours of an image.
[If you’d like to download the project files used here to follow along with this tutorial, visit layersmagazine.com, or click here. All files are for personal use only.]
STEP 1 Convert to Smart Object
The photo of the old DC-3 was taken in full afternoon sunlight and the bright, reflective aluminum of the fuselage is pretty washed out. The biggest problem, however, is the hot spot reflection on the side of the plane. We’ll explore a couple of techniques to fix this, as well as give the old bird a good polish and buff job. To apply our changes nondestructively, we’ll take advantage of Smart Filters. Control-click (PC: Right-click) on the Background layer in the Layers panel and choose Convert to Smart Object. You can also choose Filter>Convert for Smart Filters.

STEP 2 Tame the Highlights with Shadow/Highlight
Now choose Image>Adjustments>Shadow/Highlight. This feature uses the image’s own tonal “map” to create a virtual mask through which it applies the corrections. Because we’re not really concerned with the shadows in this shot, set the Shadows Amount and Tonal Width to 25% and the Radius to 50 pixels (check the Show More Options box). In the Highlights section, set the Amount to 80%, the Tonal Width to 50%, and the Radius to 50 pixels. This does a pretty good job at taming the bright highlight on the fuselage. To boost the contrast a bit, set the Midtone Contrast to +40. Click OK.
Image by SEÁN DUGGAN

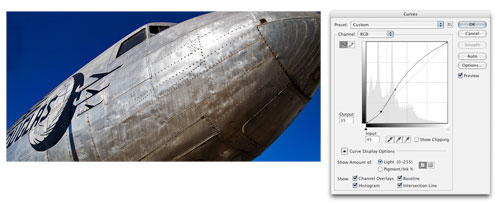
STEP 3 Polish with a Contrast Curve
Things are looking much better after the Shadow/Highlight adjustment. The highlight is not so out of control and the aluminum surface is even starting to look a bit polished. Now we’ll polish further with a simple contrast curve. Click the Create a New Adjustment Layer icon at the bottom of the Layers panel and choose Curves. In the Curves dialog, add a curve like the one shown here. For the upper point, the Input value is 90 and the Output is 105. For the lower point the Input value is 45 and the Output is 35. Click OK.
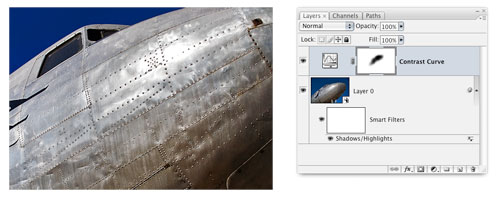
STEP 4 Modify the Layer Mask
After the contrast curve, the metal is taking on a nice shine. The problem, however, is that now the highlight is too bright once again. We can fix that with a few brush strokes on the layer mask for the Curves layer. Choose the Brush tool (B) from the Toolbox. Press D then X to make black the Foreground color. Choose a 125-pixel soft-edged brush tip and set the brush Opacity to 30% in the Options Bar. Brush over the highlights a few times to lessen the brightness.
STEP 5 Add an “Empty” Adjustment Layer
Now it’s time to apply the final coat of polish and make this old plane look like new. Add a Curves adjustment layer and in the Curves dialog, click OK without making any changes. I refer to this as an “empty” adjustment layer. At the top of the Layers panel, set the blend mode to Soft Light. You might also give Overlay a try, although it will be much stronger than Soft Light. This looks pretty cool, but it’s a bit heavy handed. In the next step we’ll use the Blend If controls to modify the effect.

STEP 6 Blend Modes and Blend If Sliders
In the Layers panel, double-click on the empty adjustment layer to the right of the layer name. This will bring up the Layer Style dialog. At the bottom of the dialog in the Blend If section, move the black slider for This Layer to 20. Then, Option-click (PC: Alt-click) on the slider and drag to the right to split the slider into two halves. Move the right half of the slider to level 80. You can also try the Overlay blend mode in the General Blending section at the top of the dialog. Click OK to apply the change.

STEP 7 The Blend If Sliders Explained
The Blend If sliders control what tonal areas of the active layer (This Layer) or the Underlying Layers are visible in the image. This adjustment made in the previous step means that the effect of the Curves layer set to Soft Light begins to gradually fade out at level 80 and is completely gone by level 20. Although the Blend If sliders are a great tool for image compositing, they’re also quite useful for tonal or contrast adjustments, as this example illustrates. For the final version, we used the Overlay blend mode for the empty adjustment layer.

STEP 8 High Pass Contrast Layer
Blend modes and the Blend If sliders are also key to a classic technique that applies a contrast boost to the visual contours of an image. Copy the Background layer by clicking-and-dragging it onto the Create a New Layer icon. (If your image already has adjustment layers, make sure that the topmost layer is active, hold down the Option [PC: Alt] key, and choose Merge Visible from the Layers panel’s flyout menu.) Double-click the name of the new layer and rename it “High Pass Contrast.” Set the blend mode to Overlay and the Opacity to 50%.

STEP 9 Set Blend Mode and Blend If Sliders
Double-click the area to the right of the layer name to open the Layer Style dialog. Adjust the Blend If sliders for This Layer to 50/70 for the black slider and 185/215 for the white slider. Use the Option (PC: Alt) key to split the sliders, as described in Step 6. The Blend If values target the contrast boost to the middle part of the tonal range, and these values will protect the darkest shadows and brightest highlight details from clipping that could be introduced by the Overlay blend mode. Click OK.

STEP 10 Apply the High Pass Filter
From the menu bar, choose Filter>Other>High Pass. Move the Radius slider and watch how the contrast along image contours changes. There’s no one “right” radius value to use, but a setting between 25 and 50 is a good place to start (you can also adjust the layer Opacity after applying the effect). The High Pass filter creates a more “contoured” layer that serves as a mask through which the Overlay blend mode contrast boost is applied. In some ways, this is a manual method for applying a technique that’s very similar to the new Clarity slider in Adobe Camera Raw and Photoshop Lightroom.

