
Excerpted from Chapter 13 of The Adobe Photoshop Lightroom 5 Book for Digital Photographers
For all the wonderful things Lightroom's Print module does, one feature it doesn't have is one that lets you backscreen a photo (a staple in most wedding albums). So, I came up with a workaround, where we can use a backscreened image as our page background, and then put another non-backscreened image in front of it on the same page. It's easy, but not really obvious.
Step One:
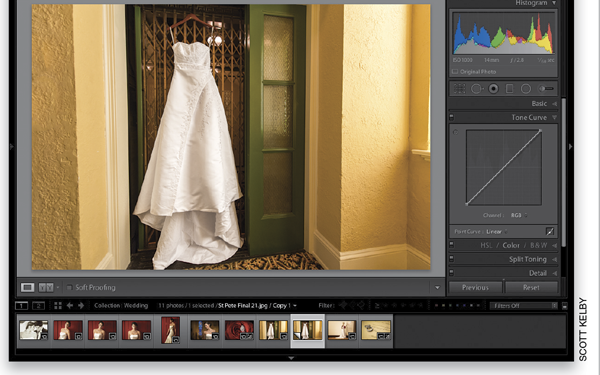
Choose the photo you want to use as your backscreened image, then create a virtual copy of it by pressing Command-' (apostrophe; PC: Ctrl-'). We'll use this virÂtual copy to make our backscreened image, so our original stays intact. Once you've created your virtual copy, go to the Develop module's Tone Curve panel. Make sure the Point Curve is visible (if yours has more sliders below it, and doesn't look like the one you see here, just click on the little Point Curve icon at the bottom-right corner of the panel).

Step Two:
To create the backscreened look, click-and-drag the bottom-left corner point straight up along the left edge until it's about 3/4 or so of the way up to the top (as shown circled here in red).

Step Three:
This is an optional step, but you see this often enough that you might want to consider converting the image you just backscreened to black and white. The advantage is it creates more contrast with the image you're going to put on top of it. To make it a black-and-white image, just go to the HSL/Color/B&W panel and click directly on B&W (as shown here). That's it—it's black and white. (Note: Because the image is backscreened, we can get away with this one-click black-and-white conversion. Otherwise, we'd use the technique for creating high-contrast black and whites found in Chapter 4) Now switch to the Print module. Click on the Page Setup button and choose a borderless 8.5×11" landscape page.

Step Four:
Then, click on Custom Package in the Layout Style panel at the top of the right side Panels area and scroll down to the Cells panel. Click the Clear Layout button, then make sure the Lock to Photo Aspect Ratio checkbox is turned off (turning this off allows you to drag a photo out larger than the page size if necessary). Now, click on your backscreened image, and drag it onto the page. To make your backscreened image fill the page, click-and-drag the image up to the top-left corner of the page, then grab the bottom-right corner point and just drag it out until it fills the entire page, edge to edge (as shown here). If your image won't stretch large enough to extend off the page, that's because you didn't turn off the Lock to Photo Aspect Ratio checkbox at the beginning of this step.

Step Five:
Getting another image to sit on top of this backscreened image is actually easy, but you kind of have to know a trick. The problem is if you add a new cell (like, for example, a 2.5 x 3.5 cell) it doesn't appear on the same page as your backscreened image. Instead, it creates a new page and adds the cell there. So, what you'll need to do is just click-and-drag your full-color photo into that new cell on the extra page (as seen here). Then, click-and-drag the cell onto the first page, and it appears over your backscreened image (as seen in the next step).

Step Six:
You can now position the image wherever you'd like (you'll see that now-blank additional page is still there, but to get rid of it, just click on the round X button in the top-left corner and it's gone). Here's the final page with the backscreened image and the second image on top of it. I also added a line of text (using the Identity Plate in the Page panel), using my favorite new wedding font, Parfumerie Script Regular (from MyFonts.com for around $30).


Learn how to do more from The Adobe Photoshop CC Book for Digital Photographers (2014 Release) by clicking here.
