In Photoshop CS6 apply simple Smart Filter stacking to create a detailed ‘bump' texture to simulate the same texture found on a golf ball.
Step One: Create New Document Preset
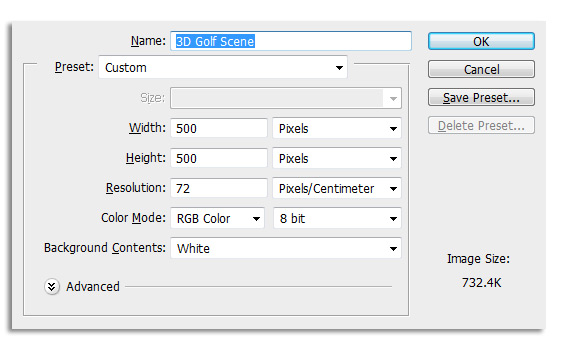
With Photoshop CS6 open, go to the ‘File > New' and create a 500×500, 72 Resolution with Background Contents of White. Click OK to commit the document creation.

Step Two: Create Empty Layer
Before initiating the 3D scene, click the Create New Layer icon command at the bottom of the Layers Panel, to create an ‘empty' Layer (called Layer 1) as I have captured below.

Step Three: New 3D Mesh from Layer > Sphere Preset
With Layer 1 active in the Layers Panel, go to the 3D > New 3D Mesh from Layer > Mesh Preset > Sphere menu command.
As captured below:
A. Layer 1 will be converted to a 3D Sphere object preset;
B. With' Layer 1' 3D object active, go to the Window > 3D menu command to access its core options; within the 3D Panel, select: 1. The Materials icon on the 3D Panel Toolbar or 2. Select the ‘Sphere_Material' sublayer. Either choice will take you to the Properties > Materials for this material. The area of importance for this walkthrough will be the ‘BUMP' option in the Properties Panel.

Step Four: Creating a Bump Map Texture
With ‘Sphere_Material' for this 3D Object active, lets add a texture material directly to the Bump property.
As captured below, in the Properties Panel, to the far right of the Bump option is a ‘folder' icon. Click it and from the context menu selection choose ‘New Texture'.

At the ‘New' dialog for ‘Sphere_Material – Bump' make the Width and Height the same size as the original document. In our case it will be 500×500. Once set click OK to commit changes.

Step Five: Edit Bump Map Texture
Now lets' edit this new bump map material by adding a custom texture with Smart Object filtering.
To edit an existing material you have two options:
1. In the Layers Panel double click the ‘Sphere_Material – Bump' sublayer;
2. Or from the Properties Panel, click the folder icon again and from the context menu options choose ‘Edit Texture'.
Either option will open a new document tab container where you can add your custom texture.

Step Six: Add 50% Gray to Bump Texture/Material
Once at the new texture (.psb) document tab, and the ‘Background Layer' active, go to the Edit > Fill menu command and at the dialog prompt use 50% Gray Contents option and click OK to commit.
As captured below (bottom) our current texture state is nothing more than a Background Layer filled with 50% Gray.

Step Seven: Convert Bump Texture/Material to Smart Object
The next step will be to apply Smart Filters, but to do so the Background Layer needs to be converted to a Smart Object Layer. With the Background Layer active in the Layers Panel, go to the Layer > Smart Objects > Covert to Smart Object menu command.
There will be no physical change to the Layer except that a Smart Object icon will be appended to the Layer thumbnail (encircled in red, below).

Step Eight: Add Smart Filter (Stack)
Now our base texture (50% Gray) is a Smart Object and is ready for Smart Filter ‘stacking'. Smart Filter stacking is simply layering one native filter above another. In our case we will employ two Smart Filters: Color Halftone followed by a slight Gaussian Blur.
With the Background Smart Object Layer active:
1. Go to the Filter > Pixelate > Color Halftone menu command. At the prompt adjust the Radius and Channel options as I have captured and click OK. The result will be a dot pattern that will resemble the indents found on a golf ball.
Tip: For Bump Materials, white areas represent ‘raised' points and dark areas are the ‘low' points.
2. Once the halftone pattern is in place, go to the Filter > Blur > Gaussian Blur menu command and use a low Radius of 1.9, then click OK to commit.
Once the Gaussian Blur is committed go to File > Save then click the X to the right of the (.psb) document tab.

Step Nine: Adjust Bump Intensity (other options)
We now have a textured golf ball, but the Bump material is still a little harsh. From the 3D Panel > Whole Scene area, select the ‘Sphere_Material' (encased in red), then In the Properties Panel, lower the Bump intensity. I settled on a 2% value and increased the Shine value to 65%.

Step Ten: Optional (Adjust Lights)
The shadows in the above version is too harsh so to adjust, click the Lights icon in the 3D Panel (encircled in red) and with the Move Tool active from the main Toolbar, drag the light handler to adjust the angle of the Infinite Light.

Final textured golf ball.

Step Eleven: Save Material as Preset
In the event that that you want to reuse this ‘Bump' material you can save it as Material preset. From the Properties Panel > Preset Picker > Picker Options context menu list choose New Material and give it a friendly name, and click OK to commit. As with Photoshop preset management the new material appear at the bottom of the Preset list the next time you go to access it.

Though the above material/texture is exclusive to a pattern found on a golf ball, you can explore a variety of Filter Stacking options to create a textured surface to the 3D object.
Until next week
Happy trails

