
Experiment with Adobe Illustrator and Adobe Photoshop CS5
Happy Accidents!
Many people use the term “happy accident” to describe an unexpected result they come across while working towards an unrelated end goal. They’re anticipating a certain reliable outcome but end up with something cooler than the original plan. Here’s an idea on how to use Adobe Illustrator CS5 and Adobe Photoshop CS5 to experiment with the goal of getting your own happy accident, although not quite so accidentally.
1 CREATE A PHOTOSHOP DOCUMENT
Let’s imagine that we need to make an interesting background in Photoshop CS5. Create a new document (File>New) in the size you need and then click on the Background color swatch and choose a color (we used R:247, G:148, B:29). Fill your background with this color by pressing Command-Delete (PC: Ctrl-Backspace). Of course, it could be filled with a gradient or have some texture, but for this example we’ll stick with a solid color.

2 CREATE BASIC SHAPES IN ILLUSTRATOR
Open Illustrator CS5 and create a new document (File>New). Select the Perspective Grid tool (Shift-P) to see a grid in the background of your document, then use the Pen tool (P) to create a couple of shapes. In this case we’ll create two separate objects, which will ultimately give us more options. Go to View>Perspective Grid>Hide Grid when finished to view the objects against a blank background.

3 COPY THE COLOR TO ILLUSTRATOR
In Photoshop, click on the Background color swatch, click-and-drag the hexadecimal number (F7941D in our example), choose Edit>Copy, then click Cancel. Back in Illustrator, double-click the Color Stroke and in the Color Picker, click on the # symbol to select the hexadecimal value, then select Edit>Paste. Now choose a slightly darker version of this color (here C6761E) and click OK. Using the Selection tool (V), select the other object, and apply the same color for its Stroke. Shift-click the first object to select both objects, click on the Fill swatch, then click the None (/) icon below to remove the fill colors.

4 ALTERING SHAPES, KEEPING THEM LIVE
Using the Width tool (Shift-W), click-and-drag on the anchor points (or any portion of a path) to interactively change the width of the lines. The advantage of this tool is that it’s a “live” effect, which means that you can edit the widths at any time. Note: If you don’t see your strokes widening when you release the mouse button you’re probably in Outline viewing mode; press Command-Y (PC: Ctrl-Y) to change your viewing mode to Preview so you can see what’s going on.

5 FROM ILLUSTRATOR TO PHOTOSHOP
Press Command-C (PC: Ctrl-C) to Copy the two objects from Illustrator and then switch to Photoshop. Select Edit>Paste and in the dialog, click on the Paste As: Smart Object. If necessary, Shift-Option-click (PC: Shift-Alt-click) a corner of the bounding box and drag it to resize the shapes proportionately from the center, and press Return (PC: Enter). A new layer called Vector Smart Object appears in the Layers panel.

6 ADD FILTERS TO VECTOR SMART OBJECT
Because the layer is a vector smart object, we can apply smart filters in Photoshop, which gives us tons of room to experiment with different settings or multiple filters. In our example, we’ll to try the Polar Coordinates filter, using the Polar to Rectangular option: With the Vector Smart Object layer active, go to Filter>Distort>Polar Coordinates, click on the Polar to Rectangular option, and click OK.

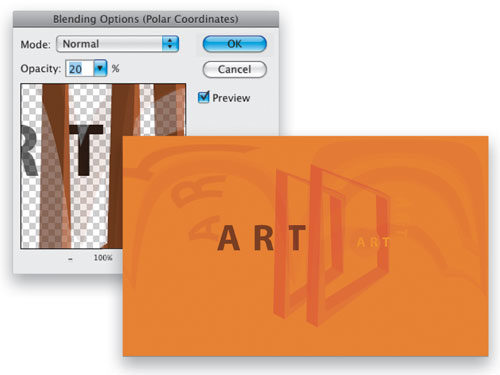
7 EDIT SMART FILTER SETTINGS
In the Layers panel, double-click the Blending Options icon to the right of the Polar Coordinates Smart Filter to try different settings. In the dialog that appears, we chose Multiply from the Mode menu then dragged the Opacity slider left to lower it to 40%. Remember, you can change these settings at any time. Click OK.

8 EDIT THE SHAPE OF THE SMART OBJECT
One of the advantages of using a vector smart object is that you can edit the original artwork in Illustrator. To do that, just double-click on the Smart Object thumbnail in the Photoshop Layers panel, read the warning and click OK to continue, alter one of the shapes in Illustrator (we flipped and moved it), and then Save the document (File>Save). When you switch back to Photoshop, the layer updates (it might take a moment to render)—with the smart filter intact.

9 ADD GRAPHIC ELEMENTS
Along with altering the original shapes, another part of our experimentation might be adding more shapes. So, double-click the Smart Object thumbnail to return to Illustrator, select the Ellipse tool (L), then Shift-click-and-drag to add a circle. Change your Fill and Stroke swatches to the same settings you used earlier, and Save. Once again, after saving the Illustrator file, jump back to Photoshop to see the changes. As you can imagine, there are lots of possibilities here, and it’s easy.

10 TRY ADDING 3D IN ILLUSTRATOR
Want to move your experiment in another direction? Why not add some 3D into the mix? Double-click the Smart Object thumbnail, and when you get to Illustrator, choose the Selection tool. Shift-click all of your shapes and go to Effect>3D>Extrude & Bevel. In the dialog that appears, click OK to add a 3D look to your shapes. Because this is an effect, it can also be changed at any time through the Appearance panel (Window>Appearance) while the shapes are selected. Once again, Save and switch back to Photoshop to see the results.

11 CHANGE THE LAYER BLEND MODE
Remember, the whole point here is to try many different things to see what we end up with. So, in the Photoshop Layers panel, under the Vector Smart Object layer, double-click the Blending Options icon again, and play with different blend modes and opacity settings. We ended up deciding (for now) to select Hard Light from the blend Mode menu and bumped up the Opacity to 80%.

12 ADD TEXT IN ILLUSTRATOR
Don’t stop there—head back to Illustrator and add some text using the Type tool (T). Tip: Because we want the text to remain editable just like everything else in our dual-application experiment, don’t create outlines.
You know the drill by now: Save when you’re finished in Illustrator and switch back to Photoshop to see the changes.

13 CHANGE ONE OR MORE FACTORS
To keep the creative flow happening, you should constantly ask yourself, “What if I…?” and then try it. The worst thing that could happen is that you’ll have to press Command-Z (PC: Ctrl-Z) to Undo or Command-Option-Z (PC: Ctrl-Alt-Z) to Step Backward because you don’t like the result(s). We decided to add more text in a lighter color and here’s the result.

14 EVERYTHING IS EDITABLE
Finally, we double-clicked the Blending Options icon and changed the settings to what you see above. Remember, the way we’ve set up this experiment means that everything is subject to change: the Illustrator artwork, the smart filter we applied, the blending options of the smart filter (opacity and blend mode), and the layer settings (opacity, blend mode, layer style, etc.) we’ve yet to adjust. The sky really is the limit when you start experimenting, to the point where the result you get isn’t just a happy accident; it’s a result of being willing to try new things.

