
Vector Graphics- 3D Depth with 2D Layers in After Effects
You see them everywhere—vector graphics, swirly elements drawing themselves onto the screen, and fake 3D depth with 2D layers. It’s a very popular trend in design and motion graphics, and remarkably easy to create. This tutorial is based loosely on (and uses footage from) a piece we’re working on for a Web trailer (hence the size), and highlights some of the ways this cool and modern effect can be achieved.
The specs for this project are a square-pixel composition (650×275), 29.97 frames per second, 6 seconds long, with a background color of white.
STEP 1 The Elements
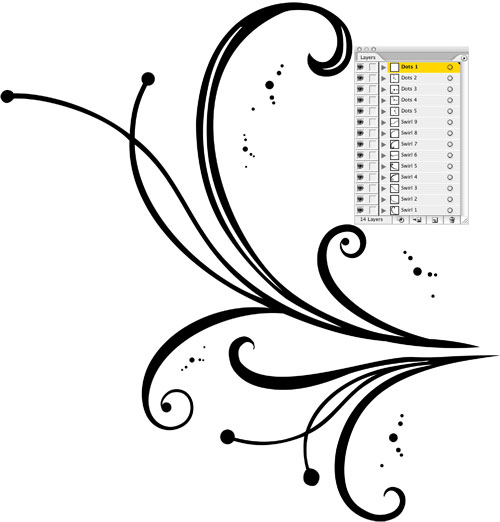
For this animation, we need a selection of elements—some easy to create, such as vector swirls and a city scene (Illustrator), and others that you might need to source from different locations (we used green screen footage of a woman running in place, and a blue sky background movie from Artbeats’ White Puffy Clouds collection). The important thing to remember is to organize the different lines of the swirls and the buildings/trees of the city scene onto separate layers in Illustrator—this will make them infinitely easier to animate.

CLOUDS CREDIT: ARTBEATS DIGITAL FILM LIBRARY, JOGGER CREDIT: STEVE HOLMES

STEP 2 Import Files
In After Effects, double-click inside the Project panel to bring up the Import File dialog. Locate and select the two movie clips, and click Open. Deselect, then access Import File again and choose your first swirls vector file (Wing Swirls.ai in this example). In the lower part of the dialog, under Import As, choose Composition – Cropped Layers. Click Open, and a Wing Swirls comp and folder of layers will appear in the Project panel. Perform the same actions to import your city scene vector file (City Scene.ai in this example) as a layered composition.


STEP 3 Open City Comp; Arrange 3D Layers
Double-click the City Scene Layers comp to open it. In the Timeline, click the 3D Layer checkbox next to all of the layers to make them 3D. At the bottom of the Comp panel, change Active Camera to Custom View 1 to see the following changes more clearly. Select all the layers, hit P to reveal their Position values, and you’ll see three values: X, Y, and Z. Leave the bottom layer (Backdrop 3) at 0. Set the next layer up to –100 on the Z axis. Set the next layer to –200 and so on, until each layer is separated by –100 pixels from the previous.
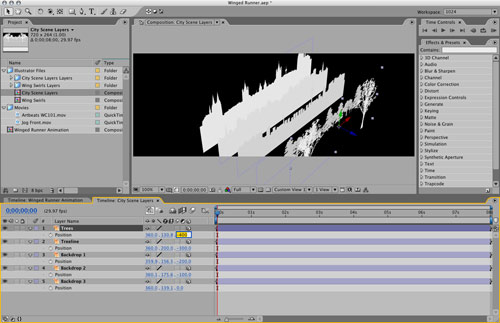
STEP 4 Duplicate Trees; Offset Z Axis
Select the top layer, the detailed trees on either side of the scene. Press Command-D (PC: Control-D) to duplicate the layer, then reveal its Position values (P) and offset the Z axis by an additional –200 pixels (to –600 in this case). Duplicate and offset again until you have four rows of trees, the final row being –1000 pixels on the Z axis. This gives us depth to play with when we animate the backdrop later on. If you want to see the scene a little more easily, hit C to access the Camera Orbit tool, and drag around the Comp panel.

STEP 5 Add Sky in 3D
In the Project panel, select your clouds clip (ours is Artbeats WC101.mov) and drag it to the bottom of the Timeline, below the other layers. Turn it into a 3D layer, then hit P and Shift-S to show the Position and Scale values. Set the Position to +300 on the Z axis, and the Scale to 200%. To add a final touch of realism, go to Effects>Blur>Fast Blur and set the Blurriness to 2.0 pixels in the Effect Controls panel (ECP) at the top left. This adds a fake depth of field effect and finishes the 3D sky nicely.

STEP 6 Add Jogger; Speed Up
In the Timeline, switch back to the initial, blank Composition tab. From the Project panel, drag your jogger clip (ours is Jog Front.mov) into the Timeline, then go to Effects>Color Correction>Levels. Adjust the Input Black, Input White, and Gamma sliders in the ECP to add contrast to the clip. As the runner in this clip runs too slowly, click the Stretch Panels icon ({}) at the bottom left of the Timeline, click on the 100% Stretch value, and change it to 80%. Naturally, you can set this to whatever speed you desire to get the correct running cadence.

STEP 7 Mask and Keylight
Double-click the jogger layer in the Timeline to open it in a Layer panel. In the Toolbar, select the Rectangular Mask tool and create a rectangle that removes the outer junk (a “garbage matte”), leaving only the runner and clean green background. Close the Layer window, then go to Effects>Keying>Keylight. In the ECP, click the eyedropper next to Screen Colour (yes, British spelling!), and click the green background on the clip to remove it. Twirl down Screen Matte and adjust Clip Black and Clip White to improve the key, if necessary.

STEP 8 Animate a Wing Swirl
Open the Wing Swirls comp from the Project panel. Select the first swirl layer to be animated, and go to Effects>Transition>Linear Wipe. In the ECP, set the Wipe Angle to oppose the direction you wish to flow (in this case, upward), and Transition Completion to 100%. Click the Stopwatch (at 0 seconds) next to this value to add a keyframe, move the Current Time Marker (CTM) to 15 frames along in time, and set the value to 0%. Control-click (PC: Right-click) on the second keyframe in the Timeline and choose Keyframe Assistant>Ease In.

STEP 9 Animate Remaining Swirls; Offset Appearance
Repeat Step 8 for each of the other swirl layers, adjusting the Wipe Angle accordingly. You can also keyframe the Wipe Angle over time to vary the flow of the transition. When done, select all the swirl layers and hit U to show the keyframes. To stagger them so they don’t all play simultaneously, select the second swirl layer and drag it an extra five frames along the Timeline (Option-Page Down [PC: Alt-Page Down] will do this one frame at a time). Repeat this on all of the other layers until you’re happy with the speed.

STEP 10 Scale Wings; Adjust Anchor
Switch back to the main composition and drag the Wing Swirls comp into the Timeline below the jogger layer. Move the CTM to around 2 seconds so the swirls are visible (to make it easier to visualize the effect), then adjust the layer’s Scale (35% in this case) to more proportionally match the runner. From the Toolbar, select the Anchor Point tool and drag the layer’s anchor point to the lower-middle right edge, where the first swirls begin. This will form the inner edge of the right wing.

STEP 11 Motion Track Settings
Select the jogger layer and choose Animation>Track Motion to open the clip in the Motion Track layer window. Position Track Point 1’s inner square on a central, high-contrast part of the clip (here, the triangle of white T-shirt visible beneath the jacket), and make it slightly larger than the white area. Set the outer square’s size to just a shade wider but taller (as the clip’s motion is vertical), then in the Tracker Controls palette, set Track Type to Transform, check Position, and set Motion Target to Wing Swirls (if it isn’t, click Edit Target and correct it).

STEP 12 Motion Track; Add Left Wing
At 0 seconds, click the Analyze Forward icon in the Tracker Controls panel to motion track the target. If the track jumps, press Command-Z (PC: Control-Z) to undo, adjust the outer rectangle, and try again. When the track motion is satisfactory, click Apply to add the tracking data to the swirls layer, then click OK to X and Y in the second dialog. Beautiful! Select the swirls layer, duplicate it, hit S to access the Scale property, uncheck the Link icon next to the values, and set the X Scale to –35%. This flips the wing to the other side, but retains the motion.

STEP 13 Add 3D City; Add Camera
At 0 seconds, drag the City Scene Layers comp from the Project panel to the Timeline, behind the other layers. Click the second switch in the Switches pane (Collapse Transformations), then go to Layer>New>Camera, choose 35mm from the Preset menu, and click OK. Go to Layer>Transform>Auto Orient and choose Off. Click OK, and hit R and Shift-P to access the camera’s Position and Orientation values. Set the Orientation to 6, 0, 0; the Z position to around –700; then adjust the Y position to around 180.

STEP 14 Animate Camera; Parent Wings and Jogger
At 0 seconds, add a keyframe for the camera’s Position, then move the CTM along the Timeline to your desired time. Adjust the Z axis to around –1000 and the background moves into the distance. At 0 seconds, Control-click (PC: Right-click) in the Source Name bar and choose Columns>Parent. Select both wing layers and set the jogger layer as their parent from the pop-up menu(s). Now, you can scale and move the jogger to fit your design space. Extra: Select the jogger layer, choose Effect>Generate>Fill, and set the Fill Color to black to match the wings. Enjoy!

