As a Photoshop user, I was really starting to dig the File Browser. It was a natural to allow me to view a folder of images without having to open them up one by one to locate the ones I wanted to work with. There was one big problem, though; the File Browser was tied to Photoshop and couldn’t be used unless you actually opened Photoshop and accessed it. Granted, I keep Photoshop open throughout the day just like most of my fellow designers, but that’s just not enough.
Luckily, the Adobe engineers felt the same way and introduced Adobe Bridge with Creative Suite 2 as well as with the individual point products such as InDesign CS2. Bridge is a standalone application that doesn’t require another CS2 application to run. You can use Bridge to browse all kinds of files, not just the ones that Photoshop can handle. So it’s like having the old File Browser detached from Photoshop and being able to use it for all CS2 applications.
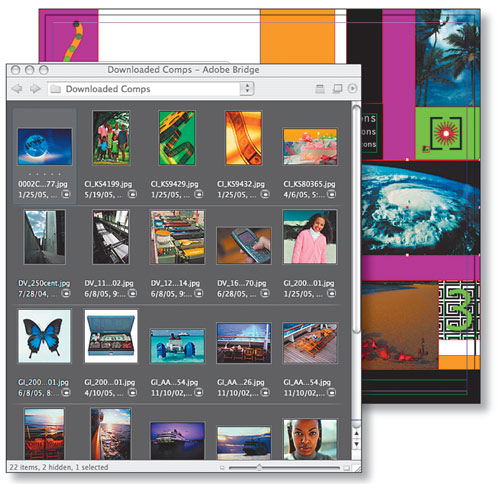
An image placement palette
Now, you might be wondering what this has to do with InDesign. The answer is, “A lot!” I use Bridge with InDesign all the time. InDesign and Bridge are almost as tightly integrated as Photoshop and Bridge: probably more integrated than the other CS2 apps. You can use Bridge as an image browser for the images and content you’re going to place into your InDesign layouts.
Not only can you browse the content, you can actually drag the content from Bridge directly into your InDesign layouts. This might seem unnatural at first, and I can understand why. You probably want to keep the Bridge window open at full size and your InDesign document at the full size of your display. So, unless you have multiple displays attached to your computer, how on earth are you going to easily drag from Bridge into InDesign? Believe it or not, there’s a very cool way to do this! Simply put Bridge in Compact mode. You can do this by either clicking the Switch to Compact Mode button in the upper-right corner of the Bridge window or by hitting Command-Return (PC: Control-Enter) on the keyboard. Once Bridge is in Compact mode, it will float on top of all other apps by default, thus turning it into an image placement palette for InDesign.
Once you have it floating above your InDesign document, you can either drag images onto your InDesign page and have InDesign build the frames for you, or you can create your frames first and then drag from Bridge directly to your frames. InDesign will create a link to your image wherever it’s located on your drive or removable media. Once the image is in the frame, you can use InDesign’s various image fitting commands to size the image down to fit the frame as you like.
Okay, that’s pretty neat, but what else can you do?
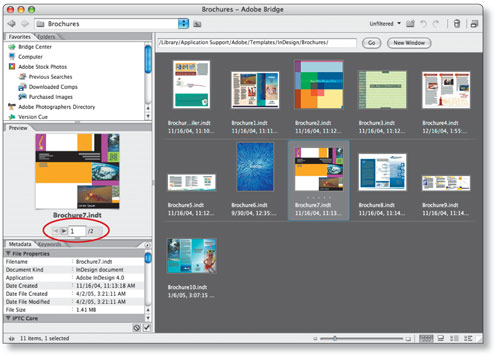
Bridge acts as the serving plate for InDesign CS2 templates. You may not have noticed that InDesign CS2 ships with a variety of professionally designed templates in various categories. The easiest way to get to the top-secret location of the bundled templates is to launch InDesign and on the Welcome Screen, click the button that says New from Template.
Now, if you’re like most InDesign users, you’ve probably unchecked the Show This Dialog at Startup checkbox and closed the Welcome Screen, never to see it again. If that’s the case, simply go to the Help menu and choose Welcome Screen, then click the New from Template button. This will automatically launch Bridge if it’s not already open, or take you to Bridge and the top-secret folder containing all the templates that ship with InDesign CS2.

The templates are organized as collections and folders actually containing the templates. Double-clicking on either one will take you to the folder containing the templates of the category you selected. At first glance, you’ll see the thumbnails for each template. While that’s cool, you’ll probably want to know what the inside pages look like. Here comes some more of that InDesign/Bridge integration that I mentioned earlier. When you click on a template, you can page through it right in Bridge’s Preview panel. This way, you can decide if the template is appropriate for you or not. Unfortunately, this feature only works with InDesign templates and not actual InDesign documents. However, even with InDesign documents, you’ll be able to see the thumbnail of the first page right in the Bridge window.
Taking stock
Lastly, Bridge includes a stock photography service called Adobe Stock Photos. Although I love taking my own pictures, there are times when it’s easier to find an image that someone else has already shot, rather than going to shoot it myself. When you go to Adobe Stock Photos in the Favorites panel of Bridge and do a search, you can download low-res comps. You can drag these downloaded comps right into your InDesign layouts so your client can see the photo before you actually purchase it.

That’s cool, but what happens when your client decides to go with the image you used? No problem. Simply bring up InDesign’s Links palette, select the link for the stock photo image, and choose Purchase This Image from the palette’s flyout menu. This will take you back to Bridge and to Adobe Stock Photos so you can get the prices and purchase the royalty-free image.

