The Who, Why, What, and How of Lightroom
Adobe made a big splash in the postproduction area of digital photography recently with a new product designed to streamline the photo-editing process. The product, Lightroom Beta, offers photographers a new way to work with their digital photos. It’s clean, it’s elegant, and it’s fast, but most importantly, it’s a product that helps photographers spend less time sorting and refining photos and more time shooting them. In this article, we’re going to take a look at the main questions that you may have about Lightroom and you’ll see how it can make an immediate impact on your workflow.
Before we get to the who, why, what, and how, let’s start out with what Lightroom is and what it isn’t. Lightroom is not a Photoshop competitor. I’m a Photoshop junkie, though, so you’ll see Photoshop references throughout this article but Lightroom is not competing against Photoshop—it’s extending it. Adobe knows that more people use Photoshop than just digital photographers. While many Photoshop features are geared toward photographers, there comes a point when you need to go beyond Photoshop because it just can’t do everything for everybody. It seems Lightroom is a new product that is aimed to do just that. That said, Lightroom is most probably a replacement for Adobe Bridge and Camera Raw.
The Who
Let’s start with the “who.” Well, it’s pretty simple. Adobe created Lightroom. There, that’s it. Done. Okay, maybe there’s more. Adobe created Lightroom but they’re not the only ones with this type of product. You’ve probably heard of Apple’s Aperture as well. Is Lightroom a competitor to Apple’s Aperture? You bet.
The Why
If you’re reading this and wondering if Lightroom is geared toward anyone but digital photographers, then stop wondering. Make no mistake about it: Lightroom is solely aimed at photographers. Adobe touts it as a new, efficient way for professional photographers to import, select, develop, and showcase large volumes of images. The whole purpose behind Lightroom and why it was developed is so photographers can spend less time sorting and refining photographs and more time shooting them. This is a big concern right now and it’s growing. Remember, in the scheme of things, digital photography is in its infancy. There are literally thousands of professional photographers who are switching from film to digital and they need a reliable way to get their photos from the camera into their clients’ hands. Lightroom is Adobe’s answer for this process and an excellent one at that.
The What
What exactly is Lightroom? As I mentioned earlier, it’s a program designed to help photographers import, select, develop, and showcase large volumes of digital images. Lightroom is essentially broken up into four modules—Library, Develop, Slideshow, and Print. Each of these modules is a stand-alone area within Lightroom, but it’s important to know that they all reside within the same window. You’re never opening multiple windows with Lightroom or moving palettes around. Everything you need is right in front of you. You can switch to and from any module seamlessly in the same window.

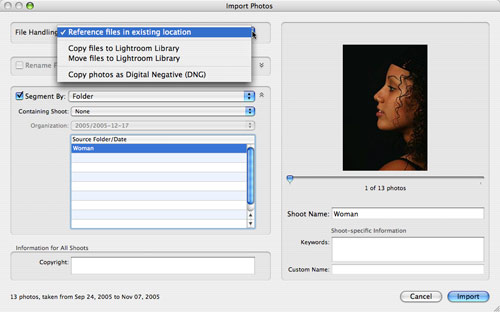
First up is the Library module. Here is where you can do the standard issue features such as browse, sort, rate, and generally organize your images. It is, in essence, your library of photos. One of the stars of Lightroom is the fact that when you first import your photos you’re not forced to store them in some locked database. As you can see here, there are several options for moving your photos into the Library and one option is to leave them where they are on your hard drive.
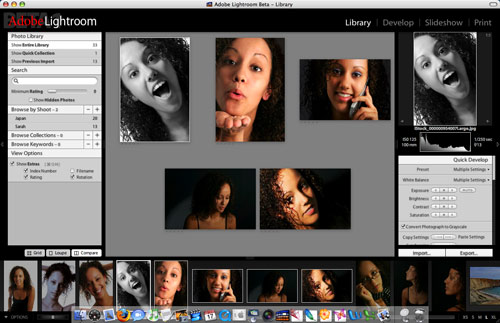
Once the photos are in Lightroom you can browse them in Grid, Loupe, or (my personal favorite) Compare mode. Here you can quickly zone in on the photos you like the best and discard the ones you don’t by pressing the Delete key.
CREDIT: IMAGES ©ISTOCKPHOTO/EVA SERRABASSA
Once you’ve organized your photos and you’re left with the best ones, you can move to the Develop module. Now, depending on your background experience with software such as Photoshop (see, I couldn’t resist mentioning Photoshop), you may or may not feel instantly at home in the Develop module. I will say that being a Photoshop addict, the thing I love most about the Develop module is that it has the lion’s share of Adobe Camera Raw features so I was able to instantly get to work. While many of the traditional Camera Raw settings you’d expect are there, such as white balance settings, exposure adjustments, lens corrections, and camera calibration, there are three new killer features that make me never want to go back to Photoshop’s Camera Raw again: the Tone Curve, Grayscale Mixer, and most of all, Split Toning. Here is where Lightroom really steps it up and hooks me in.
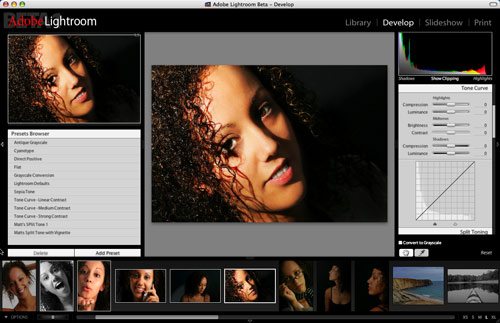
The Tone Curve is essentially “Curves done right.” It’s intuitive and it removes the technical aspects of adjusting a curve and takes care of smoothing the curve while making visual adjustments.
The Grayscale Mixer is the one-stop-shop for creating high-contrast, pro-quality black-and-white conversions.
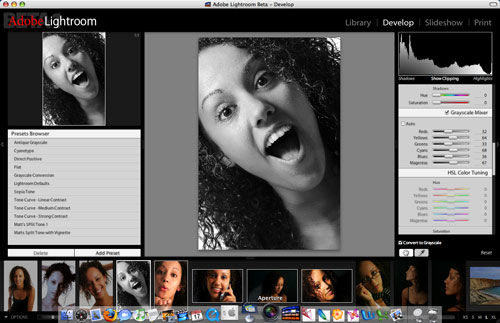
And finally, Split Toning is one of those things that photographers have been wanting for years and Lightroom has it. Now you can selectively apply warm and cool hues to the shadow and highlight areas within a grayscale image.
After adjusting your photos it’s time to move to the Slideshow module. Truth be told, I’m not crazy about the name “Slideshow” because it doesn’t convey everything that this module really does. For example, if you wanted a Web gallery, where would you go? If you didn’t say, “The Slideshow module,” then you’re wrong. Slideshow is kind of your one-stop shop for showing off your photos (except for printing, which we’ll cover next).
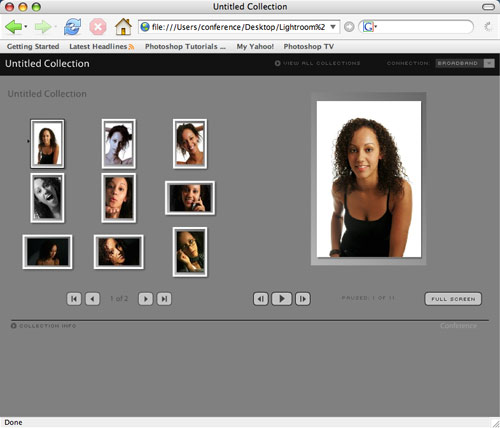
The key here is to go to the Slideshow module and mess around with all of the settings; but don’t forget to experiment with all the options that you get after clicking the Export button at the bottom right of the screen, as that is where you can actually output your slideshows.
Your last stop in your travels through Lightroom is going to be the Print module. This one is pretty self-explanatory, as you can (you guessed it!) print from this mode. Here’s the thing though: You can control all of your printing functions from this one module. Printing multiple photos, layout, size, margins, and Identity Plate set up can all be controlled here. The other nice feature is that you have access to all of the Print Job Settings right there at the bottom of the right-side panel. No more fighting with confusing dialogs just to set your color management profile for a specific shot.
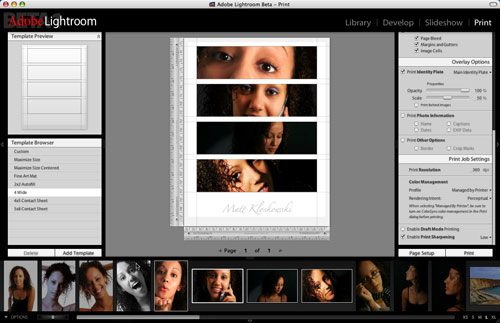
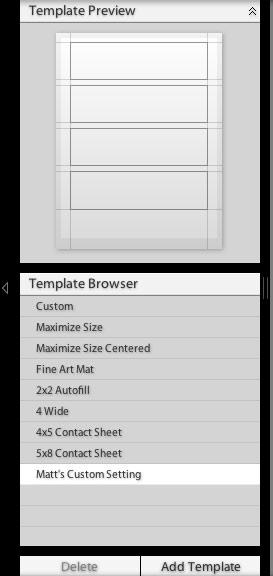
Finally, the Template Browser on the left side of the work area lets you save specifically formatted contact sheets and other types of output. So when you’ve got some favorite settings, go ahead and press the Add Template button to save them.
The How
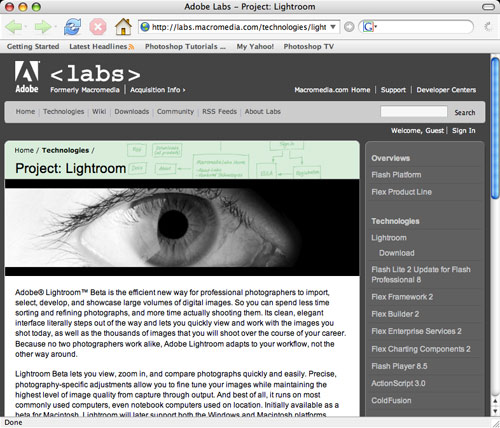
This seems like a good place to finish up. There are actually a few questions that can be answered by this “how” question. First, how do I get Lightroom? Well, it’s beta software (see “What is Beta Software?”) and can be downloaded for free at http://labs.macromedia.com/technologies/lightroom. Currently, it’s Mac only but Adobe has promised the PC version sometime soon (read: I have no idea when).
That’s the first how. But there’s more. Next is how well does Lightroom work? In my experience, Lightroom works great on my 1.25-GHz PowerBook with 1.5-GBs of RAM. I haven’t noticed any speed issues and, for beta software, it behaves extremely well. I’ve also seen it on a quad processor G5 and needless to say, it’s pretty darn fast. However, Lightroom was created for photographers. I don’t know many photographers who sit in an office toiling away at a large desktop all of the time? They’re constantly out and moving around. I always have my laptop with me when I’m out on a shoot and that’s where I want to start working on my images (as would many pro photographers).
Finally, the next logical question is how do I use it? Again, I could write an entire magazine on this, so I’ll have to take a pass here. However, I won’t leave you stranded with this one. Visit www.layersmagazine.com/category/tutorials/lightroom for some video tutorials.
The End
Will Lightroom replace the need for people to use Adobe Bridge? It may. Depending on how you work you may find that Lightroom is all you need when it comes to organizing your photos. The other question is will Lightroom replace the need for Photoshop (see, I’m a Photoshop freak—I had to tie this back into Photoshop somehow). In my opinion, the answer is no. There are still many things that I do to my photos that Lightroom just can’t do. It will replace the need for me to use Adobe Camera Raw, so I’ll use Lightroom instead and export my photos to Photoshop from there.
What is Beta Software?
A beta version or beta release of software is the first version of a program that is ready for someone (other than the engineers building it) to view. However, it’s definitely not ready to sell to the public.
To help clarify, here’s an example: When Adobe releases a new version of Photoshop it doesn’t go straight from the software engineer’s desk to the store where you buy it. Adobe goes out to hundreds of people in the industry (AKA beta testers) and gives them what are called “builds” of the beta software to put through the ringer. The beta testers then provide feedback about what doesn’t work, what is missing, or what is incomplete about the current build. Adobe engineers then scramble back to their desks to address that feedback and incorporate changes into a new updated build. This process continues (many times for nearly 6 months to a year) until Photoshop is bug-free and ready to sell in stores.
So what the heck does all of this mean to you? Essentially, as a beta tester of Adobe Lightroom, you’re adding to the completeness and quality of the final product. Okay, let’s cut to the chase and call it how it really is: You’re helping Adobe work the kinks out of Lightroom. But hey, the good news is that any work you put in will result in a more comprehensive and useful product for you later.

