
The Digital Workflow: Multipoint Color Corrections
In many images, applying a simple highlight-based color correction across the entire image is all that’s necessary to produce good results. Some images, however, do not yield to such simple color-correction techniques. Images that are captured in complex lighting environments often have a color cast that’s inconsistent across the tonal range. If you’ve ever attempted to perform a complex color correction on multiple areas of an image, each of which have different RGB values and ratios, then you know how confusing (and time consuming) it can be to keep all the numbers, areas, and adjustments straight. Here, we’ll use two key production tools and techniques to help keep it all together: the Color Sampler tool (rather than the default Eyedropper tool) to measure and record RGB image data; and Curves to adjust specific control points on individual channels to accomplish numeric corrections.
[Note: To follow along, download Keani_Start.tif from www.layersmagazine.com/magazine-downloads.]
STEP ONE:
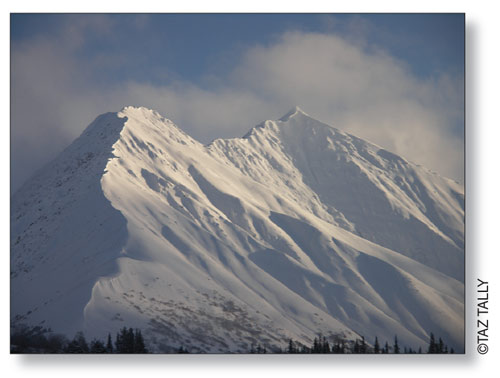
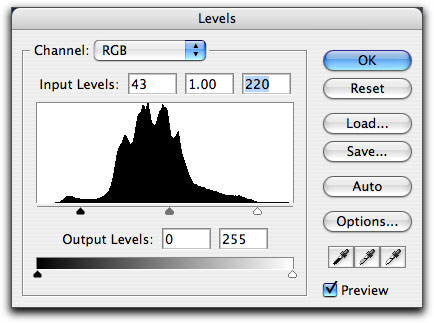
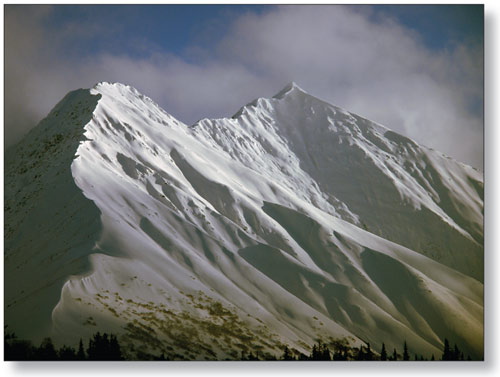
Duplicate (Image>Duplicate) the Kenai Mountain image to create a working version, and open the Levels dialog (Image>Adjustments>Levels). To improve overall image brightness and contrast (while maintaining the original color balance), we’ll make adjustments to the highlight and shadow sliders.
First, move the highlight slider left, to the beginning of the significant data (the start of the rise in the histogram). When dragging the highlight slider, hold down the Option (PC: Alt) key to locate the lightest diffuse highlight point (you’ll use this in Step Two to establish your first Color Sampler point). Next, move the shadow slider to the right until you create the shadow density you like. We moved the shadow slider beyond the beginning of the significant shadow data, so as to create a dark silhouette of the foreground trees, thereby increasing the contrast in the image. Note: As above, you can hold down the Option (PC: Alt) key as you drag the slider to see which portions of the image will be silhouetted.
STEP TWO:
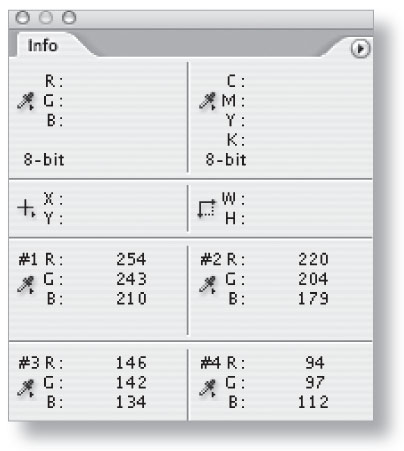
To set up and evaluate color sample points, select the Color Sampler tool from the flyout Eyedropper tool options in the Toolbox. Up in the Options Bar, set the Sample Size to 3 by 3 Average, then press F8 to open the Info palette. With the Color Sampler tool, click on the highlight point you located using the Levels display in Step One. This will place a #1 at that highlight point on the image. The RGB values for this point are recorded at the bottom of the Info palette as point #1. Now select three other Color Sampler points in critical areas of the image. We located points 2–4 in progressively darker tonal areas: points 1 and 2 are on well-lit slopes, and points 3 and 4 are on cast shadow slopes.
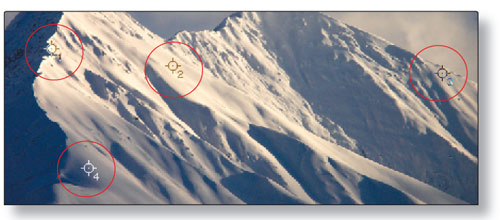
Note: To help keep these points straight in your mind, try making the points sequential by tonal range as we’ve done here: point #1 is the lightest, through point #4, which is darkest.
STEP THREE:
Evaluate the RGB values. Note that at points 1 and 2 (well-lit slopes), the Red values are higher than both the Green and Blue values, and the Blue values are the lowest. This makes sense as Red + Green = Yellow cast. At points 3 and 4 (cast shadow slopes) the Red and Green values are nearly equal, indicating a shift in color balance. At point 3, the Blue value is slightly below the Red and Green values. At point 4 (the darkest tonal area) the Blue is actually greater than the Red and Green. The change in the RGB ratios demonstrates the shift in color balance across the tonal range of the image. Because the Green values in all the color sampler points are typically the median value, we’ll use the Green values as the target values.
STEP FOUR:
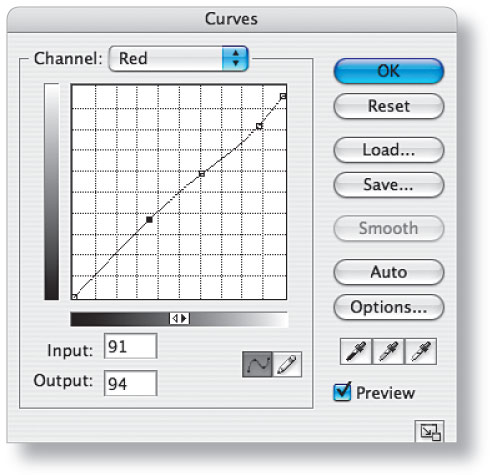
Select Image>Adjustments>Curves to open the Curves dialog. Select the Red channel from the Channel pop-up menu. Press the Command (PC: Control) key and click on the middle of each of your Color Sampler points on your image. This will place four control points along the Red channel curve.
While monitoring the Red values of your four Color Sampler points in your Info palette, starting with sample point #1, drag the control points up or down until the Red values equal the Green values. For instance, we dragged the upper-right Curves control point, associated with the #1 highlight point, down until the starting Red value of 255 measured ~243. Adjust points 2–4 similarly.
STEP FIVE:
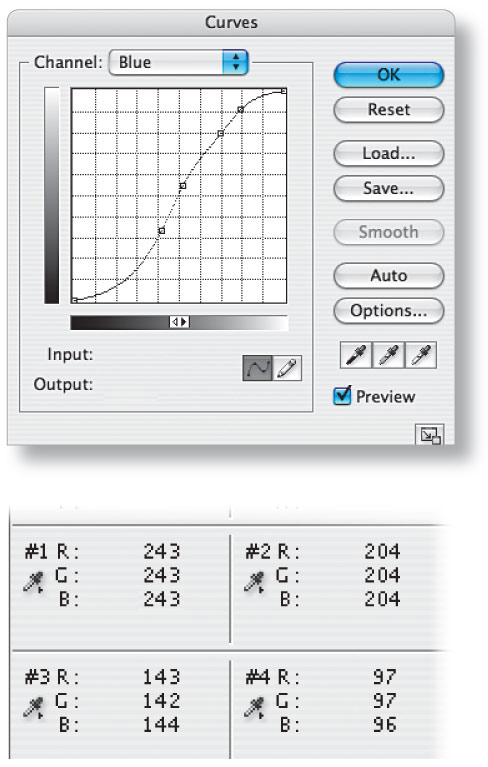
Now, select the Blue channel from the Curves Channel menu. Press the Command (PC: Control) key and click on the middle of each of your Color Sampler points on your image. This will again place four control points, but now along the Blue channel curve.
While monitoring the Blue values of your four Color Sampler points in your Info palette, starting with sample point #1, drag the control points up or down until the Blue values equal the Green values. For instance, we dragged the second Curves control point from the right, associated the #2 point, up until the starting Blue value of 179 measured ~204. Adjust points 1, 3, and 4 similarly.
Adding additional points: You can add and adjust additional control points to any curve. You’ll simply have to monitor the RGB values in the main/default Info palette field display.
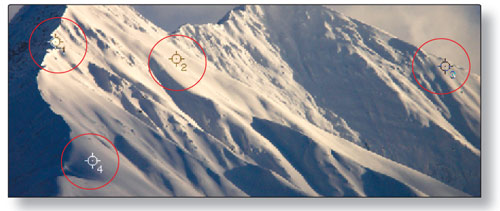
Results
The result of these corrections is an image that’s neutral with respect to most of the snow values across the entire tonal range of the image. Note how the shape of both the Red and the Blue adjusted curves changes along the tonal range. This change in shape shows how you have adjusted for the shifting color cast.
Workflow note: When correcting color images, particularly those with complex color casts, the use of Color Sampler points in conjunction with Curve control points will make your color correction easier, faster, and more accurate.
