Smokey Type Effect in After Effects
Type animation is one of the most wonderful functions to play with in After Effects, especially since version 6 introduced actual text character animation control. With CS3 adding per-character 3D control, typographic motion design has never been more fun. Let’s create some cool smoky type.
[If you’d like download the image used in this tutorial to practice this technique and also to preview the final effect, click here. All files are for personal use only.]
1 CREATE COMPOSITION & BACKDROP
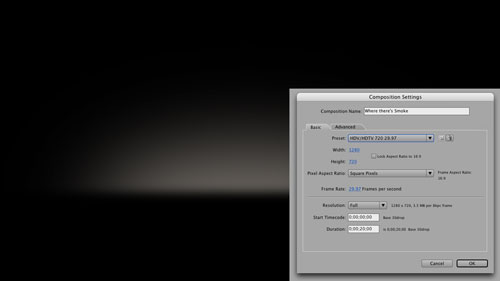
Let’s start out by creating a composition to hold our titles. We’re focusing on type animation for this tutorial, so we’ll use simple background elements instead of footage. In After Effects, click on the Create a New Composition icon at the bottom of the Project panel and create a new 20-second composition using the HDV/HDTV 720 29.97 preset, name it “Where there’s Smoke” and click OK. Then double-click in the Project panel to bring up the Import File dialog and import the Backdrop image [Backdrop image is available for download by clicking here]. Drag the backdrop image into the Timeline at 0 seconds.
2 ADD AND FORMAT TYPE
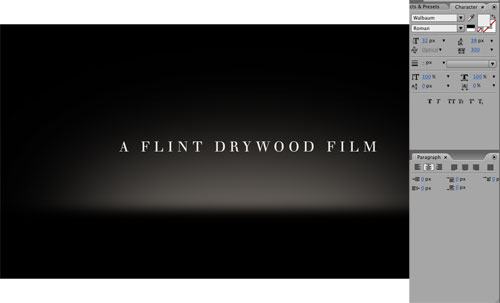
At 0 seconds, go to Layer>New>Text, to create a new text layer in the center of the comp. Type the words you desire, then use the Character panel to size, track, and style the text accordingly. This first line of text will be our intro for the main title. In my case, I’m using one of my all-time favorite typefaces, Walbaum, from Veer.com. Both classic and modern, it suits clean typographic work nicely.
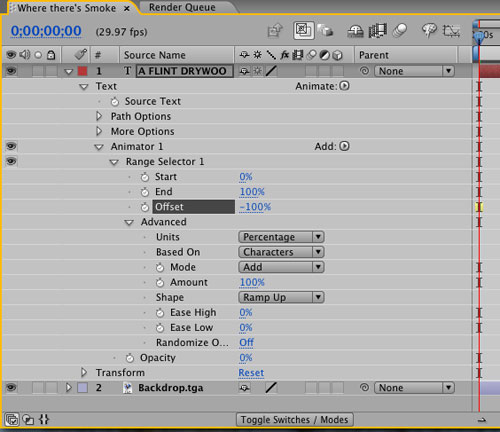
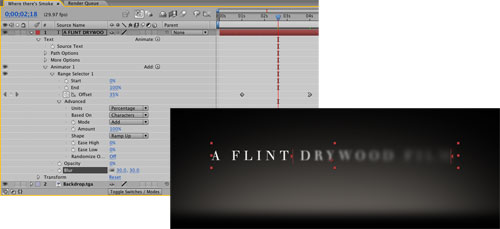
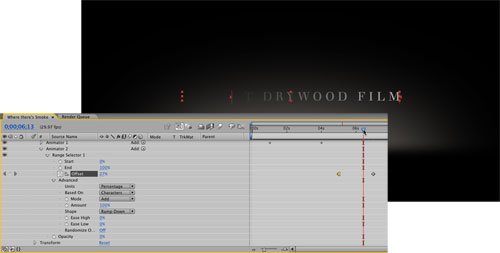
3 ADD OPACITY ANIMATOR; ADJUST
Go back to the Selection tool (V) so the entire text layer is highlighted, then twirl down the text layer in the Timeline. Next to Text, click on the right-facing arrow next to Animate and choose Opacity from the flyout menu to add an opacity Animator 1. Twirl that down, and then twirl down both Range Selector 1 and Advanced. Set Shape to Ramp Up, and drag the animator’s Opacity value down to 0%. You’ll see the right half of the line fades out. Finally, adjust the Range Selector’s Offset value to –100%, and the type is now invisible.
4 KEYFRAME ANIMATOR; ADD BLUR
At 1 second along the Timeline, click the Stopwatch next to Offset to add a keyframe. Then, move along to 4 seconds and adjust the offset to +100%, revealing the type. Control-click (PC: Right-click) on that second keyframe and choose Keyframe Assistant>Easy Ease In. Now, click on the Add option next to Animator 1, and choose Property>Blur from the bottom of the flyout menu. This adds the Blur function into this already animated item. Simply adjust the Blur value to around 30, then scrub the Timeline and see the result!
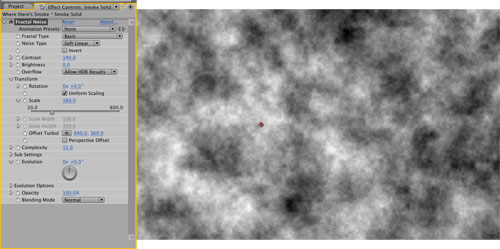
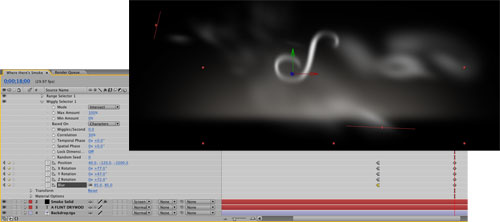
5 CREATE SMOKY SOLID
Now we need the “smoke” that we’ll use to reveal the type. Go back to 0 seconds, then go to Layer>New>Solid. Click the Make Comp Size button, check the color is black, name it “Smoke Solid,” and click OK. Now go to Effect>Noise & Grain>Fractal Noise, and in the Effect Controls panel, set the Contrast to 140, Complexity to 12, and twirl down Transform and set Scale to 160. Animating any and all of these items can create moving smoke nicely, so feel free to play around with these settings at any time.
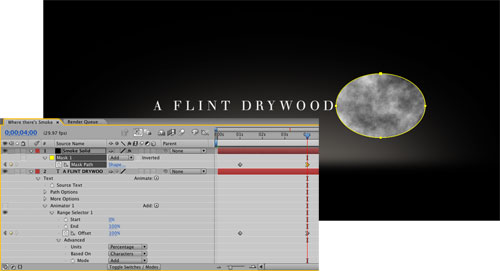
6 ANIMATE SMOKE MASK POSITION
Go to the Toolbar and select the Ellipse tool. Click-and-drag over the center of the smoke to create a mask shape of your chosen size. Go back to the Selection tool, and in the Timeline click on the Eye icon next to Animator 1 to disable it. Double-click on the edge of the smoke mask, then drag it over the start of the text line. At 1 second, press Shift-Option-M (PC: Shift-Alt-M) to add a mask keyframe, scrub to 4 seconds, and drag the mask to the end of the text line. Be sure to Easy Ease In that second keyframe.
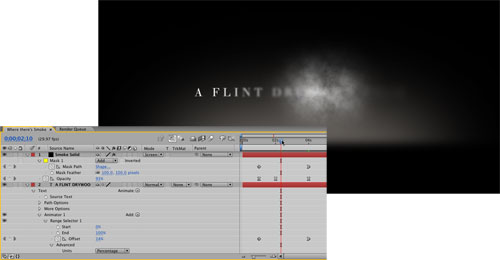
7 ANIMATE SMOKE MASK OPACITY
At 1 second, press Shift-T to show the layer’s Opacity. Add a keyframe and change the value to 0%. At 2 seconds, set the value to 100%, and at 4 seconds back to 0%. Shift-click to select all three keyframes and go to Animation>Keyframe Assistant>Easy Ease. Press Shift-F to show the Mask Feather value and adjust it to 100 pixels. In the Mode column, set the layer blend mode to Screen to remove the black edges. (If you don’t see the Mode column, Control-click [PC: Right-click] on Source Name and select Columns>Modes.) Finally, turn back on the visibility icon for Animator 1 on the text layer, and view your results. Very smoky, very nice!
8 ANIMATE TEXT OFF
Now we want to use another animator to “wipe” the text back off before the main title appears. Twirl up Animator 1 (be sure it’s not selected). Click on Animate next to Text and choose Opacity once again. This adds Animator 2. Use the exact same settings as in Step 3 but set the Shape to Ramp Down instead. Then, keyframe the Range Selector’s Offset from –100% at 5 seconds to +100% at 7 seconds. Select the first keyframe, use Easy Ease Out, and your text intro is perfectly animated.
9 ADD MAIN TITLE LAYER
Twirl up the text and smoke layers, and at 8 seconds go to Layer>New>Text. Add and style your main title accordingly, making sure to keep all the words on this one layer. This example uses a font called Freebooter Script. Use different font sizes and change the baseline shift as needed. For example, we set the smaller text at 45 pixels and the larger text at 175 pixels. We then added Returns after each “There’s,” adjusted the baseline shift for the various lines, and then added a few spaces before the word “Smoke.” Position the text layer in the center as shown here.

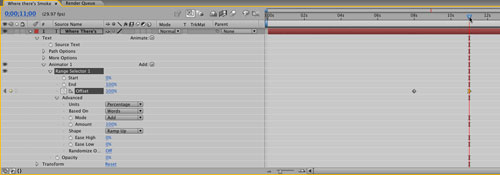
10 ANIMATE MAIN TITLE OPACITY
Twirl down the new text layer and add a new opacity Animator. Twirl down all the options, and set them once again to the same values we used in Step 3 (Opacity 0%, Ramp Up, Offset –100%), but change the Based On option to Words. At 8 seconds, add a keyframe for the Offset value, and at 11 seconds change it to +100%. Then be sure to Easy Ease In the second keyframe. It’s cool that the exact same settings can be used again, but it gives a different effect when set to Words and not Characters!
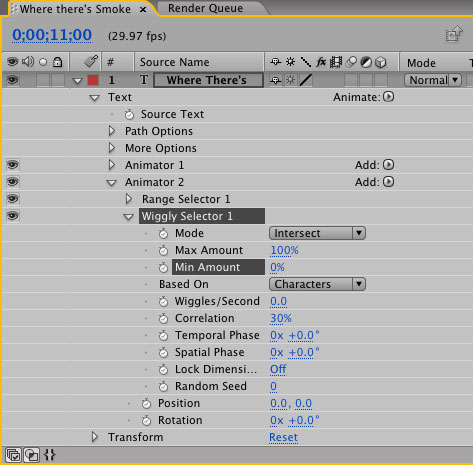
11 ADD NEW TITLE ANIMATOR
Twirl up Animator 1, deselect it, then add a second Animator choosing Position. Click on Add (next to Animator 2) and choose Property>Rotation, and then click on it again and choose Selector>Wiggly. Twirl down the Wiggly Selector, and set Wiggles/Second to 0 and Correlation to 30%. Most importantly, set the Min Amount value to 0%, which means when we animate these characters with random values, they’ll only move in one direction: forward.
12 ADD 3D; ANIMATE VALUES
Click on the Animate option next to Text, and choose Enable Per-Character 3D, which activates multiple axes for Position and Rotation in the Animator. At 13 seconds, add a keyframe for Position and the X, Y, and Z Rotation values of Animator 2. Then, at 18 seconds, adjust the values as desired. Be sure to adjust the third Position value (Z axis) to a negative number, pulling the characters toward you. When done, select the four keyframes at 13 seconds and set them to Easy Ease Out.
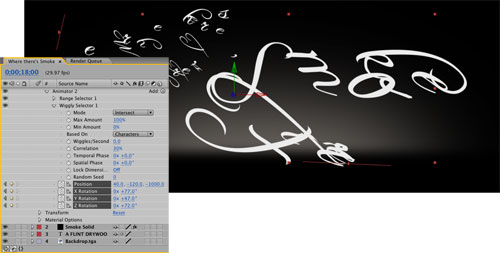
13 APPLY BLUR
As a final nod towards the “smoky” feel, go ahead click on Add again and choose the Property>Blur option to add it into Animator 2. Keyframe it across the same 13–18 second timeframe (including Easy Ease Out), starting at 0 and ending however blurred you wish to see it (85 in this example). Now as you scrub the Timeline from 8 to 18 seconds, you can see the “simple” animator bringing the words in separately, and the “detailed” animator randomly moving and spinning the letters towards the viewer and “smoking” them out in the process. Beautiful!
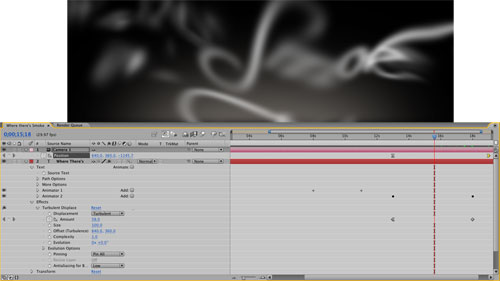
14 ADDITIONAL EMBELLISHMENTS
As an additional flourish to this piece, you could add a 3D camera (Layer>New>Camera—we used the 50mm Preset) to the scene and animate its z axis so it moves toward the middle from 13–19 seconds to make the letters fly “behind” the camera and offscreen (we set our Z axis to –200 at 19 seconds). At the same time, you could add an effect such as Turbulent Displace (Effect>Distort>Turbulent Displace) and animate it’s Amount over the same time period from 0 to 150, making the letters simply “wisp” away. Some very powerful type animation options, achieved using a handful of simple Text Animators. Enjoy!