Processing Winter Scenes in Lightroom
Editor note: This is from the February issue of PSU, pages 78–82
Photographing winter scenes brings its own set of challenges due to the weather. Similarly, processing those same scenes in Lightroom presents unique challenges due to the variable lighting conditions and the abundance of reflective snow.
One of the things I love most about living in New Hampshire is that we get to experience the best that all four seasons have to offer. One of my favorite seasons for getting out of doors is winter because even the most ordinary scene can become magical after being draped with a blanket of snow. And there are no mosquitoes!
Dealing with Underexposure
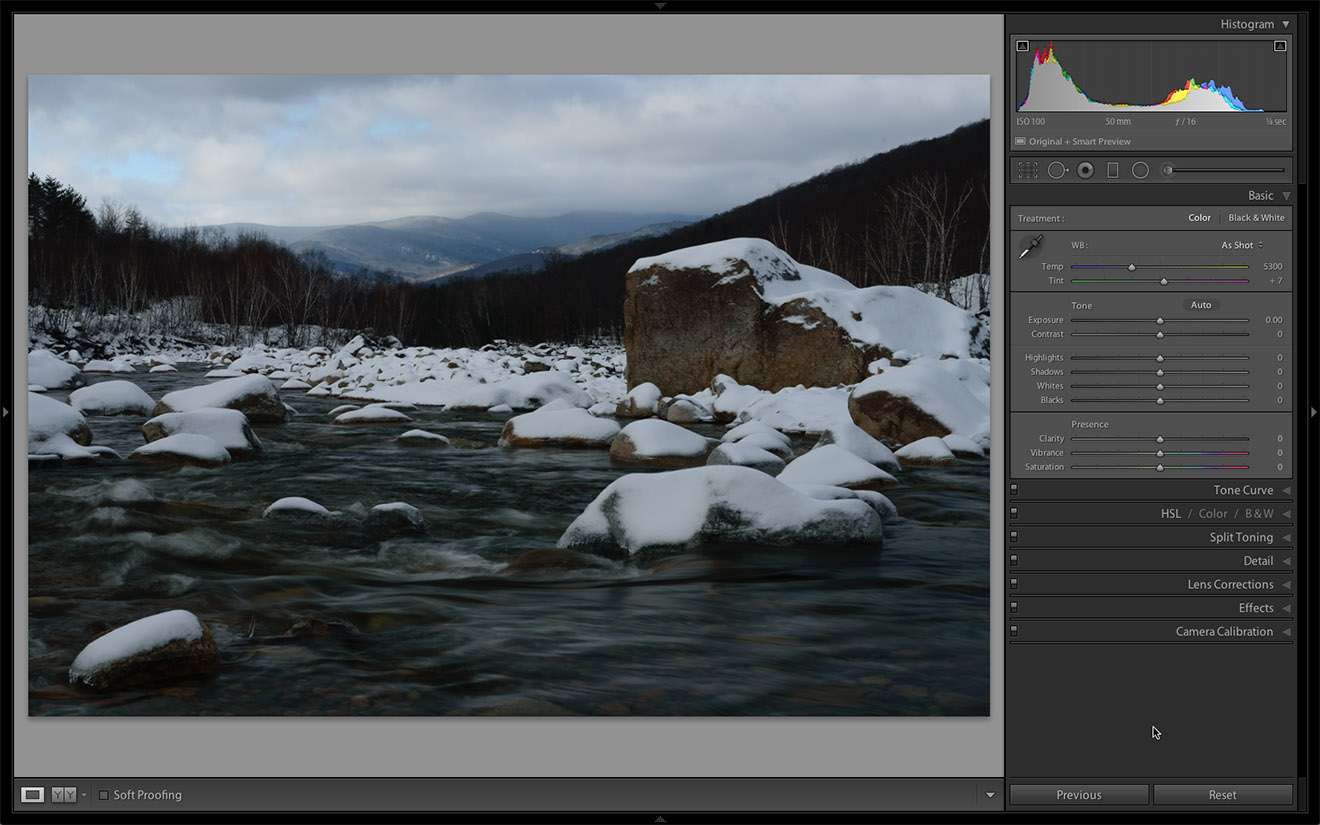
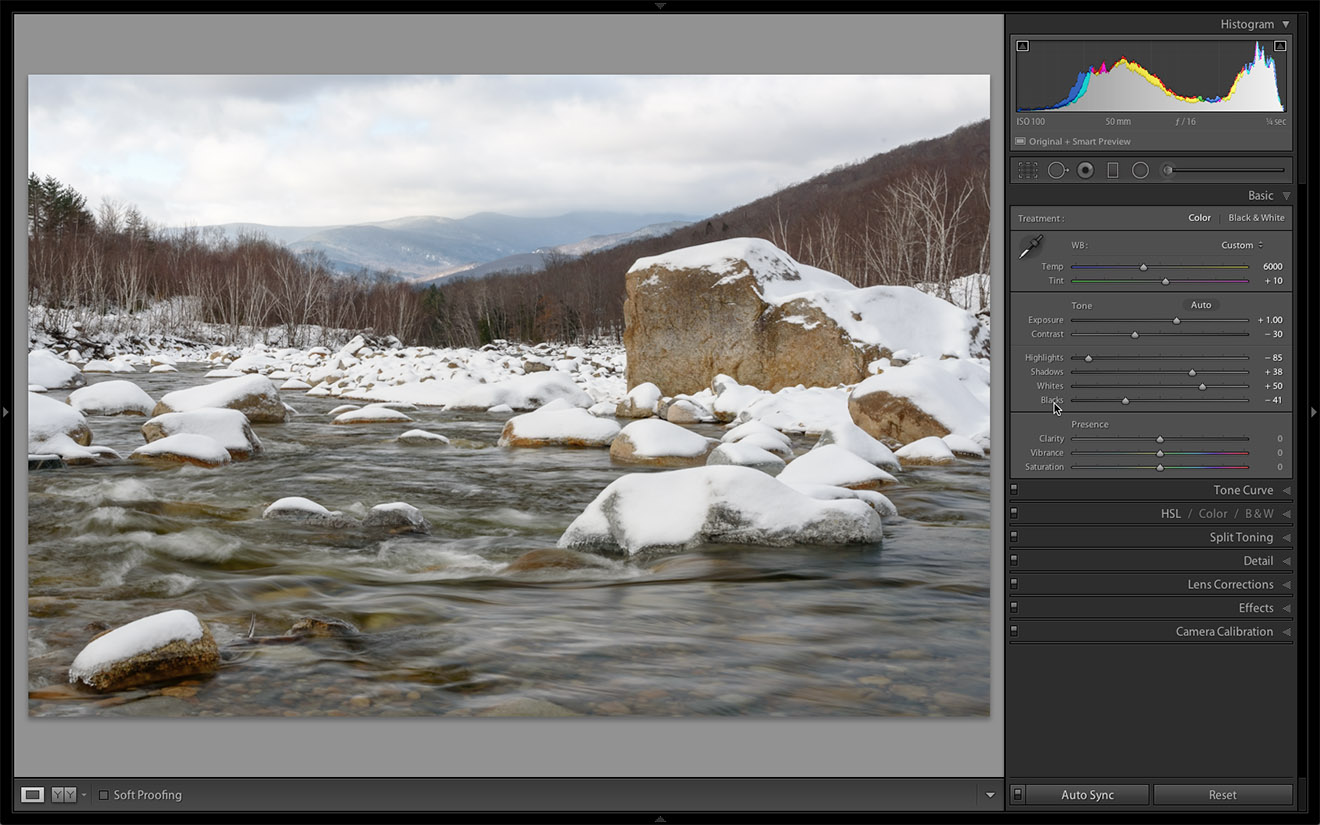
Correcting underexposure is one of the most common problems with snow scene photographs due to how the reflective snow can trick the camera meter into underexposing the scene. This is obviously best corrected at the time of capture by using positive exposure compensation, shooting in Manual mode, or exposure bracketing the scene (I have a few other tips for shooting in snow at the end of this tutorial). I usually shoot in Manual mode and bracket, but for the sake of demonstration I’m going to start with a photo that was shot at the correct exposure as determined by the camera while in Aperture Priority mode with no exposure compensation. As you can see it’s about a full stop underexposed.
One of my goals when processing a snow scene is for the snow to appear white yet still retain some texture. Whether you’re exposing for the scene at the time of capture or when adjusting exposure in Lightroom, you always want to avoid losing detail in the highlights. Because the photo was underexposed, we know the highlights have not been clipped, but now we need to take steps to minimize making existing noise more visible as we brighten the image.
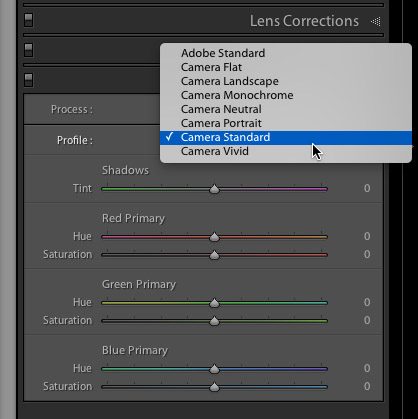
I typically have a top-down approach for processing in the Develop module, with one exception: the camera Profile found in the Camera Calibration panel at the bottom of the right-side panels area. For snow scenes I prefer to start with a lower-contrast camera profile to help bring out more detail in the highlights and shadows, so in this case I went with Camera Standard. The choices for camera profile will vary with the camera model you’re using (and only apply to RAW files), so try each one you have to see what works best for your photo. From there, it’s back up to the Basic panel to address white balance and tonal values.
Balancing Act
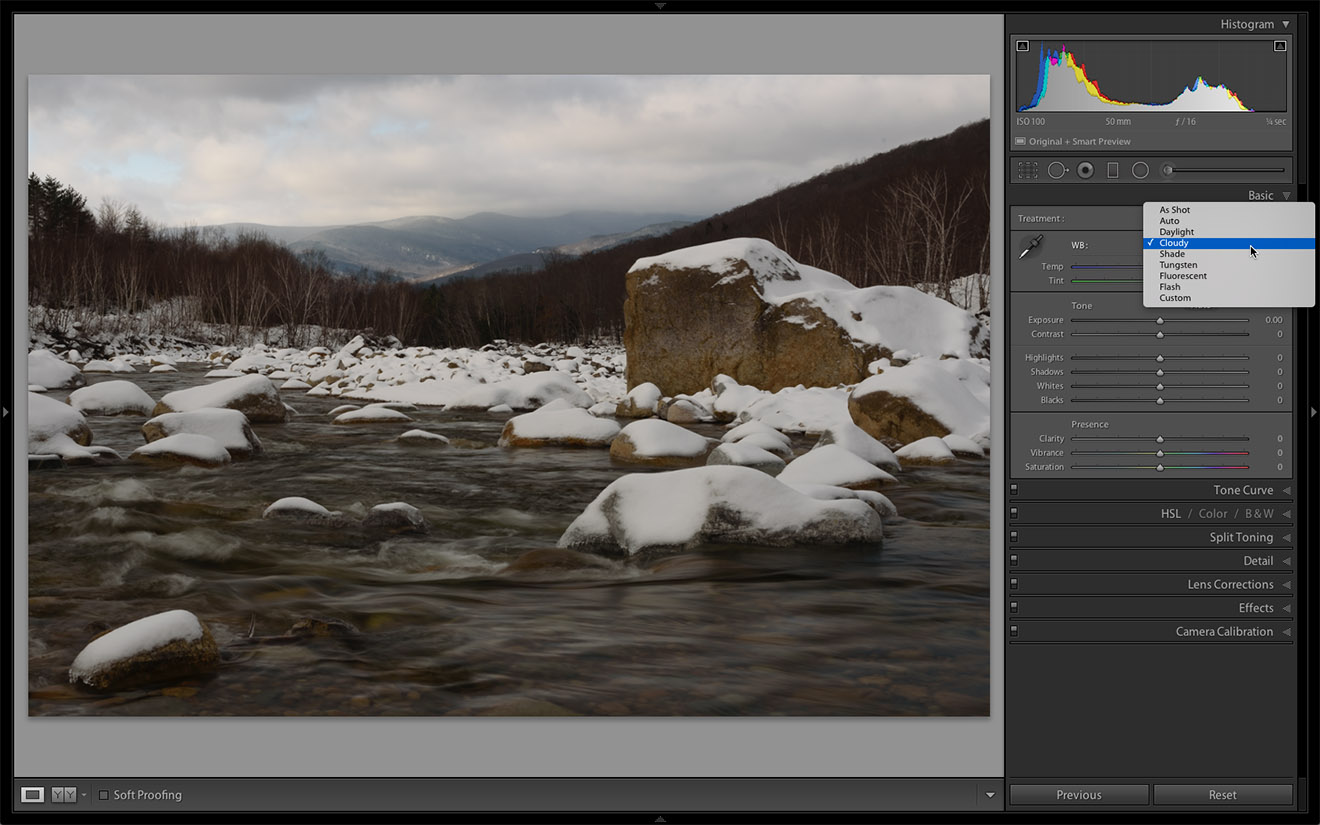
White balance can be tricky for snow scenes due to the reflective nature of snow and the evocative nature of color casts on the viewer. It’s no surprise that snow looks blue under a clear blue sky, while it can look a soupy grayish-yellow under overcast skies. Since snow scenes depict a cold environment, I prefer a white balance that is a tad cooler than neutral to help convey that feeling of coldness. I had the in-camera white balance set to Daylight in this photo, and that’s not too bad. If I were to switch it to Cloudy, it would go too warm for my taste. If there’s something in the scene that’s neutral, you can use that with the White Balance Selector tool (W), but clicking on the snow itself can yield mixed results.
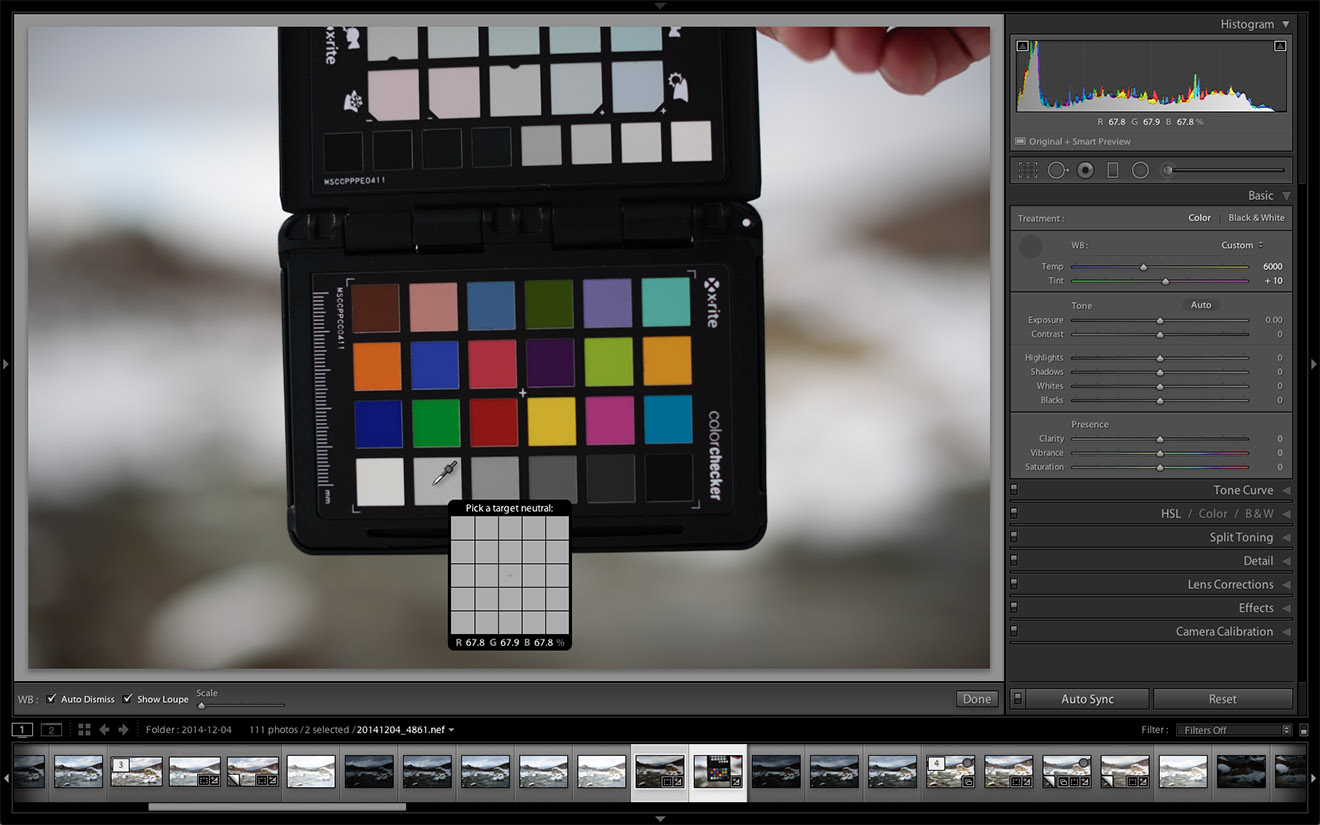
I always carry a ColorChecker Passport in my pack and take a shot of it in these conditions just to have as a reference. With the shot of the ColorChecker as the most selected photo and the photo of my scene also selected, I can enable Auto Sync and simply click the light gray swatch on the ColorChecker to set a neutral white balance to both photos at once. (Note: If you see the Sync button, click the switch to the left of the button to enable Auto Sync.) This gives a much more natural result without the snow getting too warm. Depending on the scene I may use the Temp slider to cool it down a little for effect. No matter what you use for a starting point I find manually tweaking the white balance adjustment usually gives me the most preferable result.
Setting the Tone
Now I can move on to adjusting tonal values, starting with Exposure. For this photo, I want to increase the Exposure slider at least a full stop. Having the snow end up with RGB percentages in the low 90s should yield white snow with detail. My next move is to reduce the Contrast slider to help reveal texture in the snow (reducing contrast also reduces saturation and that works well for many winter scenes). We’ll add snap to the photo later with the Tone Curve.
As I continue down the Basic panel, I’ll reduce Highlights to bring out that snow detail and increase Shadows to brighten the darker parts of the image. Now I feel that I’m in a good place to set the white and black points with the Whites and Blacks sliders, respectively. I like to work with the highlight clipping indicators turned on in the Histogram, which can be done by pressing the J key, to alert me if I’m pushing it too far (seeing red tells me I’m clipping my highlights and blue indicates the blacks are being clipped). An automated way to set the white and black points is to press-and-hold the Shift key and double-click each slider label in turn. It’s not unusual to have to go back and tweak Shadows and Highlights to fine-tune the adjustment.
Make It Curvy
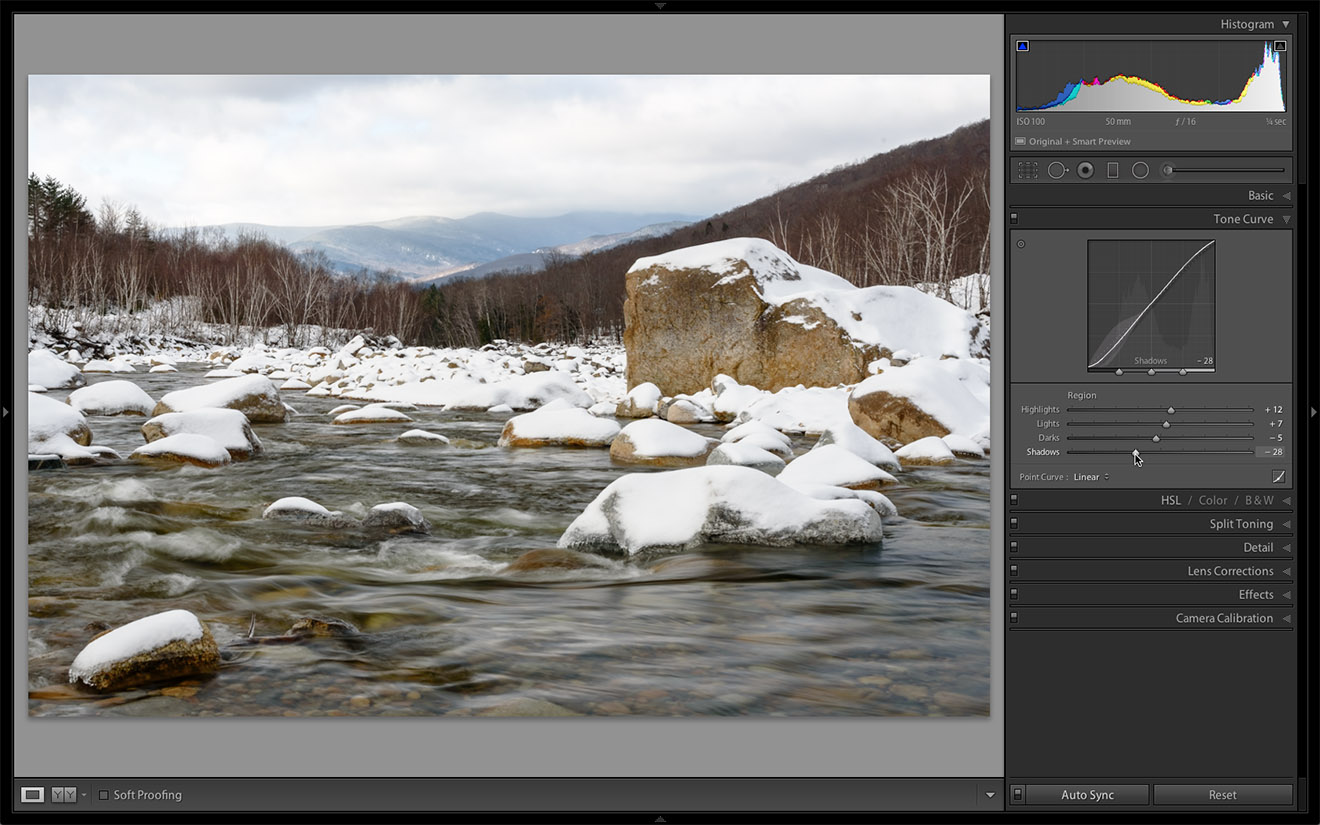
At this point I’ve succeeded in brightening the overall image to where it should be, preserved detail in highlights and shadows, and added back some contrast to what was becoming a flat scene. Now I want to finesse the contrast using the Tone Curve panel.
The Tone Curve can be used to add or reduce contrast, as well as brighten or darken parts of an image. I want to remain mindful of my highlight detail, but I also want that snow to look a nice, bright white. At the same time, darkening the Darks and Shadows regions will add back the amount of contrast I want in the scene.
There are a few ways to apply adjustments with the Tone Curve, but I find it easiest to make these adjustments by dragging the respective sliders while visually evaluating the change made to the photo.
Eye in the Sky
True to most landscape photos, you may have to deal with the sky separately from the foreground using the Graduated Filter (M). In this case, I applied a Graduated Filter over most of the sky, reducing the Exposure by almost another half of a stop, darkening the Highlights a little more, and increasing the Shadows to brighten the parts of the treetops and hills that were inadvertently affected by the Graduated Filter. Press M to close the filter.
A Time to Sharpen
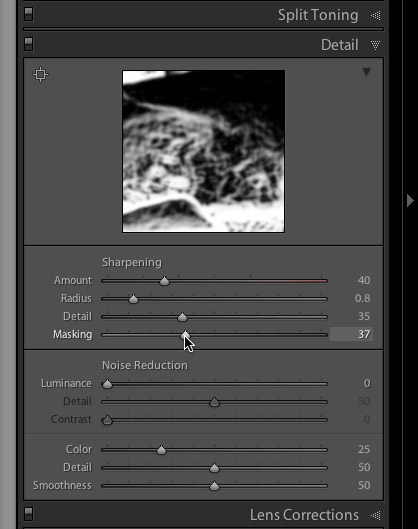
The next set of adjustments I want to make in Lightroom are in the Detail panel. Because I was correcting an underexposed photo, I want to do what I can to mitigate any noise I made more visible, and I want to enhance good detail with capture sharpening. For a landscape photo, a great place to start is the Sharpen – Scenic preset found under Lightroom General Presets in the Presets panel.
The only setting I want to change here is Masking. This preset sets Masking to 0, which means the sharpening settings are being applied to all pixels in the image. I don’t want to make noise more visible by sharpening it, so I want to increase the Masking amount to limit sharpening to just important detail edges. Hold down the Option (PC: Alt) key while dragging the Masking slider and you’ll see the mask that Lightroom is generating based on the edges in the image. White areas will receive the full sharpening amounts and the black areas get no additional sharpening. It can help to zoom into an area of smooth color, like the sky, where there’s no detail you want sharpened, and keep increasing the Masking slider until that area is nearly (or completely) black. That will go a long way in the quest to avoid enhancing noise. If there’s still some noise present, go down to the Luminance Noise Reduction slider and increase it to finish the job. Remember, it’s usually better to have a little noise and good detail than no noise and mushy detail.
Revisiting Older Photos
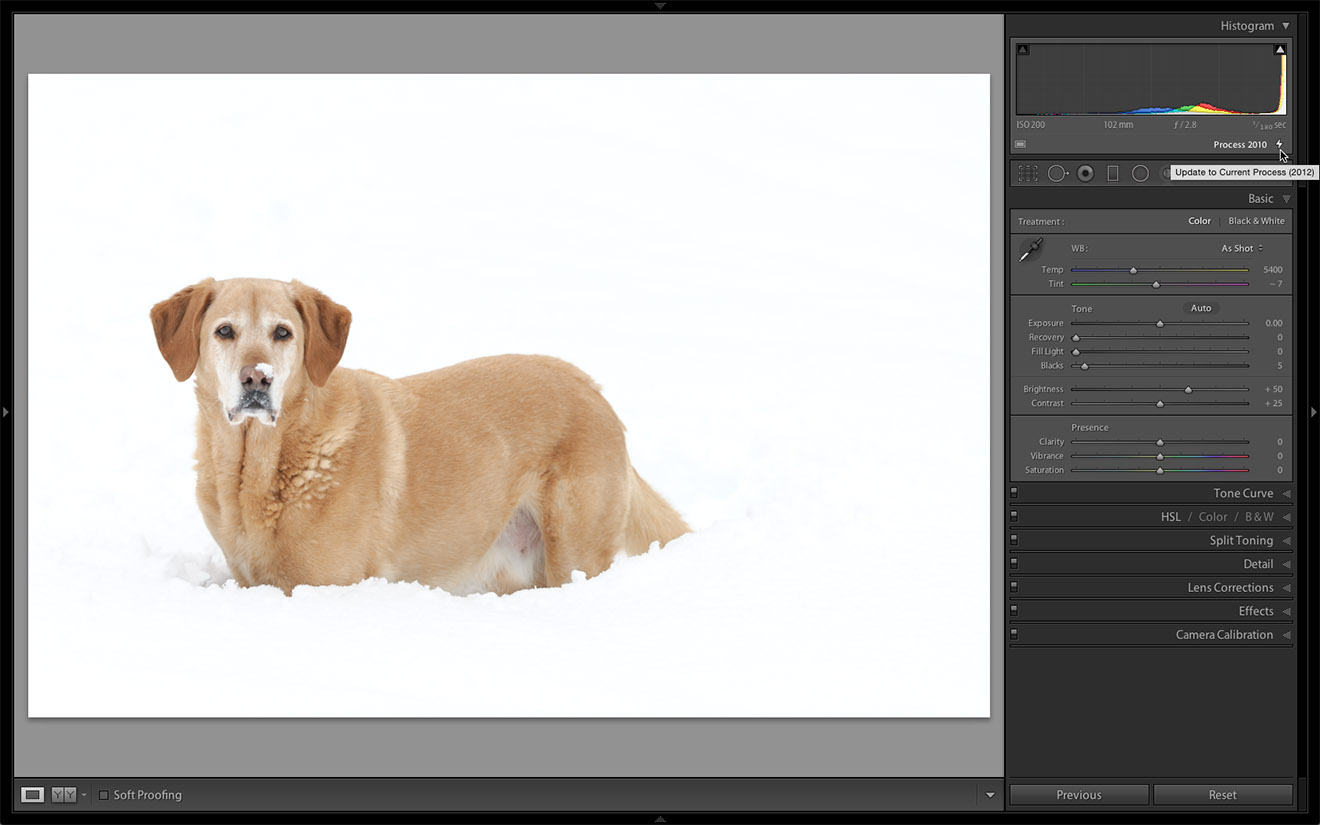
This is the usual approach I have to all snow scenes with the difference in settings mainly being driven by how good the original exposure was to start out. I went back to some photos taken in 2011 and found this shot of my dog chest deep in snow. It looked to be completely blown out, but then I realized it was imported into Lightroom before we had Process Version 2012 (under Process in the Camera Calibration panel). By simply updating the photo to PV2012 (click the lightning bolt icon in the Histogram panel), all of the highlight detail was recovered.
The steps in my process to correct this photo were exactly the same as the one before except that I moved the Exposure slider in a negative direction (very slightly) this time since it wasn’t underexposed. I usually finish these types of photos in Lightroom with an increase in Clarity to give it another touch of snappiness before sending to Photoshop to do any needed retouching and creative sharpening. I leave you with some tips for shooting in winter:
- Keep spare batteries in inner pockets.
- Use a lens hood to keep falling snow off glass.
- Fingerless gloves and hand warmers make a good combo for dexterity and comfort.
- Put the camera in a case before coming inside to prevent fogging.
ALL IMAGES BY ROB SYLVAN
This article is courtesy of Photoshop User magazine, the official publication of KelbyOne, which provides quality online education for creative people. For more information, visit KelbyOne.com

