
Photoshop and Illustrator: Preparing Your Art to Pop
In this tutorial, illustrator Matt Knannlein will show you how to use the Posterize adjustment in Photoshop to transform a photo into a template you can trace in Illustrator. To learn how to create pop art in Illustrator, read Cheryl Graham’s article, Make Your Portraits Pop.
Most people haven’t had years of drawing classes to help them understand shadows or how light bends around a form. Luckily, with digital photography and Adobe Photoshop, it’s quick and easy to create a reference image that calls out simple, realistic areas of light and dark for tracing in Illustrator. The method I use most often for accentuating lights and darks in my source images is Photoshop’s Posterize feature.
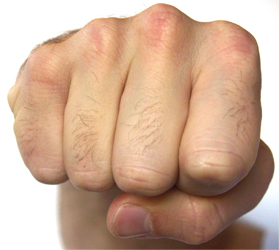
First, open your image in Photoshop. (In this case, I’m starting with a shot of my fist.)
From the Image menu, choose Adjustments > Posterize. The Posterize dialog pops open with the default value of 4 entered. Make sure the Preview box is checked, and start trying different posterization levels. For this image, 3 was just right for what I wanted: A few basic levels of lights and darks are called out.

Save your new image as a JPEG with a different name to keep your original photo intact.
Next, create a new file in Adobe Illustrator. (Just use the default size; that can always be changed later.)
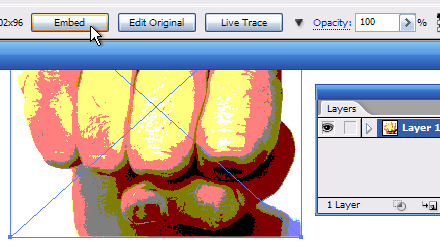
Choose File > Place and use the pop-up window to browse to the location where you saved your posterized image. Select it and click the Place button. A copy of your posterized JPEG now shows up in your work space with an “X” through it. This tells you it’s a linked image.
If you aren’t familiar with linked images, this simply means that whatever you do to your original picture in Photoshop will be reflected in Illustrator. If you resize it or apply a filter, it will dynamically update in Illustrator. And if you move it to another folder or delete it, the copy in Illustrator will disappear.
Since I tend to accidentally move or delete files from time to time, I like to embed my image, making it a permanent part of my Illustrator document, so I don’t need to worry about what happens to the original file. To do this, make sure the image you just placed is still selected and then click the Embed button in your Control Palette.
Next, lock your source image to keep from accidentally selecting it as you draw. Your image lives in Layer 1, the only layer present. The layer has a little eye icon that shows or hides what’s on that layer when you click there. To the right of the eye is an empty box: click here to lock the layer.
Finally, click the “New layer” icon at the bottom of the Layers palette. You can start drawing in the new layer, and from time to time, turn Layer 1 off to see how your art is shaping up.
Using Illustrator’s various drawing tools, trace around the various highlights and shadows, creating filled shapes. (For color, I started with swatches from the Skintones palette that comes packaged with Illustrator.)
Don’t worry about tracing the shadows and highlights too literally. Remember, the posterized photo is just a guideline for your finished art – it’s there to help eliminate most of the guesswork. However, you still may need to smooth out areas or ignore certain shadows or highlights altogether to achieve a well-balanced illustration.
To keep your artwork from looking too “flat,” you can also try using subtle gradients in some of your shapes to add a little more dimension. For my fist, I used gradients in the areas around the knuckles to make the shadows there a little less harsh.

As a final touch, I used the Brush tool to lay in my line work on top of the filled shapes. (I rarely use the Pen tool anymore. Mostly, I use a pen and tablet with Illustrator’s simple 3pt. round calligraphy brush and pressure sensitivity turned on. With some practice, you can paint nice fluid lines to really add some life to your illustrations.)
When you’re all done with your illustration, you can delete the layer with the posterized image from your Illustrator file to reduce your file size.

