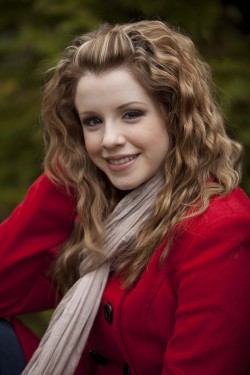
Portrait Lighting: Subtract It
[tps_header]When taking portraits outside, the challenge is to make the lighting look natural. If you use a flash on top of your camera, the lighting often looks unnatural because the source is too small. To keep my outdoor portraits looking natural, I’ve learned how to use and control the available natural light and refrain from using a flash on top of the camera. There are many ways available to control natural light by making use of reflectors and gobos. In this tutorial, I’ll show the simplicity of using subtractive lighting.
In the northern hemisphere in the middle of the day, the sun is aiming down and north. To put the sun behind your subject and avoid harsh sunlight on her face, you’re limited to shooting only toward the south and never north. On a sunny day, you’d have to tame the harsh sunlight with a large diffuser. Count your blessings on an overcast day because the clouds act as a diffuser, taming the light for you. I love taking photographs outside, especially on an overcast day, because you can photograph the subject in any direction without the limitation of having to put the bright sun behind your subject.
On a cloudy day, the light is coming from all directions. Even though the light is diffused on an overcast day, you’ll still need to avoid unflattering shadows under the eyes, as well as the brightest portion of light on top of the head and front of the nose. Let’s look at how to use subtractive lighting with black gobos in the correct position to eliminate these unwanted shadows and redirect the natural light to flatter the subject’s face.
[/tps_header]
Step One
 We can clearly see from the first image that the natural light is too bright on our subject’s forehead and nose, and it has also left deep shadows under her eyes. To an amateur, this photograph might look pleasant and might probably still be sellable to the customer, but let’s see how we can improve it.

