
Go with the flow
The ease with which you can move type and images between the Creative Suite applications allows you to take best advantage of the specific capabilities of each application. In the following tutorial, we’re going to use Photoshop, Illustrator, and Acrobat to create, display, and distribute a sequential demonstration of power flow from a wind turbine to an electric grid.
1 PREPARE BACKGROUND IMAGE
In Photoshop, prepare the background image you’d like to use. Resize this image (Image>Image Size) to its final presentation dimensions of 1024×768 and assign a linear resolution of 72 ppi. In this example, we’re using a photo of a connection between a wind turbine tower and the electrical grid at the Bear Creek Winery in Homer, Alaska.

2 SET TYPE IN ILLUSTRATOR
Using the superior type capabilities in Illustrator, select the Type tool (T) and type the various phrases you want to use in your presentation. Use the Control bar to set the Fill, Stroke, Font, and Font Size. We assigned a green color to the type associated with the turbine energy (to represent green energy), and red to designate the electrical grid energy. We also added a two-point black stroke to help the type show up when placed over the background image in Photoshop.

3 CREATE ARROWS IN ILLUSTRATOR
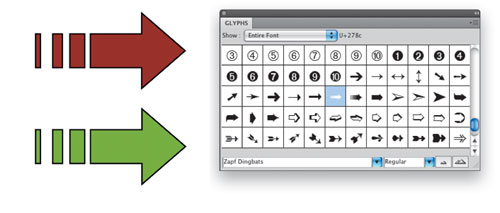
Still in Illustrator, create a series of arrows you’d like to place over your image in Photoshop to represent the electrical flow. While you can accomplish this in Photoshop, it’s much easier and faster in Illustrator. There are many ways to create or import arrows, but we’ll use the Glyphs panel (Type>Glyphs). Click on the artboard with the Type tool, select Zapf Dingbats in the Font drop-down menu, and then double-click one of the arrows in the Glyphs panel as a starting place. Create both red and green arrows to show both the turbine and grid input. Apply a two-point black stroke like you did with the type.
4 CONVERT TYPE TO OUTLINES IN ILLUSTRATOR
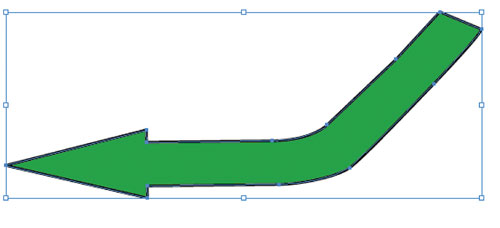
As an option, you can convert your type characters and arrows to outlines in Illustrator using Type>Create Outlines so you can edit them as vector paths. Here, we converted one of the Zapf Dingbats arrows into outlines and used the Direct Selection tool (A) to create a custom curved arrow. After you alter the arrow shape, you can still color and stroke your path. Note: You may want to use slightly different shades of green for your type and arrows to make them visually distinct.
5 PASTE TYPE AND ARROWS IN PHOTOSHOP
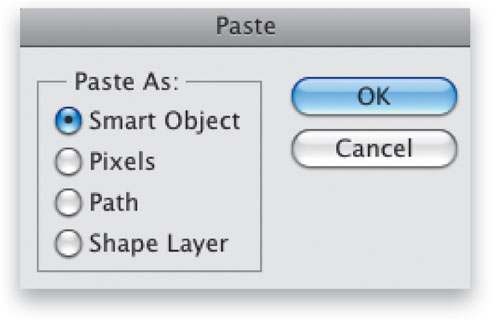
Use Edit>Copy in Illustrator and Edit>Paste in Photoshop to move your type and arrow segments into your Photoshop background image. Each pasted element will be assigned its own layer in Photoshop. Plan your copy-and-paste sequence to match the layer order in which you want the various type and arrow elements to appear to save yourself some layer-reorganization time in Photoshop (see next step). Your paste options in Photoshop include: Smart Object, Pixels, Path, and Shape Layer. Choose Smart Object to preserve the edge quality of the vectors during transformation in Photoshop, or Shape Layer to edit vector paths in Photoshop.
6 ARRANGE LAYERS IN PHOTOSHOP
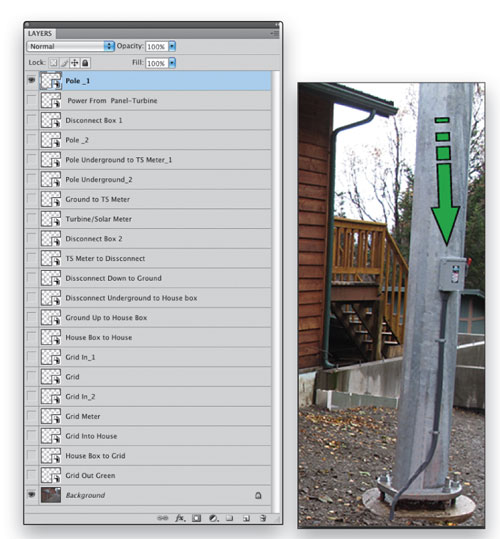
Once you’ve pasted all your type segments and arrows into Photoshop, label and arrange your layers in the sequence you’d like them to appear in the demo. Use logical names for each of your layers to make them easy to identify. Place the first layer that will appear in the demonstration at the top of your layer sequence. Doing so will make it easier to relate your layer sequence to the sequence of layer comps you’ll create in Step 10 below.
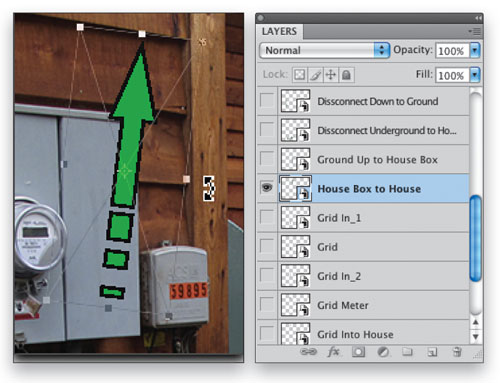
7 TRANSFORM TYPE AND ARROWS IN PHOTOSHOP
Using the Move tool (V), reposition your type and arrows to where you want them over your background image. Use the Free Transform command (Edit>Free Transform or Command-T [PC: Ctrl-T]) to resize, reshape, and rotate your arrows to suit their various locations. Since you’ve placed your arrows as smart objects, you can transform them as many times as you like without loss of image quality.
8 EDIT TYPE AND ARROW SMART OBJECTS
If you want to change the characteristics of your arrows, such as color or stroke, or the formatting of your type—such as leading, color, or stroke—simply double-click directly on the thumbnail of the smart object layer in the Layers panel. This will take you back to the original Illustrator object where you can apply your edits and save them. When you return to Photoshop, the edits you made in Illustrator will automatically update in your Photoshop file. This method is simple, easy, and fast, and maintains the quality of all your smart object elements.

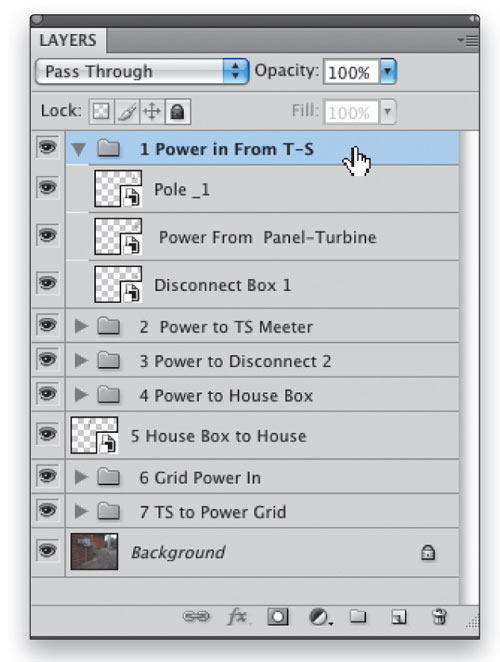
9 CREATE LAYER GROUPS IN PHOTOSHOP
To help you organize your many Photoshop layers into their display sequences, group your layers together in layer groups. Perform this by Shift-clicking on a sequence of layers you want to appear together, and then choose New Group from Layers from the Layers panel flyout menu. Each layer group appears as a folder in the Layers panel. Once again, label each layer group with easy-to-identify logical names. Click the triangle tick mark located on the left side of each layer group to display its constituent layers. Note: Whole groups or individual layers can be shown or hidden.
10 CREATE LAYER COMPS IN PHOTOSHOP
The layer groups you created in Step 9 should be in the order in which you’d like them to appear in your demonstration sequence. Test this sequence to make sure it’s correct by turning off the visibility of all layers (click on the Eye icon next to each layer) except the background image layer. Then, display (make visible) each group starting at the top and working your way down. Now, just display the first (top) layer group in your sequence and the background image. Then activate the Layer Comps panel (Window>Layer Comps), and choose New Layer Comp from the flyout menu. Create a layer comp for each layer group.

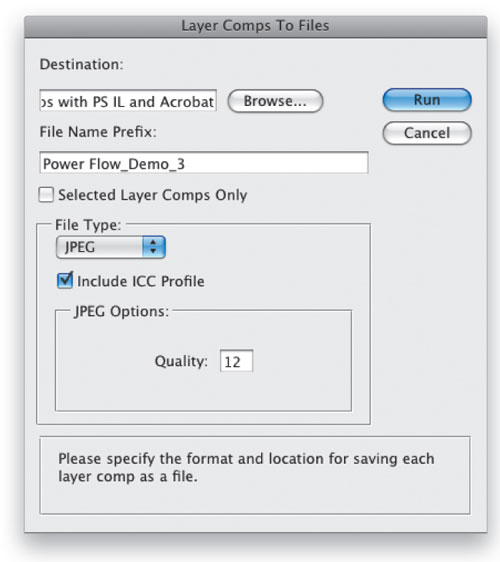
11 EXPORT LAYER COMPS TO JPEG FROM PHOTOSHOP
To create a sequence of demo images, choose File>Scripts>Layer Comps to Files. This dialog allows you to export each of your layer comps as a separate file. Your series of layer comp files will contain your demonstration sequence. You can export as a variety of file format types, including PDF; however, exporting as high-quality JPEGs (set Quality to 12) will reduce the size of your files. PDF and PSD files exported in this manner are often large and require some attention to reduce their file size.
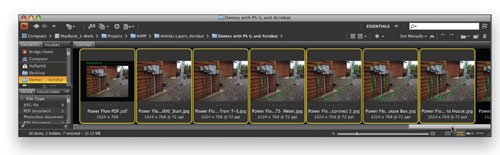
12 REVIEW AND ORGANIZE LAYER COMP JPEGS IN BRIDGE
Review your exported layer comp JPEGs in Bridge. Check to make sure each file contains the sequence content you’d like. If you’ve paid close attention to the naming and organization of your layers, layer groups, and layer comps, you’ll likely have fewer problems at this point.
13 CREATE PDF PRESENTATION THROUGH BRIDGE
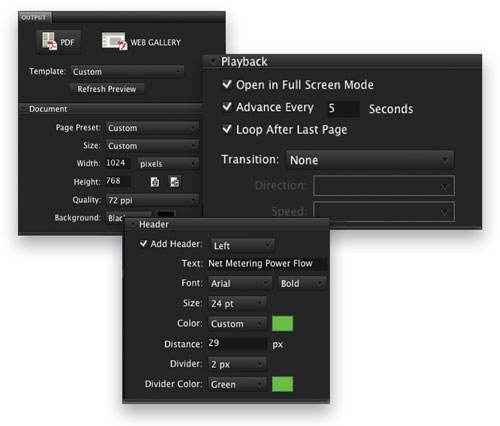
In Bridge, select the JPEG layer comp files and choose Window>Workspace>Output. Choose PDF at the top of the Output panel to activate the PDF export options. Assign the same pixel dimension and linear resolution as your exported JPEGs (here 1024×768 at 72 ppi) to minimize downsampling interpolation during the PDF creation process. In the Layout section, set both Columns and Row to 1. Add any Headers or Footers you like, and assign Playback characteristics (we turned on all the options). Set the Transition to None to keep the background stable during playback. Check on the View PDF After Save and then click the Save button to create your PDF.
14 TEST AND CONFIGURE INITIAL VIEW IN ACROBAT
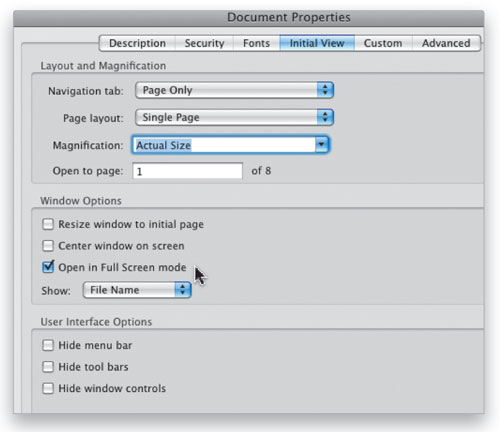
Once your demo PDF opens in Acrobat, choose File>Properties and select the Initial View tab. Configure your Initial View as follows: Navigation Tab: Page Only; Page Layout: Single Page; Magnification: Actual Size; Open to Page: 1; and Window Options: Open in Full Screen Mode. These characteristics will control how your demo PDF will open and perform on someone else’s computer. Click OK and Save. You can now take, send, share, open and display your PDF demo on anyone’s computer who has Adobe Reader or Acrobat.
ALL IMAGES BY TAZ TALLY UNLESS OTHERWISE NOTED
