
Motion Design in Photoshop CS3 Extended
As more and more users discover the video capabilities in Photoshop CS3 Extended, I’m increasingly asked for techniques and tutorials that show how to create After Effects-type motion design projects—in Photoshop. I think there are three basic reasons why people want to be able to do this:
1. They’re Photoshop addicts and they want to learn everything this program can possibly do.
2. They want to assign certain work (such as simple animations, title slides, and lower thirds) to interns, while freeing up their main animators for more intensive work.
3. And they don’t want to invest in After Effects.
To help with these requests, I’ve created a full After Effects-like motion design animation that involves playing video inside an iPhone graphic. This includes a full motion video background and a reflection of the iPhone with video playing inside the reflection as well. Here’s how you do it in Photoshop CS3 Extended.
[If you’d like to download the project files used in this tutorial to practice these techniques, click here to download the practice files.]
STEP ONE:
Find BlueRadialSquare.mov in the project files that you downloaded from the Layers website and open it in Photoshop Extended. You can also use your own animated video backdrop (like the kind you can get from Artbeats or Digital Juice). Click the Create a New Layer icon at the bottom of the Layers panel, drag it below the movie layer, and fill it with white.
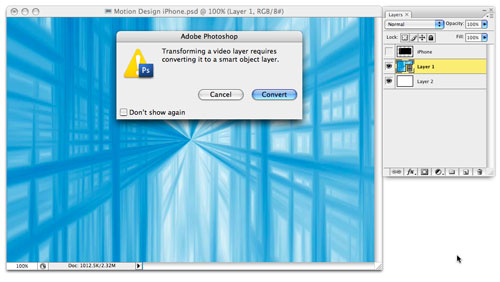
STEP TWO:
With the video layer active, press Command-T (PC: Ctrl-T) to bring up Free Transform. Photoshop will ask you if you want to convert your video layer to a smart object. Click Convert. Drag the bottom middle control point up until the Height value in the Option Bar reads 75%. Click Return (PC: Enter) to commit the transformation.
CREDIT: ROD HARLAN
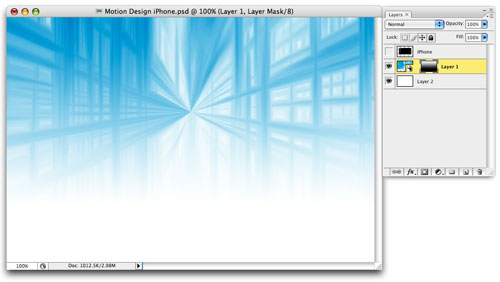
STEP THREE:
To blend the bottom of the video clip into the white background, you need to add a gradient layer mask. Click the Add Layer Mask icon at the bottom of the Layers panel to add a mask to your video layer. Grab the Gradient tool (G) and select the Foreground to Transparent gradient in the Gradient Picker in Options Bar. Make sure your Foreground color is black in the Toolbox, and then drag the Gradient tool from the bottom edge of the video layer to the top of your document. Tip: Depending on the look you’re trying to achieve, you could also try dragging the Gradient tool a shorter distance. Feel free to experiment.
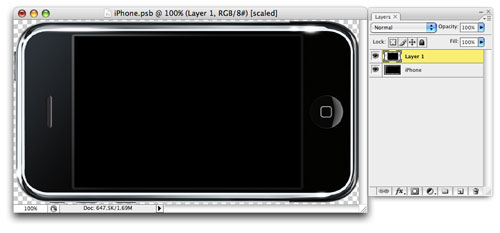
STEP FOUR:
Bring in an object that has a screen where you can play your video (e.g., iPod, iPhone, PSP, etc.). Convert it to a smart object (Layer>Smart Objects>Convert to Smart Object), and then drag it to the Create a New Layer icon to duplicate the layer.
We converted the object into a smart object before we duplicated it because when we embed our video clip later in the tutorial, the embedded clip will automatically update in all copies of the smart object.
STEP FIVE:
Using the Move tool (V), hold the Shift key and drag the duplicate object down below the main object to create the reflection. Then, choose Edit>Transform>Flip Vertical to flip the duplicate object so that it mirrors the original object above it.
STEP SIX:
Add another gradient layer mask (see Step Three) to the duplicate object layer to blend the object into the white background. Drag the Gradient from the bottom of the duplicate object to just above the top edge of the object.

CREDIT: FELIX NELSON
STEP SEVEN:
Open your original smart object layer by double-clicking on its thumbnail in the Layers panel. Use the Rectangular Marquee tool (M) to select the screen area where you want your video clip to play. Then, press Command-J (PC: Ctrl-J) to put this selection on its own layer.
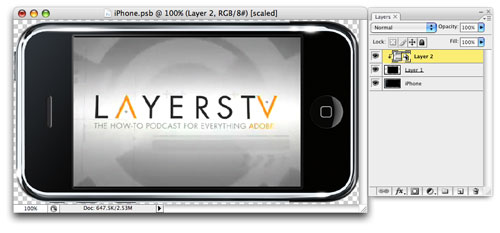
STEP EIGHT:
Open the video clip that you want to play inside this object (LayersTVopen.m4v in this example). Use the Move tool to drag this video into the smart object document and position it above the screen area. If you need to, use Free Transform to scale the video to fill the screen area. Option-click (PC: Alt-click) between the video layer and screen layer in the Layers panel to create a clipping mask. This will “clip” away any excess video outside the screen area. Close the smart object window and click Save when prompted.
STEP NINE:
Press the Spacebar to play the clip. The video is playing in both the main iPhone object as well as the reflection. Very cool! Now simply go to File>Export>Render Video to render to the format of your choosing.

Note: You’ll notice that the final movie also has sound with it. Even though Photoshop CS3 Extended doesn’t have direct support for an audio layer, it doesn’t strip out audio layers. So if you have a video clip with audio attached, it will both import and export through Photoshop untouched.
