Light Painting with Dave Black
Humanity is drawn to light. We can’t help but look toward the brightest part of a picture. As a photographer, it’s my responsibility to help guide the viewer to the scene, and I can do so with light.
Why light paint? Why not use a flash with a strobe and softbox? There’s something about the way light painting feathers right onto the subject and makes it distinctively different from a studio-flashed image. By moving the light source continually, swirling and brushing light across the subject during a long exposure, you can wrap light around the subject. You can create pockets of light and soft transitional edges in places that other lighting systems cannot. The look is very stylized and unique, and produces a one-of-a-kind image.
So grab your flashlight, turn off the lights, and let’s light paint.
Macro Subjects: Yellowtail Fly

Nikon D7000, NIKKOR 28–300mm VRII zoom lens at 300mm, ISO 400, 30 seconds at ƒ/32, WB 6700 K, Gitzo tripod, SLIK Ball Head with Kirk L-Bracket, Stylus Penlight with homemade slit snoot, SanDisk 64GB Extreme Pro CompactFlash Card
In general, light paintings make use of long exposure times, such as 1 second, 10 seconds, 30 seconds, 2 minutes, or more. During the long exposure, a mobile light source (e.g., penlight, flashlight, or portable spotlight) is used to illuminate the subject and various elements of the scene. I encourage photographers to apply the light to the subject from an off-camera location. In this image, light is coming into the scene from the upper-right edge of the frame. The main subject usually receives the most light while the supporting elements receive less light. Without the light that I applied to the yellowtail fly, this image would be dark with no distinguishable subject.
This image of a fishing fly is a very small macro light painting measuring only 2″ wide. The yellowtail fly itself is only about 1″ in length. A large flashlight would flood the entire scene with light, but I wanted to draw viewers’ eyes directly to the yellowtail fly, so I used a single LED penlight called a Stylus Penlight by Streamlight (www.streamlight.com). I can determine how much light to apply and where to apply it by reviewing each image on the back of the camera. The closer the light source is to the subject, the brighter the subject becomes. The more time you spend illuminating your subject, the brighter the subject becomes. Too much light or too much time spent applying light can overexpose portions of the image. I use the flashing Highlights setting (in the Set Up menu) to help me determine if an area of the scene is overexposed or too hot.
I try to keep the light source (penlight) moving while applying the light, usually in a swirling or brushing motion. This helps soften the transitional edges between light and shadow, and creates a painterly quality to the picture. You are, in effect, painting with light. After precisely light painting the yellowtail fly for 15 seconds, I then brushed some light along the greentail flies for about 7–10 seconds. (Note: I always activate the Long Exposure Noise Reduction mode on my Nikon camera.)
Tabletop Subjects: Jenny’s Boots

Nikon D3, NIKKOR 24–70mm lens, 15 seconds at ƒ/8, ISO 400,
WB 5000 K, Gitzo tripod, Inova Bolt 2L LED flashlight, Gitzo tripod, SLIK Ball Head with Kirk L-Bracket
The tabletop-size subject is perfect for the photographer to learn the craft of light painting. Begin by arranging your subject and composing the scene. Then, like all light paintings, secure your camera on a sturdy tripod. With the studio lights turned on or by using light from your flashlight, autofocus on your subject and then turn off the autofocus. This is so the autofocus doesn’t activate or search in the dark when you turn off the lights and begin to light paint. With the room lights turned off, I can begin to determine the exposure and use Manual exposure. While there’s no perfect formula, I’ve found it’s easiest to have students begin with a baseline exposure of ISO 400 (which is noiseless in most cameras); 30 seconds at f/8; and use a small, hand-sized LED flashlight. I use the Bolt 2L flashlight by Inova (www.inovalight.com).
My exposure time is usually determined by how much time I think I need to light paint the subject and other elements in the scene. Most cameras have a long exposure setting of up to 30 seconds. Many tabletop-sized light paintings can be done in this amount of time and sometimes less, but if I need more than 30 seconds I set the camera on Bulb and use an electronic cable release, such as a Nikon MC-36 digital remote cord. I’ll often use more than 30 seconds in order to apply the light more precisely to specific areas, even in a very small tabletop or macro scene. More time also allows me to think about where I want to apply the off-camera lighting, and even walk around the subject during the exposure to apply light from different angles. Using f/8 gives me a suitable depth of field that keeps most tabletop-size subjects entirely in focus. This baseline exposure of ISO 400, 30 seconds at f/8 will help get you started, but remember this: how close your light source is to the subject, and how long you apply the light to the subject, also affects the brightness or darkness (exposure) of the image.
I always make a blank image first—a sort of blank canvas, if you will. Press the shutter button and make the long exposure without adding any light painting just to see if the image is dark enough. The image must be dark enough so that when you apply your own light, it makes a significant difference in leading the viewer to the subject. This blank image also allows you to see if the image has any helpful or unwanted ambient light spilling into the scene. Sometimes a slight bit of ambient light in the scene, combined with additional light painting, can add dimension to a picture.
I set the camera on Self-Timer mode at 5 seconds for a tabletop light painting. This allows me to press the shutter and then have 5 seconds to get into an off-camera location to light paint before the shutter opens. It also allows the camera to become steady before the shutter opens. Here’s a tabletop light painting called Jenny’s Boots.
Live Subject: Young Ballerina

Nikon D2x, NIKKOR 17–55mm lens, 1 minute at ƒ/8, ISO 100, Nikon MC-36 electronic cable release, WB 70000 K, Gitzo tripod, SLIK Ball Head with Kirk L-Bracket, Inova Bolt 2L LED flashlight
When setting up your tripod and camera, setting the focus, and determining the exposure become second nature to you, it’s time to increase the size of the scene and add a live subject. All the same procedures apply, but most important is to have a subject that has plenty of patience. Light paintings make use of long exposure times, thus the subject must remain motionless during the entire exposure. The slightest movement in the eyes, head, arms, torso, legs, etc. results in movement and blurring of the image.
Pose your subject in a comfortable position. This is best accomplished when the subject is sitting or leaning against something. I begin the exposure by applying light to the face and head, usually for about 2 seconds. Once the face and head is done I can move over the rest of the body. When the body is complete, I can apply light to other elements of the scene. Because there’s no light on me during the long exposure, I can walk into the scene and not be visible in the final image. This image of a ballerina required a 1-minute exposure time. As the long exposure started, I stepped into this scene and stood over the roses so I could light paint her face and head (2 seconds); shoulders, arms, and torso (15 seconds); and pink leg warmers and toe shoes (8 seconds). Then I backed out of the right side of the frame and light painted the roses and floor (4 seconds); walked through the scene to the left side and light painted her tutu and chair (6 seconds); and then the floor (5 seconds). This totals 40 seconds of applied light. I used 20 seconds to step in, slowly back out, carefully walk through the scene, and position myself to apply the light. With a live subject, I want to move easily while working and not scurry around too fast. I made 5–7 images before I determined how much time and light each part of the light puzzle needed. As I recall, this is the tenth image I made out of 15.
…Most important is to have a subject that has plenty of patience. Light paintings make use of long exposure times, thus the subject must remain motionless during the entire exposure. The slightest movement in the eyes, head, arms, torso, legs, etc. results in movement and blurring of the image.
Large-Scale Landscapes: Stardust Barn
Light painting outdoor subjects, especially large-scale landscapes, is the most fascinating process of all. These larger-than-life light paintings require a more powerful light source for three reasons: My subject is very large, the distance from my light source to the subject is usually far, and there’s often some ambient light visible in the scene. I use a Brinkmann Max Million II (www.brinkmann.net/products) for my outdoor landscape light paintings. The Brinkmann Max Million II is a 2-million candle-powered spotlight. It’s easily handheld, trigger activated, and rechargeable.
All the same light painting basics apply, but with one major exception: our previous light paintings made use of rather low ISO settings, but many of my landscape light paintings use higher ISO settings, such as ISO 2000 or 2500. These high ISO settings allow me to capture a starfield above the landscape.
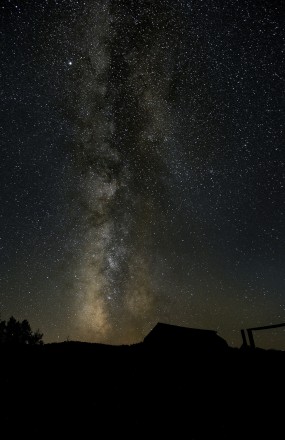
Stardust Barn Silhouette
It was an amazingly clear night for this light painting of the Mormon Row barn near Jackson Hole, Wyoming. The Milky Way was located directly over the town of Jackson Hole, which added to the horizon glow and seemingly more illumination to the already brilliant cosmos. I’ve done several large-scale landscape light paintings with star fields, so my experience helped me determine the exposure of ISO 2500, 30 seconds at f/4. In this image, I’m just determining the available ambient light, a.k.a. the Milky Way. This blank image exposure illustrates that 30 seconds is enough time to capture the stars, but leaves the barn in silhouette and ready to be revealed with light painting.
Stardust Barn Revealed

Nikon D3s, NIKKOR 14–24mm lens, 30 seconds at ƒ/4,
ISO 2500, WB 4000 K, Gitzo carbon fiber tripod and ball
head with Kirk L-Bracket, Brinkmann Max Million II with 20° honeycomb grid and white washcloth placed over the
front to help diffuse the strength of light, SanDisk 32GB Extreme Pro CompactFlash Card
I set the camera self-timer to 20 seconds. This gave me ample time to press the shutter button, trot 120′ off camera to the left, and begin feathering in some light (simply flickering the trigger) from the Brinkmann when the 30-second exposure began. I light painted the trees for about 2 seconds, the barn for about 3 seconds, and the ground and corral for about 3 seconds. That’s only 8 seconds of light painting during the 30-second exposure. At this high setting of ISO 2500, it doesn’t take much light from the Brinkmann to illuminate the scene. In fact, it’s so easy to cook (overexpose) the subject that I covered the front of the Brinkmann with a white washcloth while flickering the Brinkmann’s trigger. I also used a 20° round honeycomb grid to keep excess light from spilling into portions of the scene.
I hope this article gets you excited about making your own light paintings. To best learn this very creative lighting technique, you can find my light painting videos on KelbyOne.com – Enjoy making your own light paintings. Adios.
Light painting outdoor subjects, especially large-scale landscapes, is the most fascinating process of all.
We hope you enjoyed this Light Painting Tutorial. Share on your favorite social media sites and let us know what tips and inspiration you will use in your photography. Looking for another article to read? Scott Kelby shares his Dreamy Focus look right here on Planet Photoshop. Looking to buy some new gear? Check out our review section on LayersMagazine. Find out more about Dave Black over on his website.


