
Product Boxes Made Easy in Adobe Illustrator
Companies must often begin promoting their products before they’re actually produced. One way to promote goods before they’re completed is to generate the package art and create a 3D box shot.
Now this is something we see all the time. In fact, just recently this was prominent on the Adobe website where they had all the Creative Suite box shots displayed. We’ve also seen it used on the Apple website for a lot of their products. So let’s create our own virtual box shot in Illustrator.
If you’d like to download the images used in this tutorial to practice this technique, visit http://layersmagazine.wpengine.com/downloads.html.
Step 1 Begin with the Product Art
For this tutorial, we created the artwork for the box in Photoshop that we’ll apply to a 3D object in Illustrator. The art consists of three separate flattened PSD files that we’ll place in Illustrator. The file for the front of the box is 5×5", and the files for the sides are 3×5". (Note: For this tutorial, we’ll only be using the front and right side of the box artwork.)

Step 2 Place Art in Illustrator
In Illustrator, choose File>New to create a new document. Now go to the File menu and choose Place. Navigate to your art files and select the first file. Before you click the Place button in the Place dialog, make sure that the Link option is unchecked. This will embed the art into the file. You’ll only be able to place one file at a time, so double-check these settings for the other placed files.

Step 3 Convert the Art to Symbols
Now go to the Window menu and choose Symbols. To create symbols out of your art, click-and-drag each item into the Symbols panel, or simply press F8. You’ll see the new Symbol Options dialog that’s been carried over from Flash, which allows you to make the art a Graphic symbol or a Movie Clip. We want to select Graphic and give the symbol a name that corresponds to which side it represents. Do this for all the objects. Once the art is converted to symbols, delete the art on the artboard.


Step 4 Draw the Box Shape
Choose the Rectangle tool (M) in the Toolbox and click once on the artboard. In the dialog that appears, enter “5 in” for both Width and Height. With the box still selected, go into the Toolbox and double-click on the Fill color swatch to bring up the Color Picker. Change the Fill color to 50% gray (C:0, M:0, Y:0, K:50) and click OK. Next, set the Stroke to None in the Control panel.


{module:ads/large_rectangle}
Step 5 Duplicate the Box Shape
Now we need to make a duplicate of the box just beneath the original. This will be the reflection of our product box. Under the Object menu, go to Transform, and choose Transform Each. In the Move section of the dialog, enter “–5 in” for the Vertical setting and then click Copy. Choose the Selection tool (V), select both shapes, and group them by going under the Object menu and choosing Group.


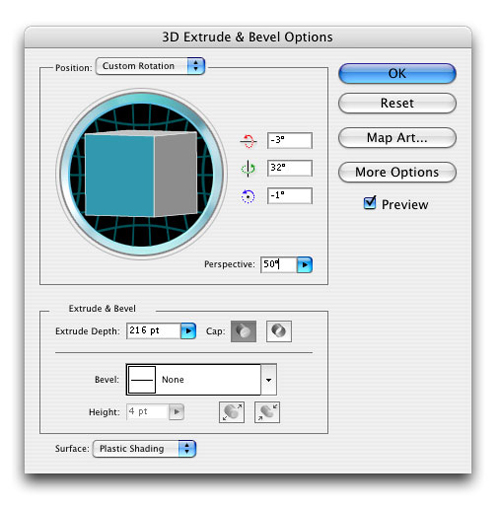
Step 6 Make the Objects Three Dimensional
Next, go under the Effect menu, under 3D, and choose Extrude & Bevel. By default, the Preview is unchecked, so turn this on before you start. For this tutorial, we used the settings shown above. Note that the Extrude Depth should be equal to the width of the art for the side of the box, which is 3". As this setting is only measured in points, type in “3 in” and Illustrator will convert it to 216 points. After entering the settings shown, click Map Art.

Step 7 Map Front Box Art
At the top of the Map Art dialog is a Surface toggle where you can click the arrows to toggle through each surface plane of the 3D object. The active plane is indicated by a red outline. Select the front surface, then go under the Symbol pop-up menu and select the art for the front of the box. Don’t click OK yet.
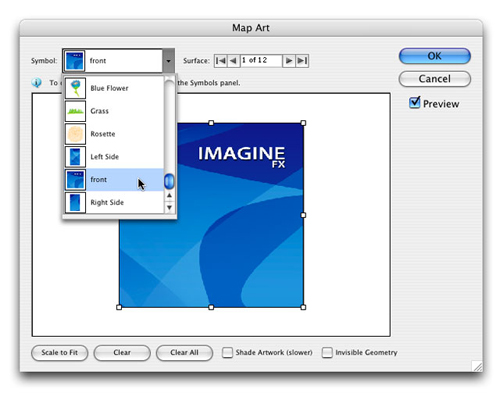

Step 8 Map Right Side Box Art
Once the front art is in place, toggle through the surfaces until the red outline targets the right side of the box. Then scroll down the Symbol menu and choose the art for the right side of the box. Depending on the orientation of the Symbol, you may need to rotate the art to fit. Simply hover over any control handle in the Map Art dialog until your cursor turns into a bent double arrow, then click-and-drag to rotate the image.

Step 9 Map Artwork to Reflection
Now let’s apply the same art to the reflection. Toggle through the surfaces until you find the reflection, then select your symbol for the art. Rotate the art in the Map Art dialog so the images are mirrored and not stacked. Do this as before by grabbing the handle and just dragging to rotate. Unfortunately, holding down the Shift key will constrain the angle, so position it as closely as you can manually. Repeat for the side box art. Even though the art is rotated, both pieces still need to be flipped horizontally so the art is mirrored.


Step 10 Flip the Reflected Image
To flip the reflection, grab a side handle and drag it toward the opposite side, stopping just short of the other handle. Now, grab the opposite handle and drag it to the original position of the first handle. (Tip: Turn off Preview so you don’t have to wait for the artwork to update every time you drag a handle.) With the image now flipped, fine-tune any of the side handles that don’t line up with the surface lines. Click OK to close the Map Art dialog, then click OK to close the 3D Extrude & Bevel Options dialog.


Step 11 Draw a Rectangle over the Shape
Now we have 3D box art and a reflection beneath it. To complete the effect, we need to apply an opacity mask to the reflected area so that part of it appears to be transparent. Begin by choosing the Rectangle tool and drawing a rectangle over the entire graphic. Tip: Set the Fill to None so you can see the artwork beneath the rectangle.

Step 12 Set a White-to-Black Gradient
Go to the Window menu and choose Swatches. At the bottom of the Swatches panel, click-and-hold the Show Swatch Kinds Menu icon, and choose Show Gradient Swatches. Select the Linear Gradient 1 swatch (it’s a white-to-black gradient). Now choose the Gradient tool (G) in the Toolbox, and click-and-drag from the center point toward the bottom of the rectangle to change the direction of the gradient.

Step 13 Apply Opacity Mask
With the Selection tool, select both the product art and the gradient. Go to the Window menu and choose Transparency. In the Transparency panel’s flyout menu, select Make Opacity Mask. This will mask out the object only where the black and gray are present, and not in the white area. Click on the mask icon in the Transparency panel to modify the mask itself.


Step 14 Final Art
Production Note: No copy for final Step. Place Step title at top of box and fill box with final image.

