
Illustrator: Spin the bottle with 3D Revolve
 In this tutorial, I’ll be discussing some of the ins and outs of the 3D Revolve Effect by rendering a three dimensional wine bottle with a label. This Effect allows you to revolve an outline profile of the right side of an object around a center axis to create a 3D object. Considering how simple the feature is to use, the results are really quite remarkable.
Once you have the profile of the object that you wish to render, you can Revolve it, add lighting, and map other elements to its surface, or throw it into perspective, in minutes.

STEP 1: Starting on the On the Edge of Reality.
There are lots of ways to create the contour of an object to be used for this 3D exercise. You could take a digital photograph of an object and trace the right half of it using the Pen tool in either Illustrator or Photoshop. If you’re not an expert with the Pen tool, find a silhouette of an object as an existing vector path (in a clip art collection) to be used as the basis of your profile. Or, if you are really lucky, get a profile of an object, such as a wine bottle, from the bottle maker.
STEP 2: In Preparing to Revolve, You May Need to Rotate Your Profile
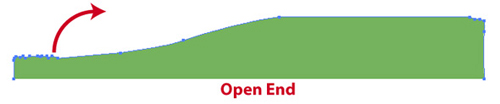
Before you do anything, you have to make sure that the open end of the profile is to the left which will become the axis for profile to Revolve around. If the profile needs to be rotated, select it with your Selection tool and double-click on the Rotate tool. In the dialog window that opens, specify the number a number of degrees. I needed to rotate my profile -90º.
STEP 3: Making It Into a Bottle, Inside and Out
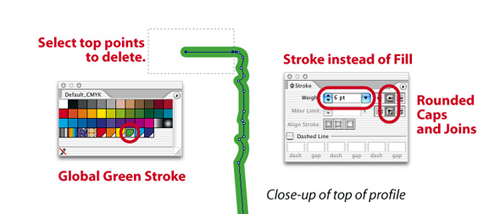
You could Fill the contour with the bottle’s color and no Stroke, which would render a solid bottle shape when the 3D Revolve Effect is applied. But for this tutorial, I prefer to make the bottle hollow and uncorked so at higher angles we’ll be able to see the inside.
To achieve this, I’m going to Stroke the contour instead of Filling it using a 6 point Global Green Stroke (about the thickness of the bottle’s glass). I will also use Rounded Caps and Rounded Joins for the Stroke so the bottle doesn’t have sharp edges (in case there’s kids out there). I will also have to delete the top of the bottle’s contour so the top will be open.

STEP 4: Outline the Stroked Contour
Once the Stroked contour is just the way I want it, I’m going to convert it to outline. This will convert the Stroked path into a Filled path without altering its shape. Why Outline the Path? Because the inside of the object can be altered to make it different than the outside, and Filled contours seem to render better with the 3D Revolve Effect. To turn the Stroke into an outline, go to Object > Flatten Transparency and in the window that opens, check “Convert All Strokes to Outlines” if it is not already selected.
In my profile, this created some complex overlapping shapes inside the path. To keep things simple, I Option- clicked (Alt.-click on PC) the “Add to shape area” button in the Pathfinder palette (Window > Pathfinder) to eliminate the problem.
STEP 5: Take Your Contour Out for a Spin
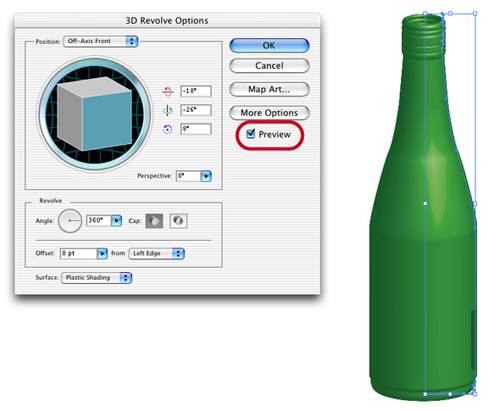
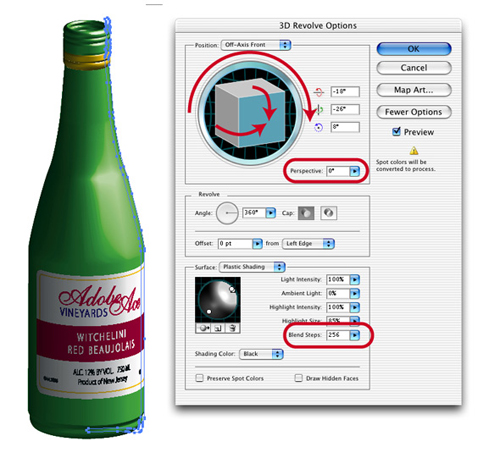
Now that we’re done preparing our profile, we’re ready to “spin” the contour into a 3D object. Simply select the profile and go to the Effect menu > 3D > Revolve. In the dialog window that opens, use the default settings, check Preview and watch the magic happen. But that’s just the beginning.
STEP 6: Add Your Own Spin on Reality
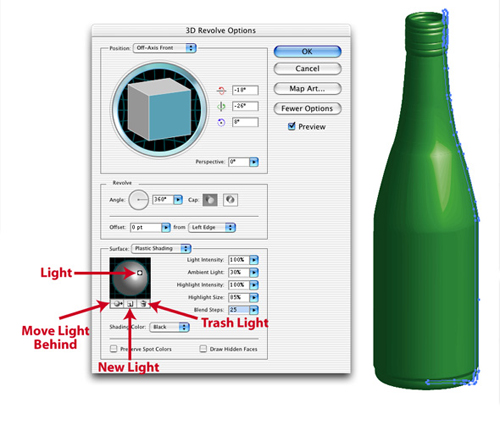
To add your own special light to the wine bottle, click the More Options button in the 3D Revolve window. This uncovers additional options that allow you to specify lighting as well as the kind of surface being lit. To keep this manageable in a short tutorial, we’ll use Plastic Shading with just one light. The globe in the Surface and Lighting section gives you an mini preview of the results of your settings as you change them. You can click on and drag “lights” to position them around the globe. The icons buttons beneath the globe can be used to add new lights, trash an existing light or even move a selected light behind your object.
I wanted my lighting to be dramatic, so I chose high Intensity settings for my light (100%) with low Ambient Light (30%). This means that the bottle will be shiny and lit with a bright light from one side but there’s enough available room light so the shadows will not be too dark.
STEP 7: Preparing to Put a Label on It
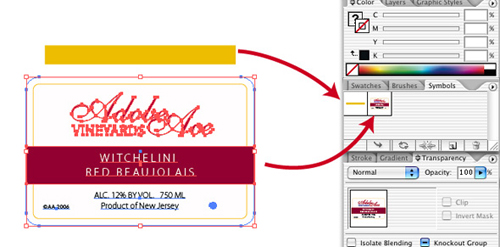
Many artists with a basic knowledge of Illustrator think that the only purpose of Symbols is to create designs to be sprayed on with the Symbol Sprayer tool. But Symbols also are the only way to “map” artwork to the surface of a 3D object. So to “paste” a label onto to a wine bottle, it first has to be made in a Symbol. And like most features in Illustrator, there’s more than one way to accomplish this. To create a Symbol of your artwork, either select the artwork and drag it into the Symbols palette OR select the artwork and under the flyout menu of the Symbols palette, select New Symbol, name it and click OK.

STEP 8: Mapping Your Label
To “paste” your label onto the wine bottle, do the following:
1. Select your wine bottle and double-click on the 3D Revolve listing in the Appearance palette and in the 3D Options window that opens, press the “Map Art…” button;
2. In the Map Art window, find the surface onto which you’d like to map the art (The surfaces will be highlighted in red as you click through them. But remember, with a hollow bottle, half of the surfaces are inside the bottle.);
3. Select the Symbol to Map;
4. Drag the Symbol into position (white areas are visible, gray areas are not);
5. Check Preview to see what’s happening (You can re-size your label at any time by dragging corner points in the bounding box and holding down the Shift key to maintain proportion);
6. Check Shade Artwork to shade the label with the same lighting as your bottle; and
7. Click OK in the Map Art window and OK again when you’re happy with the results.
STEP 9: Final Twists and Tweaks
To make final tweaks, select your wine bottle and double click on the 3D Revolve listing in the Appearance palette. To turn the bottle in space, click and drag on the edges of the cube or the ring around the cube. You also can change the perspective of the bottle to make the rendering more wide angle.
I altered the lighting to make the label lighter. And last but not least, to prepare for print, I also increased the number of blend steps from 25 to 256.
Jeff Witchel is an Adobe Certified Instructor for Adobe Illustrator CS2 and Adobe InDesign CS2 with training clients in New York, New Jersey, and Pennsylvania. He just completed his first DVD training project with Magnet Media in New York named “Inside Adobe Illustrator CS2.” Jeff also is a regular on the Layers Forum, known to many as “AdobeAce.”
Training website – http://mywebpages.comcast.net/AdobeAce
Portfolio website – http://mywebpages.comcast.net/witcheladv
