Grunge Borders in Adobe Illustrator CS3
There has been a surge of “grunge” effects lately that have been created using Adobe Photoshop and Adobe Illustrator. So here’s one more effect for your arsenal of grunge effects. In this tutorial, we’ll show you how to create a custom brush and use it to create a really cool border mask in Illustrator, allowing you to apply it to a photo or graphic without affecting the original image. You can then take this mask and use it with any graphic that you want. It’s simply a matter of getting used to working in mask mode.
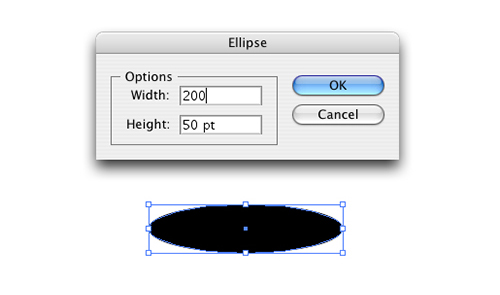
STEP 1 Create an Oval Shape
To begin, select the Ellipse tool (L) from the Toolbox. Click once on the artboard and, in the dialog that appears, enter 200 pt for Width, 50 pt for Height, and click OK. This will create an oval shape on your artboard. Double-click the Fill color swatch in the Toolbox to bring up the Color Picker. Change the Fill color to black and click OK. Set your Stroke to None in the Control panel.
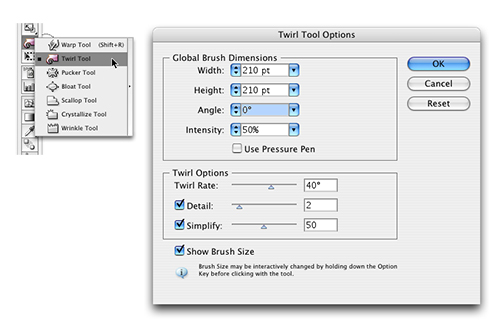
STEP 2 Configure the Distortion
Choose the Twirl tool, which is nested under the Warp tool in the Toolbox. Then double-click the tool itself to bring up the Twirl Tool Options dialog. For the brush size, we want to enter a diameter that’s just a bit larger than the object (we entered 210 pt for both the Width and Height). Leave the Intensity set to 50% and click OK.
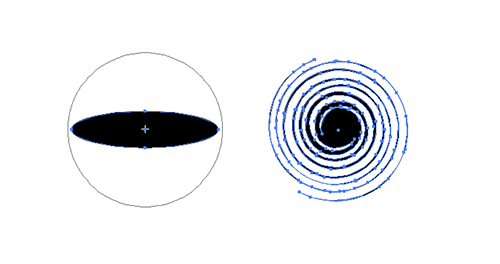
STEP 3 Distort the Object
Center the brush over the object (it should be a bit larger than the object itself). Click-and-hold the mouse and the object will begin to twirl; release the mouse when you’re happy with the result. Tip: You can reverse the direction of the twirl by holding down the Option (PC: Alt) key after you begin twirling.
STEP 4 Change Object Color to White
Because we’re going to apply this art as a mask via a custom brush, we need to make the object white so it reveals the art in the mask. Masks work just like they do in Photoshop: black areas will hide the art and white areas reveal it. Press D on your keyboard to set the default Fill and Stroke colors to white and black, respectively. Now click on the Stroke in the Toolbox and click the None icon below it to remove the stroke.
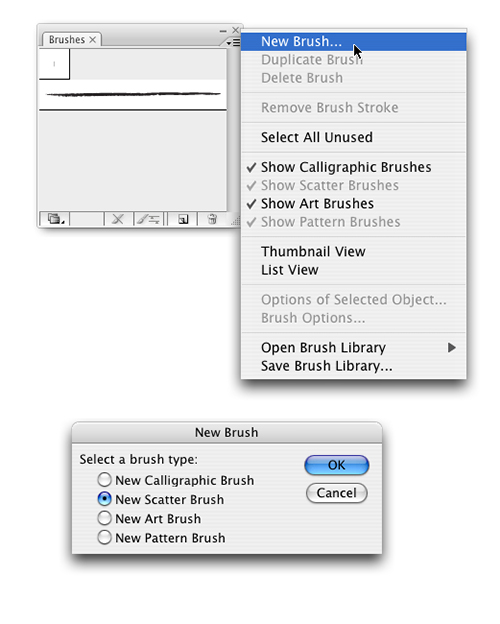
STEP 5 Create the Brush
With your object still selected, go under the Window menu and select Brushes. Click the Brushes panel’s flyout menu and choose New Brush from the menu. In the New Brush dialog that appears, choose New Scatter Brush and click OK. Click OK in the Scatter Brush Options dialog that appears, as we’ll change these settings later.
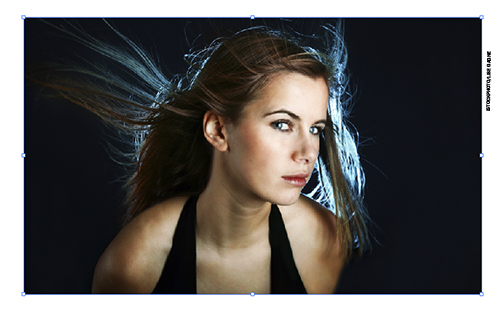
STEP 6 Import the Image
Now place the graphic or photograph (File>Place) that you’ll be masking with your new brush. We chose an image with a black background, which will contrast with the white of our artboard. You could also create a background shape of a different color, depending on your image.
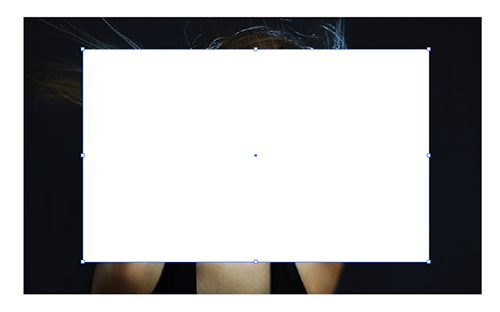
STEP 7 Draw the Mask Shape
Next, we need to draw the initial shape that the image will be masked inside of. In the Toolbox, choose the Rectangle tool (M). Set the Fill to white and the Stroke to None. Draw a box inside the graphic or photograph, making the box approximately 25% smaller than the image itself and mostly centered in the image. The area outside this white box will be the area where we’ll later apply our custom brush to the mask.
STEP 8 Apply the Mask
Choose the Selection tool (V) and Shift-click the image in your document so that both the image and the white box are selected. Go under the Window menu and choose Transparency. Click the Transparency panel’s flyout menu and select Make Opacity Mask. Now the image is only visible in the area of the white box.
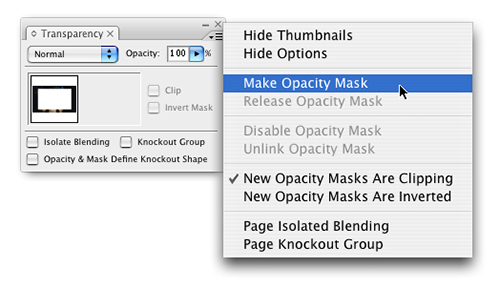
STEP 9 Go to Mask Mode
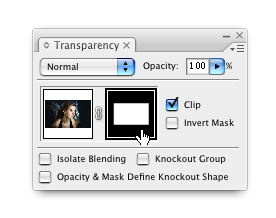
There are two thumbnails in the Transparency panel: The one on the left represents the artboard area and the one on the right shows the masked areas. A black outline around the thumbnail indicates which “mode” you’re working in. By default, the artboard area is highlighted, so click on the mask thumbnail to make it active.
STEP 10 Apply Custom Brush
Now that we’re working with the mask, select the mask shape with the Selection tool and open the Brushes panel. Click the thumbnail for the custom brush we created in Step 5 (it’s a blank thumbnail because the shape is filled with white). It will apply the brush with its default settings, so it doesn’t quite look the way we want it to yet, but we’ll change that in the next step.
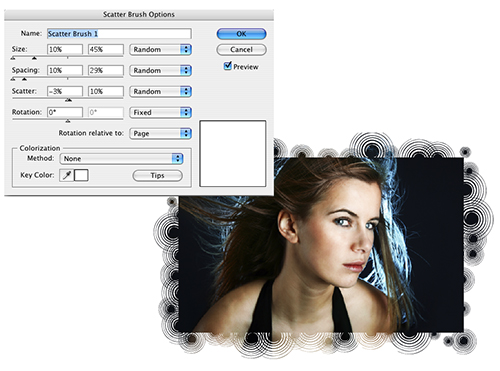
STEP 11 Change Brush Options
Double-click the brush thumbnail in the Brushes panel to open the Scatter Brush Options dialog. Here we’ll make some changes to the Size, Spacing, and Scatter parameters. When changes are made, they’re immediately updated in your working art so you can tweak them on the fly (just be sure to turn on your Preview checkbox). Feel free to experiment with different settings to achieve different results.
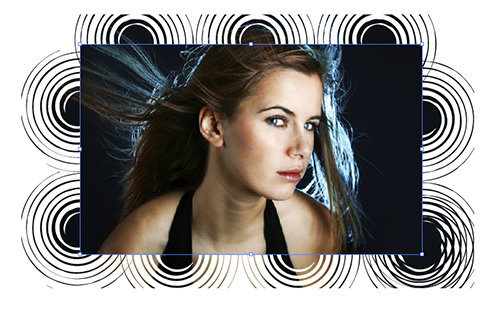
STEP 12 Twirl Edges of Mask
Although we have a good brush effect applied, the rectangular shape is still evident. To change this, choose the Twirl tool from the Toolbox. Now randomly click-and-hold to twirl areas around the box edge to distort the path (double-click the Twirl tool to change its size and to vary the effect). As a result, the brush effect will redraw with more shapes because you’re increasing the area to which the brush effects are applied. Do this all the way around and you’ll end up with a cool, stylized border that you can copy and paste to any other image.
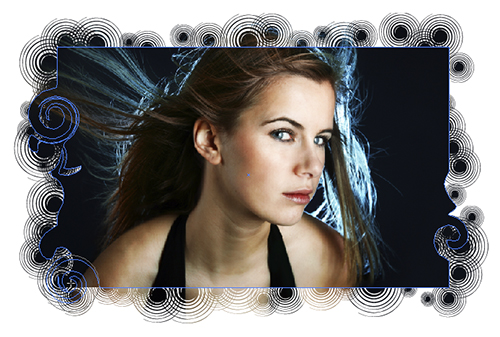
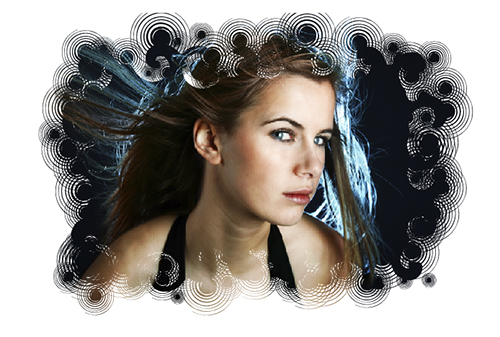
Final Image